Configuring Hybrid Network
Virtualization for AIX
This article will show you how to configure Hybrid Network Virtualization for AIX partition.
An overview and description of Hybrid Network Virtualization, or HNV as it more commonly known, can be found at the following blog post:
The blog was written by Chuck Graham, the lead IBM architect for SR-IOV. It’s an excellent blog, which I highly recommend you read before attempting to configure HNV in your environment.
As described in the blog, HNV was introduced to allow administrators to use SR-IOV “…for optimal performance and mobility….”. As we know, native SR-IOV adapter logical ports offer the best possible network performance, when compared with Virtual NIC and Virtual Ethernet Adapters (backed by VIOS SEA). So, if you need the absolute best network performance from an Ethernet adapter (that can still be shared with other LPARs), then native SR-IOV is the best choice for your configuration. From Chuck’s blog:
“PowerVM’s SR-IOV technology allows a partition to have
direct access to a shared physical adapter to provide low overhead, high
performance networking..”
Having said that, the downside to employing SR-IOV logical ports is that it cannot be used in environments that require Live Partition Mobility (LPM) or Simplified Remote Restart (SRR). As we know, in an LPM/SRR environment, all devices must be virtual. An SR-IOV logical port is not a true virtual adapter, it is considered a physical adapter, and, as such, will prevent a partition from being LPM capable. From Chuck’s blog:
“Previously, partition mobility operations were not
allowed when a partition’s configuration included direct access to physical I/O
adapters…”
So, to take advantage of the speed and efficiency of SR-IOV logical ports (which map to SR-IOV Virtual Functions or VFs), and allow an LPAR to participate in mobility operations, IBM introduced HNV. Again, from Chuck’s blog:
“One of the key advantages of the HNV approach is the
integration of the dynamic remove and add of the Migratable logical port as
part of active LPM, inactive LPM, or SRR operations…”
The HNV capability is enabled by selecting a new Migratable
option when you configure a new SR-IOV logical port.
The aim of this article is to provide a “how to” guide for configuring HNV, with an AIX LPAR in mind. We’ll show you how to configure an existing LPAR so it can start using a HNV configuration. We’ll also describe what happens during a LPM operation.
First, a little about the environment. In our lab we have two POWER9, S924 systems, configured with the following:
System Type/Model: S924/9009-42G
System firmware: FW950.50 (VL950_105)
HMC: V10R1 M1021
AIX: 7300-01-01-2246
VIOS: 3.1.3.21
SR-IOV adapter: EN0H. PCIe3 4-port (2x10 Gb FCoE, 2x1 GbE) SFP+ adapter (FC EL38, FC EL56, FC EN0H, and FC EN0J; CCIN 2B93) https://www.ibm.com/docs/en/power9/0009-ESS?topic=ad-pcie3-4-port-2x10-gb-fcoe-2x1-gbe-sfp-adapter-fc-el38-fc-el56-fc-en0h-fc-en0j-ccin-2b93
|
|
|
|
In this example, we will re-configure an existing AIX LPAR to use HNV. The LPAR is currently configured with one Virtual Ethernet Adapter (VEA), ent0. The VEA is configured on VLAN 691, with an IP address of 10.8.191.123:
root@aix73-sriov
# entstat -d ent0 | grep -i vlan
Invalid
VLAN ID Packets: 0
Port
VLAN ID: 691
VLAN
Tag IDs: None
root@aix73-sriov
# ifconfig -a
en0:
flags=1e084863,81cc0<UP,BROADCAST,NOTRAILERS,RUNNING,SIMPLEX,MULTICAST,GROUPRT,64BIT,CHECKSUM_OFFLOAD(ACTIVE),LARGESEND,CHAIN>
inet 10.8.191.123 netmask
0xffffff00 broadcast 10.8.191.255
tcp_sendspace 262144 tcp_recvspace
262144 rfc1323 1
...
At a high level, we will perform the following steps to configure the LPAR for HNV. First, we will assign a SR-IOV logical port to the LPAR, marking it as migratable. We will also specify the VLAN id tag of 691 (which is required for our network). Then, we will configure a backing device for the migratable logical port; the backing device, in this example, will be another Virtual Ethernet Adapter, connected to the VLAN 691.
Let’s look at each step in detail.
Configuration steps for HNV for an AIX LPAR
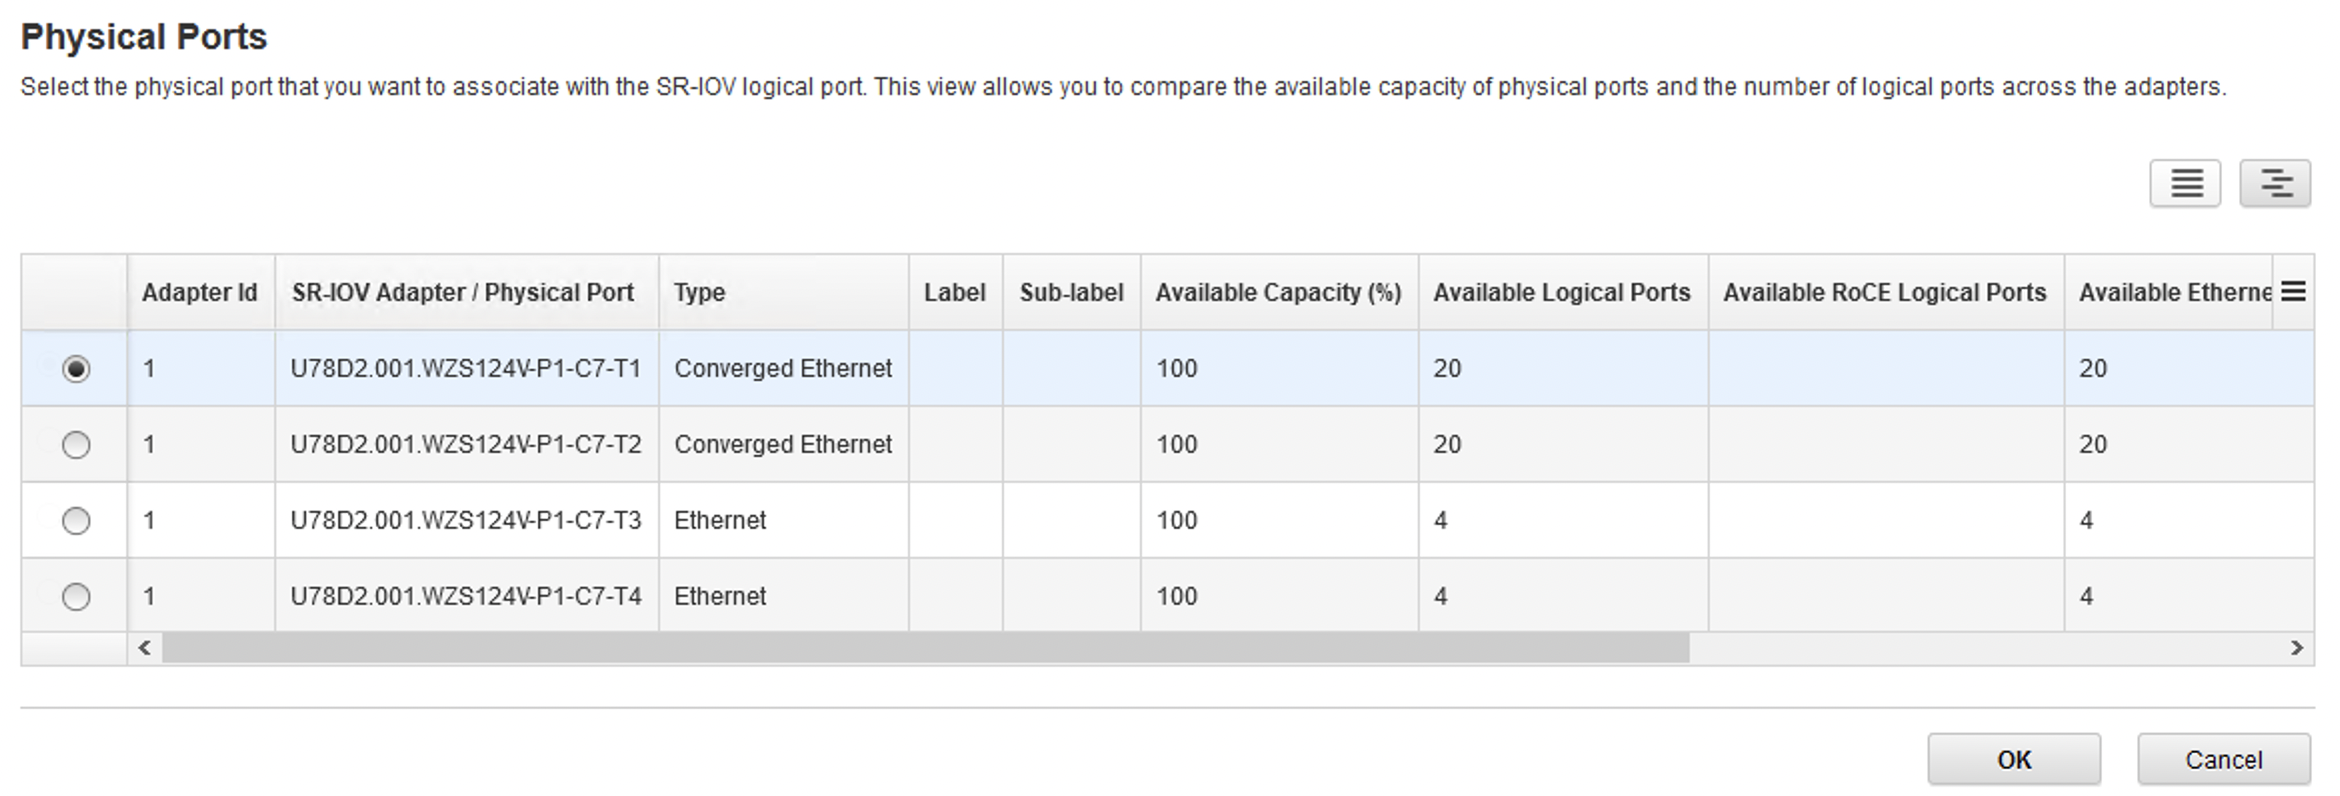
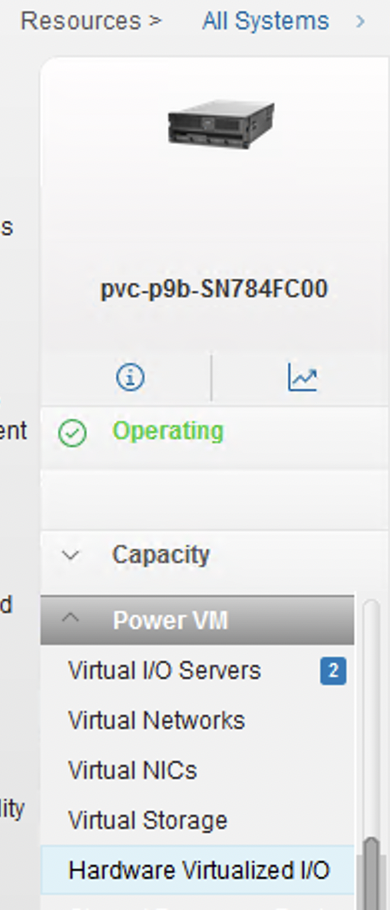
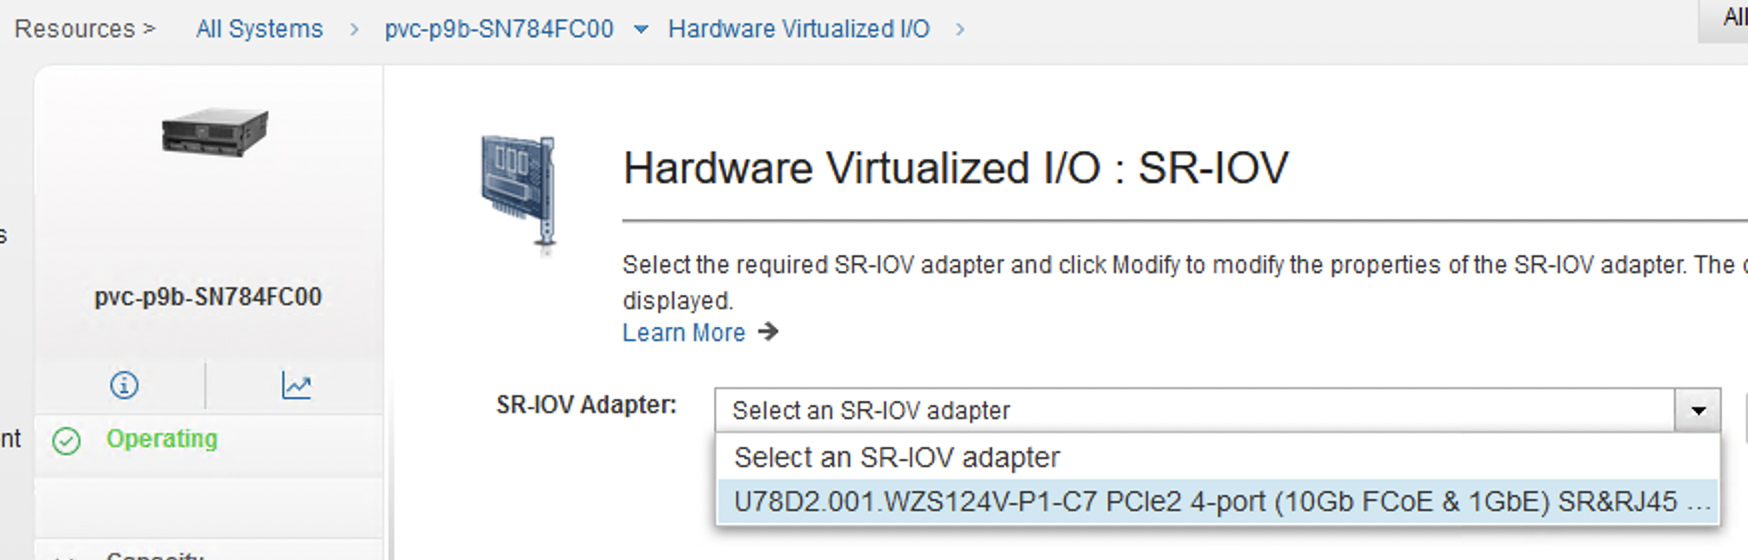
1. Assign a SR-IOV Logical Port to the LPAR. Click
Hardware Virtualized I/O for your LPAR. Click Add Port.
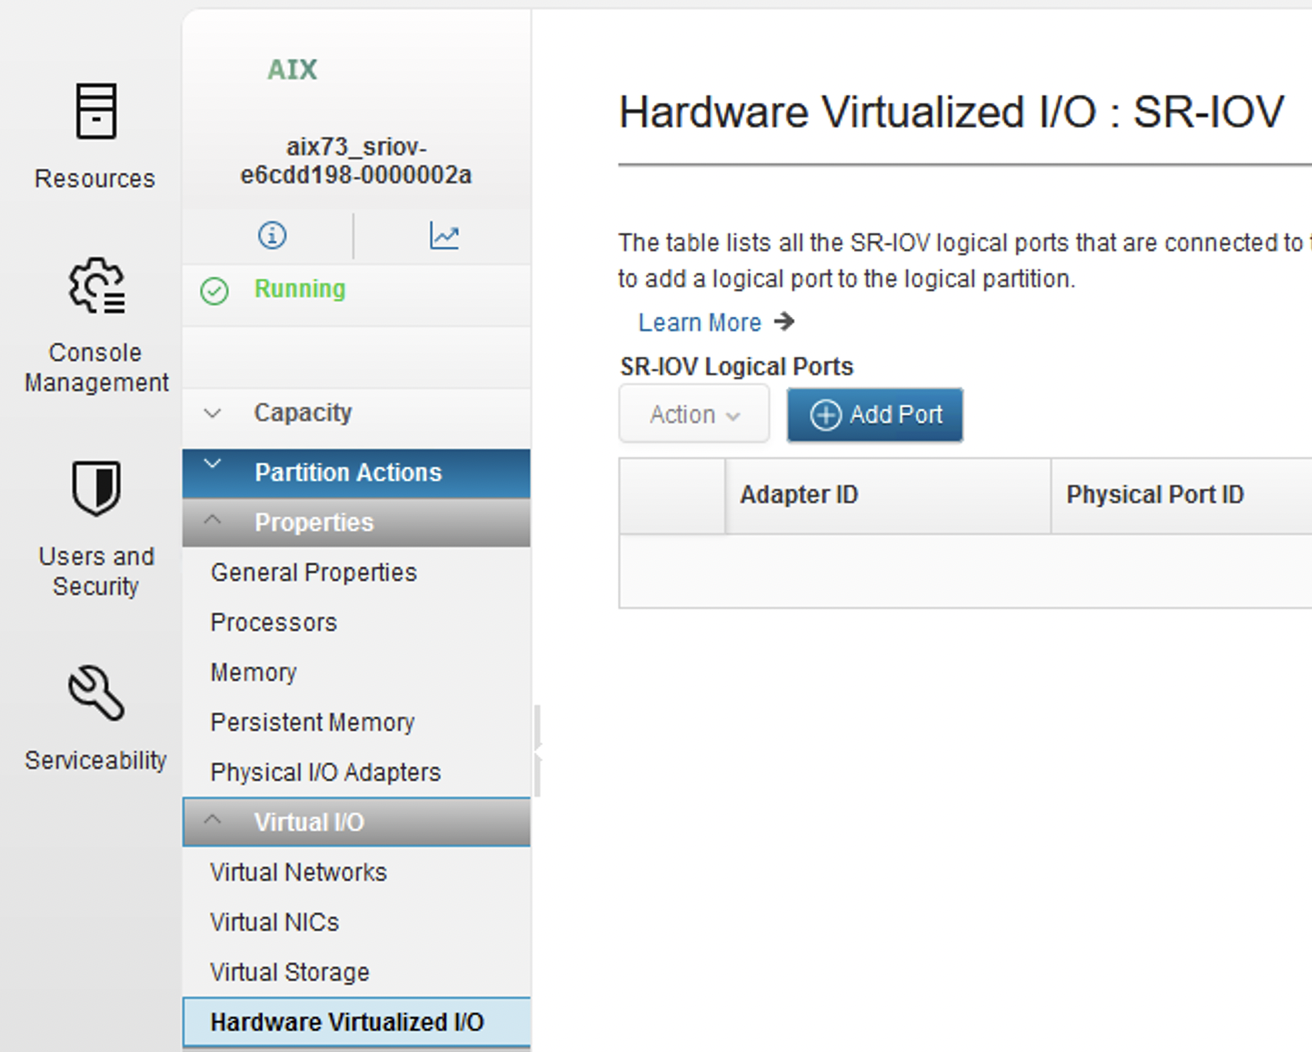
Click Select an SR-IOV physical port.
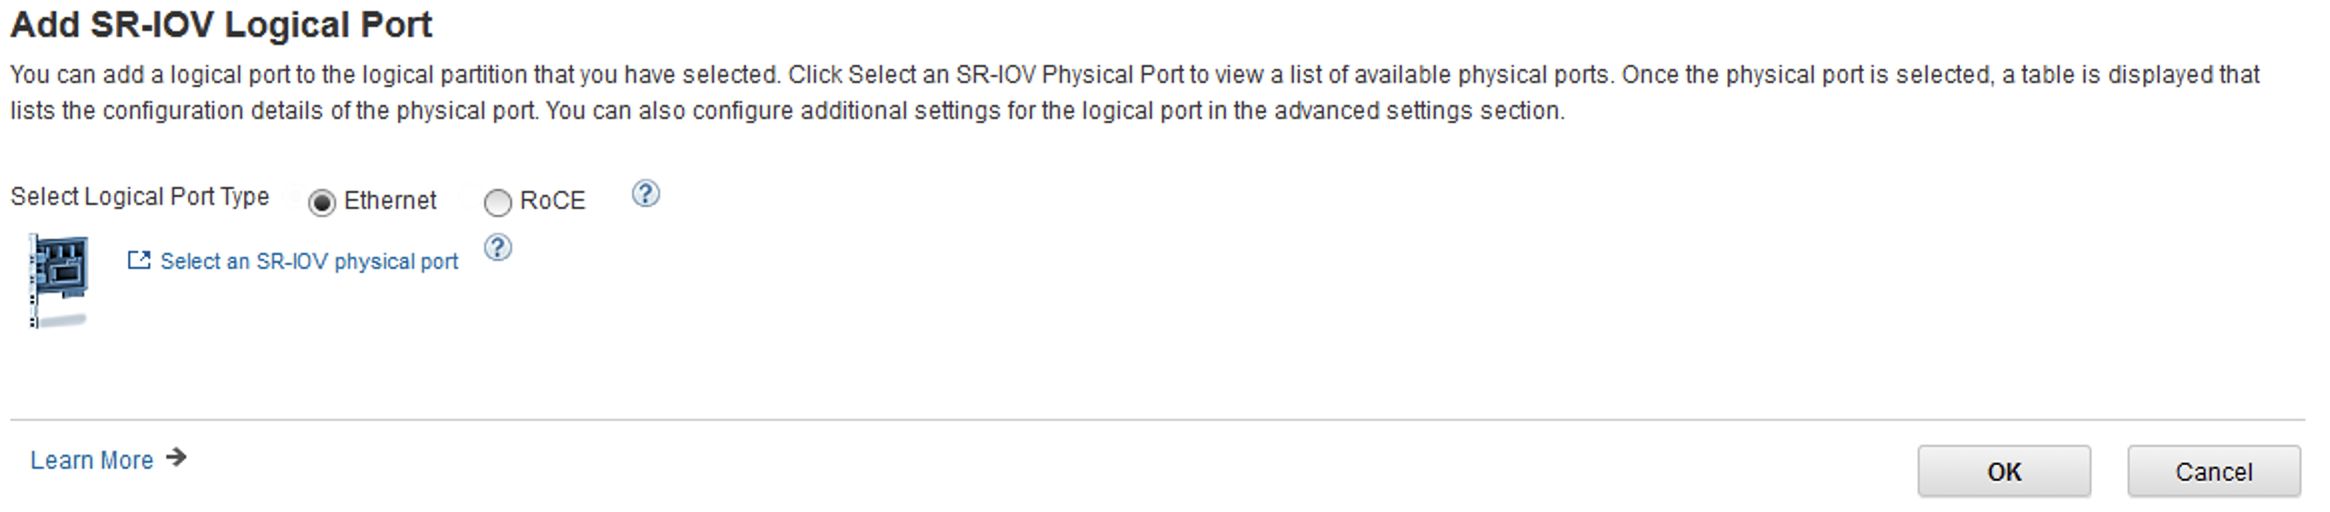
Select the SR-IOV physical port and click OK.
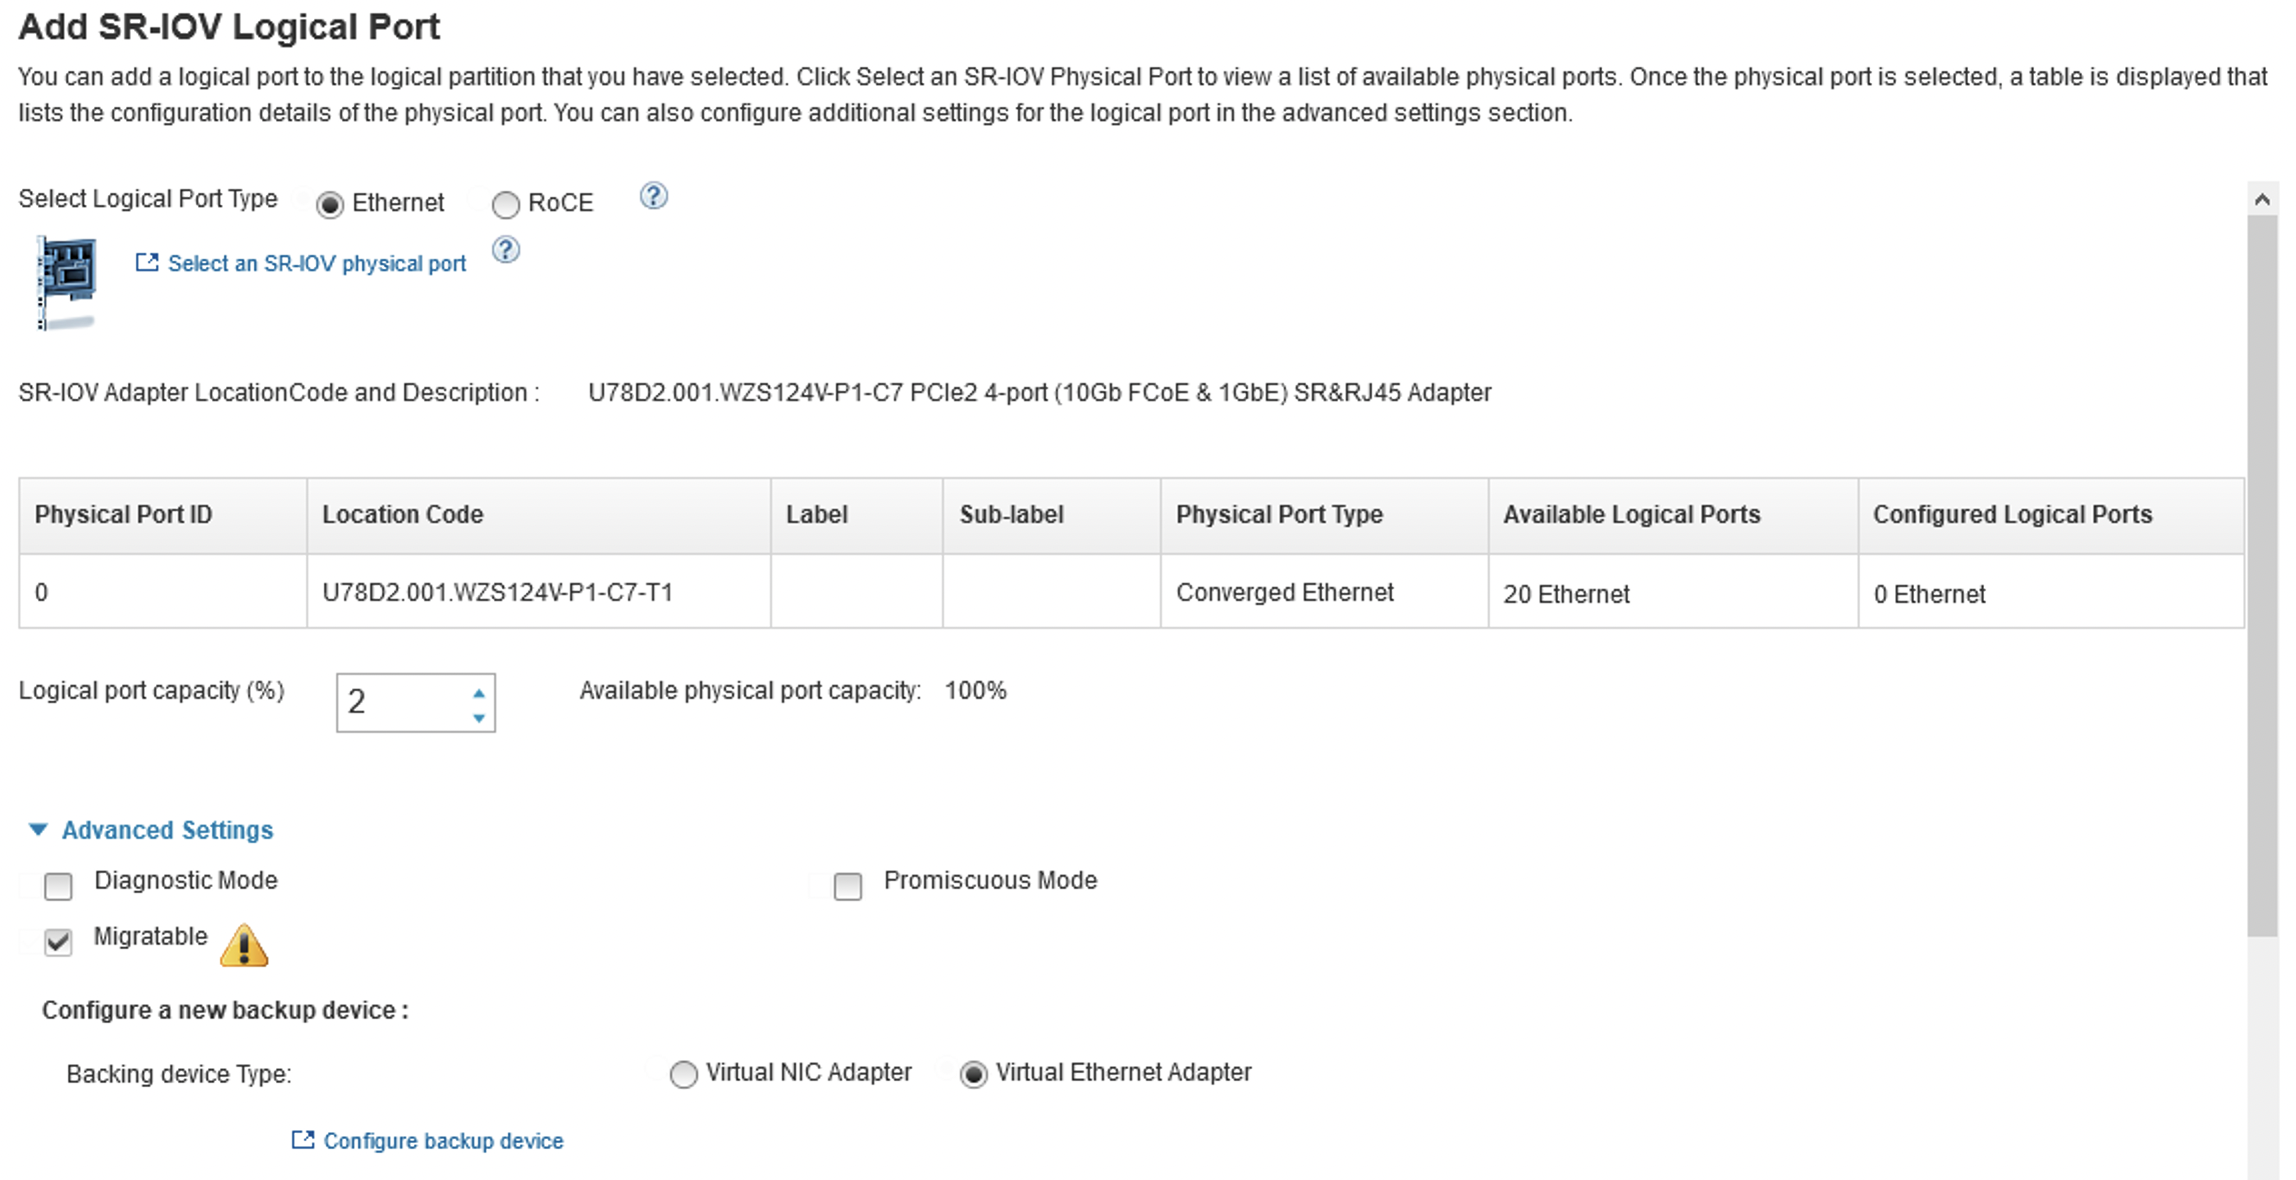
2. Click Migratable. Click Virtual Ethernet
Adapter.
|
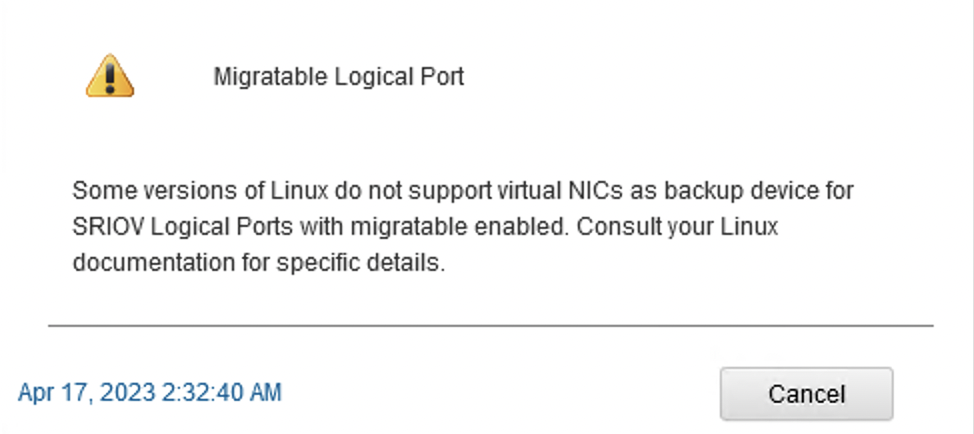
Note: If you click on the yellow triangle exclamation
icon, it provides an informational message about Linux (which we can ignore
because we are configuring HNV for an AIX LPAR).
|
3. Click Virtual Ethernet Adapter. Click Configure
backup device.
Note: You can also configure a vNIC device as backup device for HNV. Please refer to the IBM online documentation for details.
![]()
4. Select the VLAN for the VEA. In our case VLAN 691.
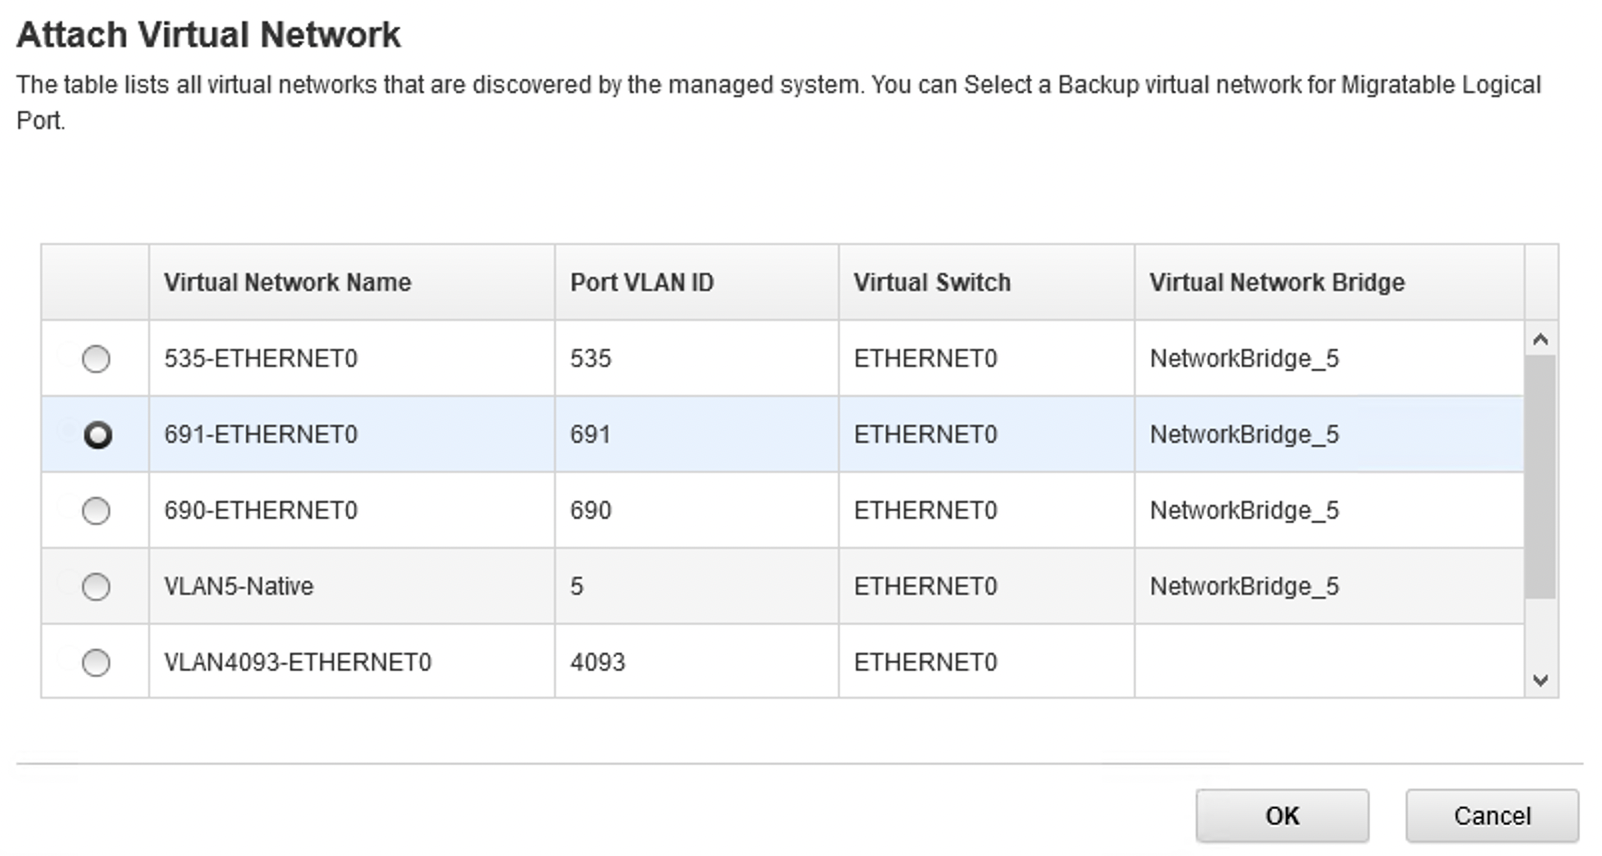
Enter the PVID for the VLAN the SR-IOV LP will be connected to on the network. Again, in our example, VLAN 691 is the desired VLAN. Click OK.

That’s it! The HNV configuration is complete!
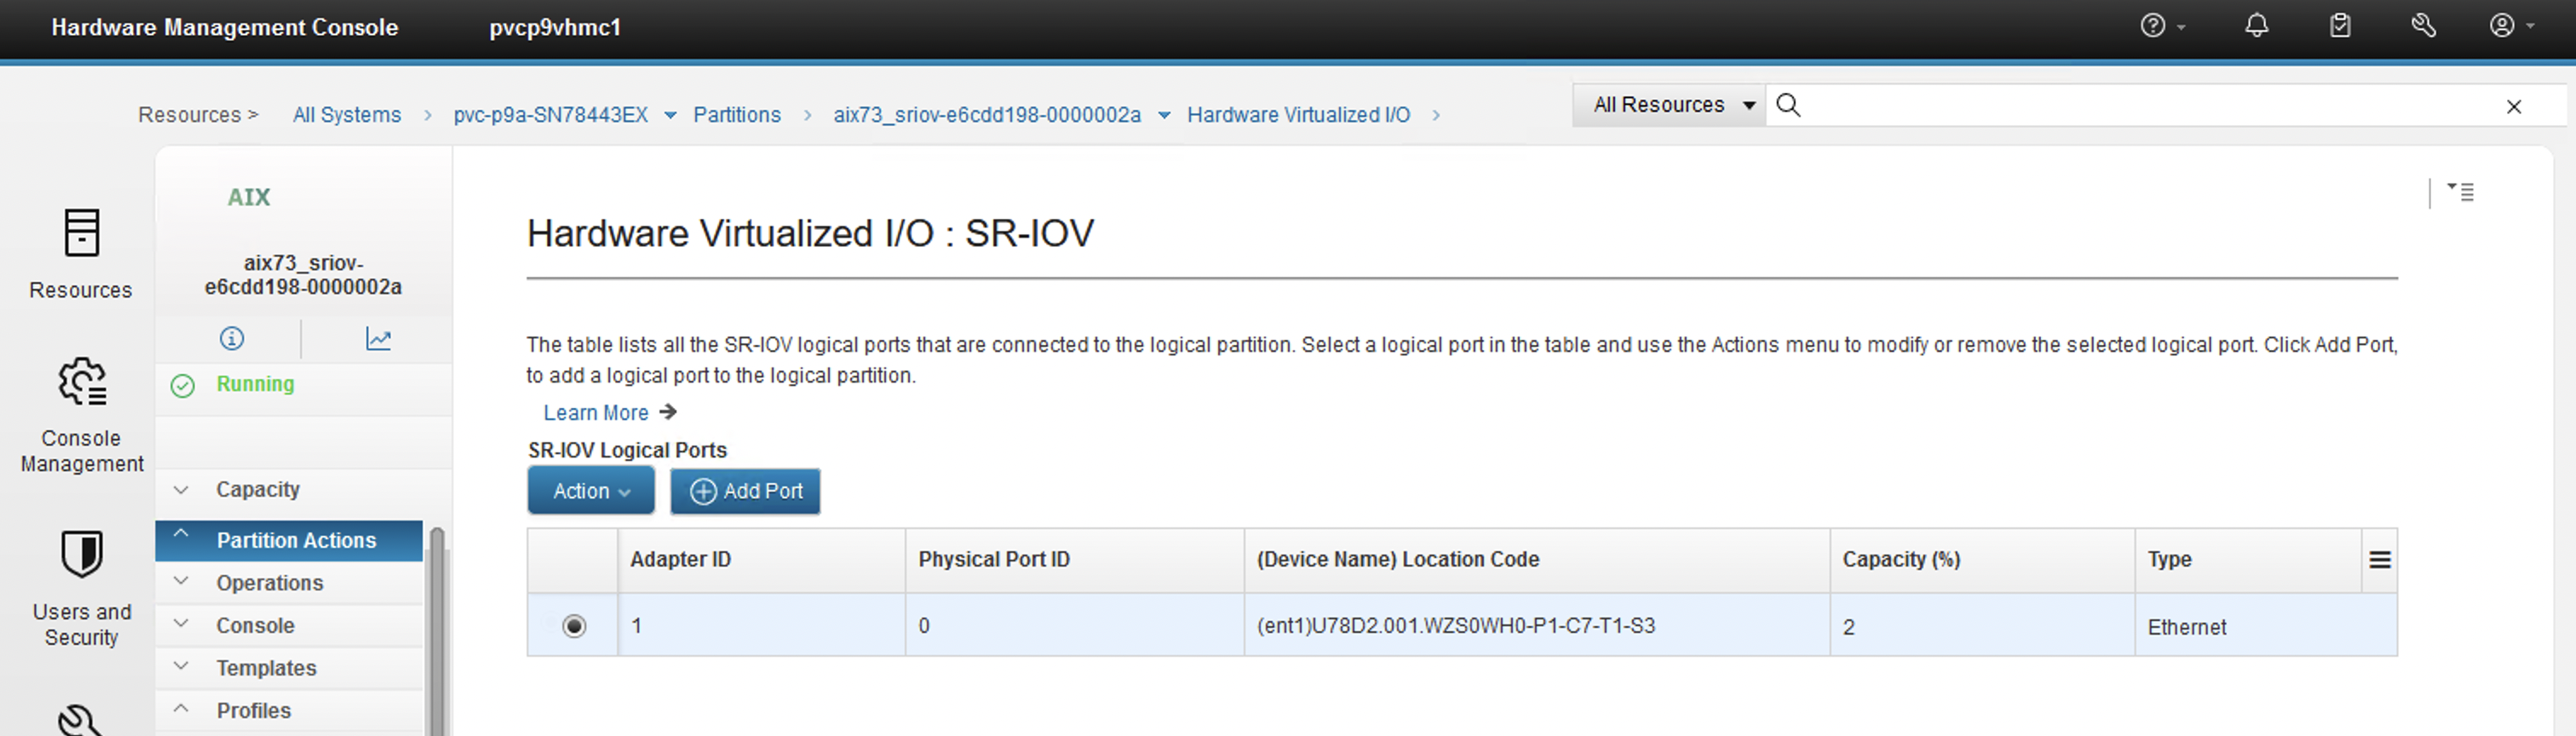
You’ll see a new SRIOV logical port listed for your LPAR, under Hardware Virtualised I/O.
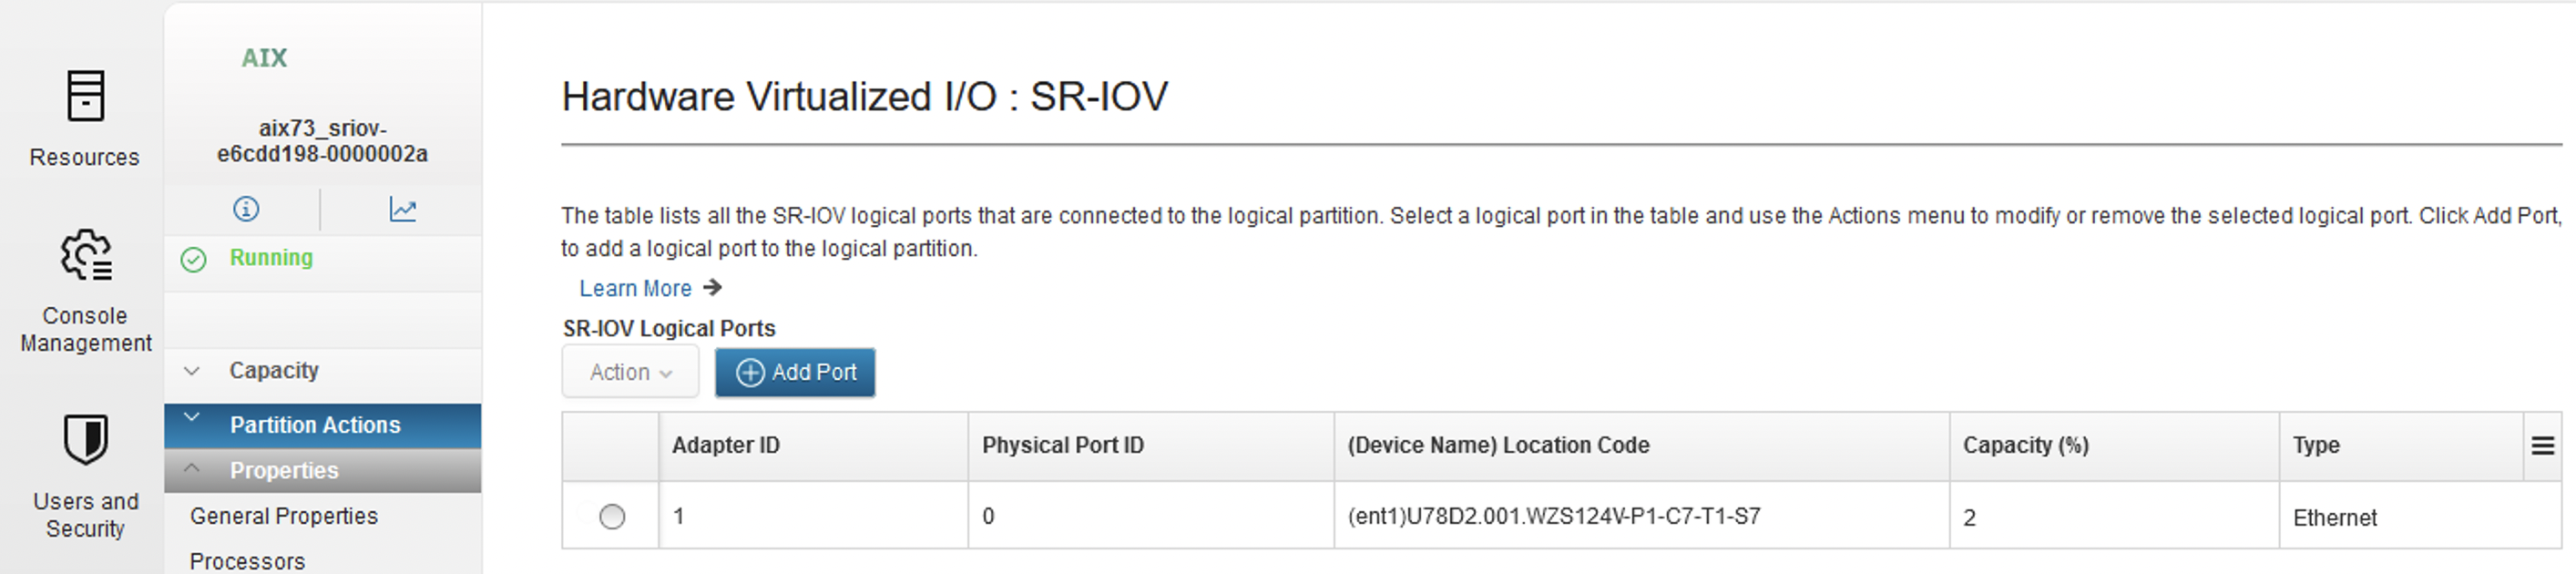
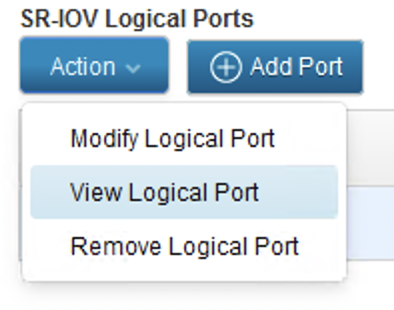
You can view details of your newly configured port by selecting the port, clicking Action and View Logical Port.
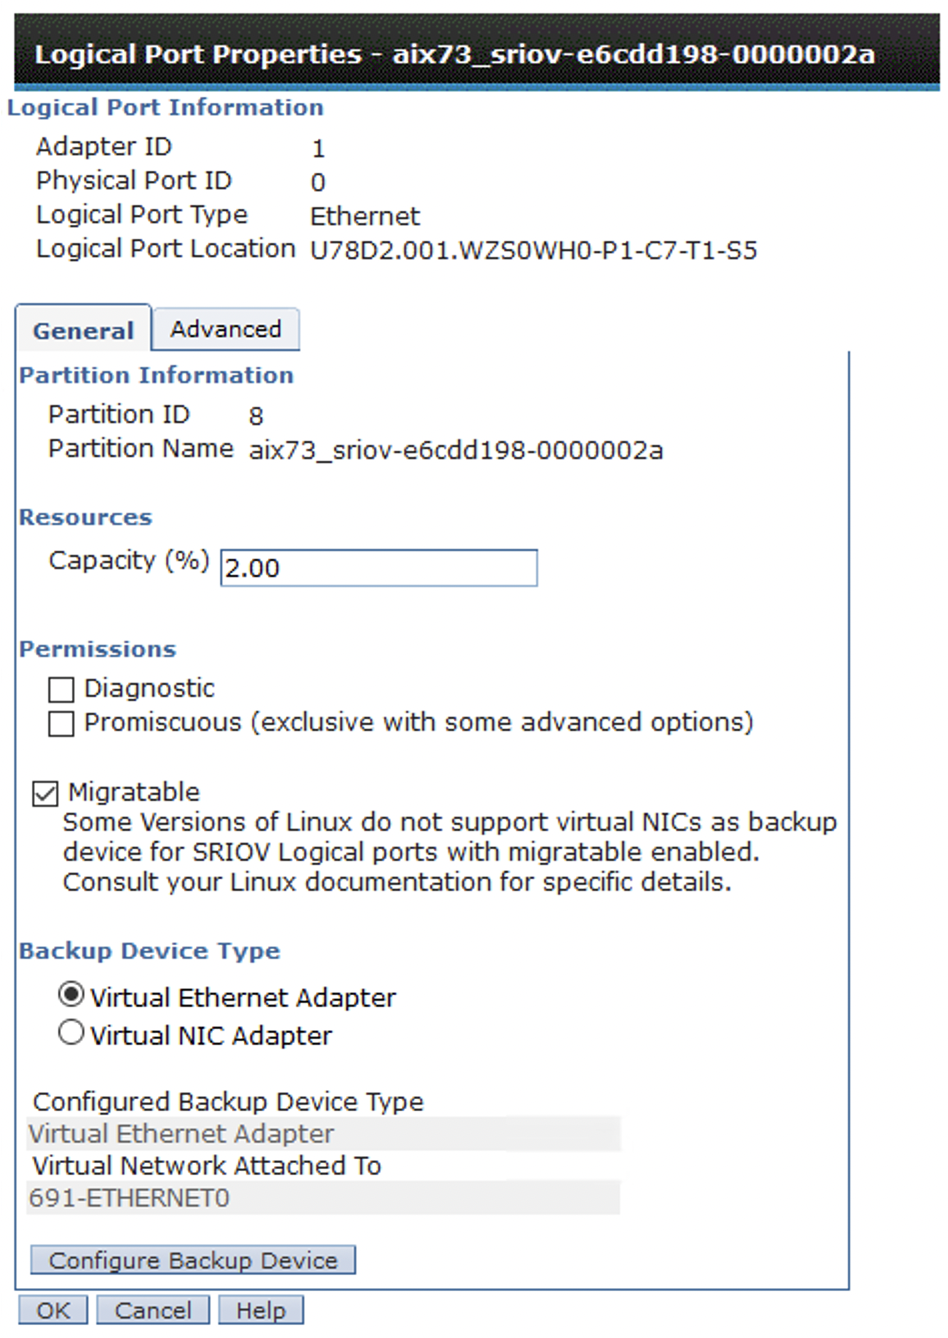
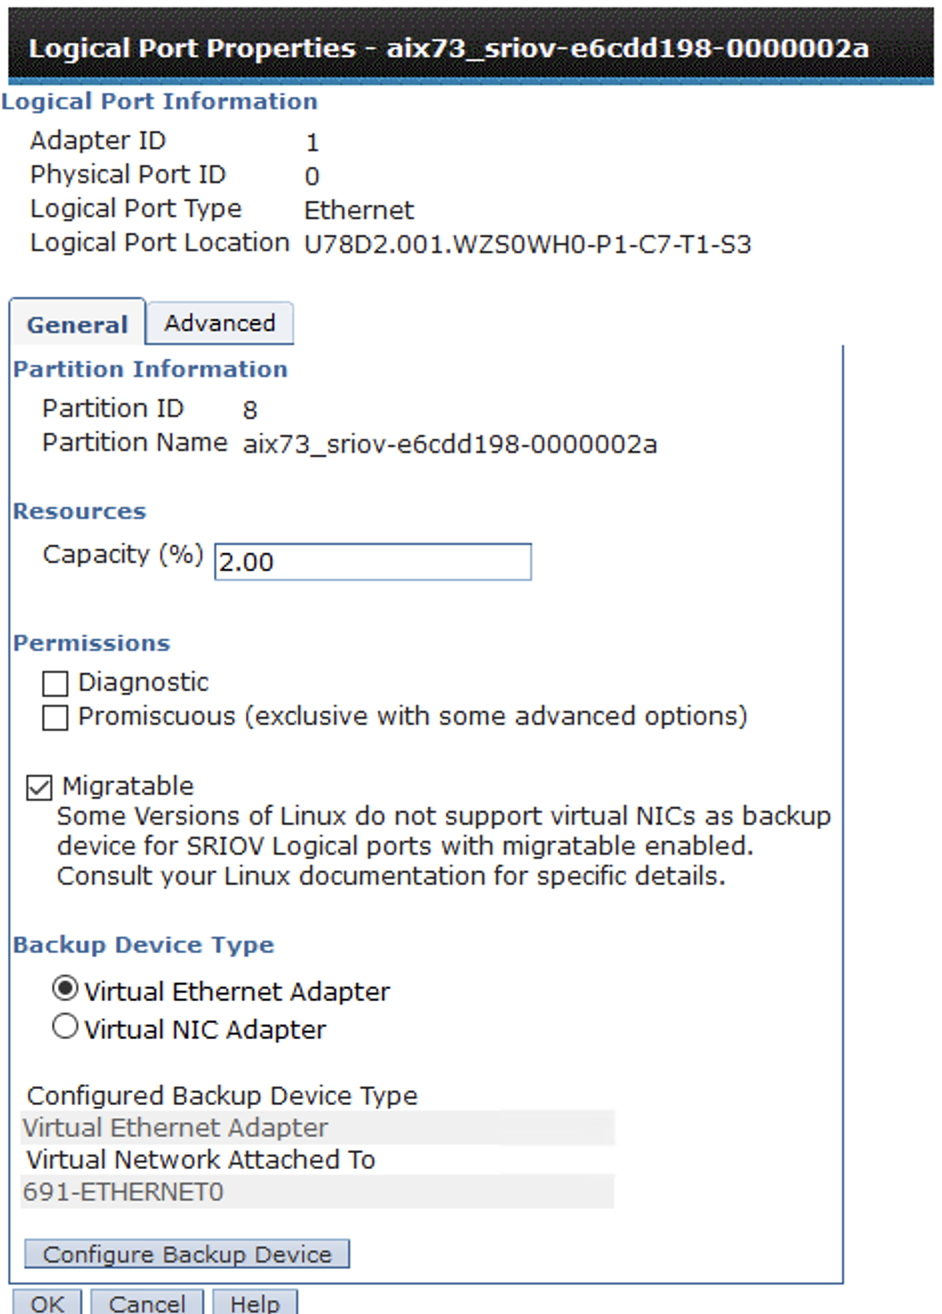
In the view panel, you will see details of your logical port, including the ticked Migratable option and the Backing device Type (in this case Virtual Ethernet Adapter). You can click View to see information for the backup network device.
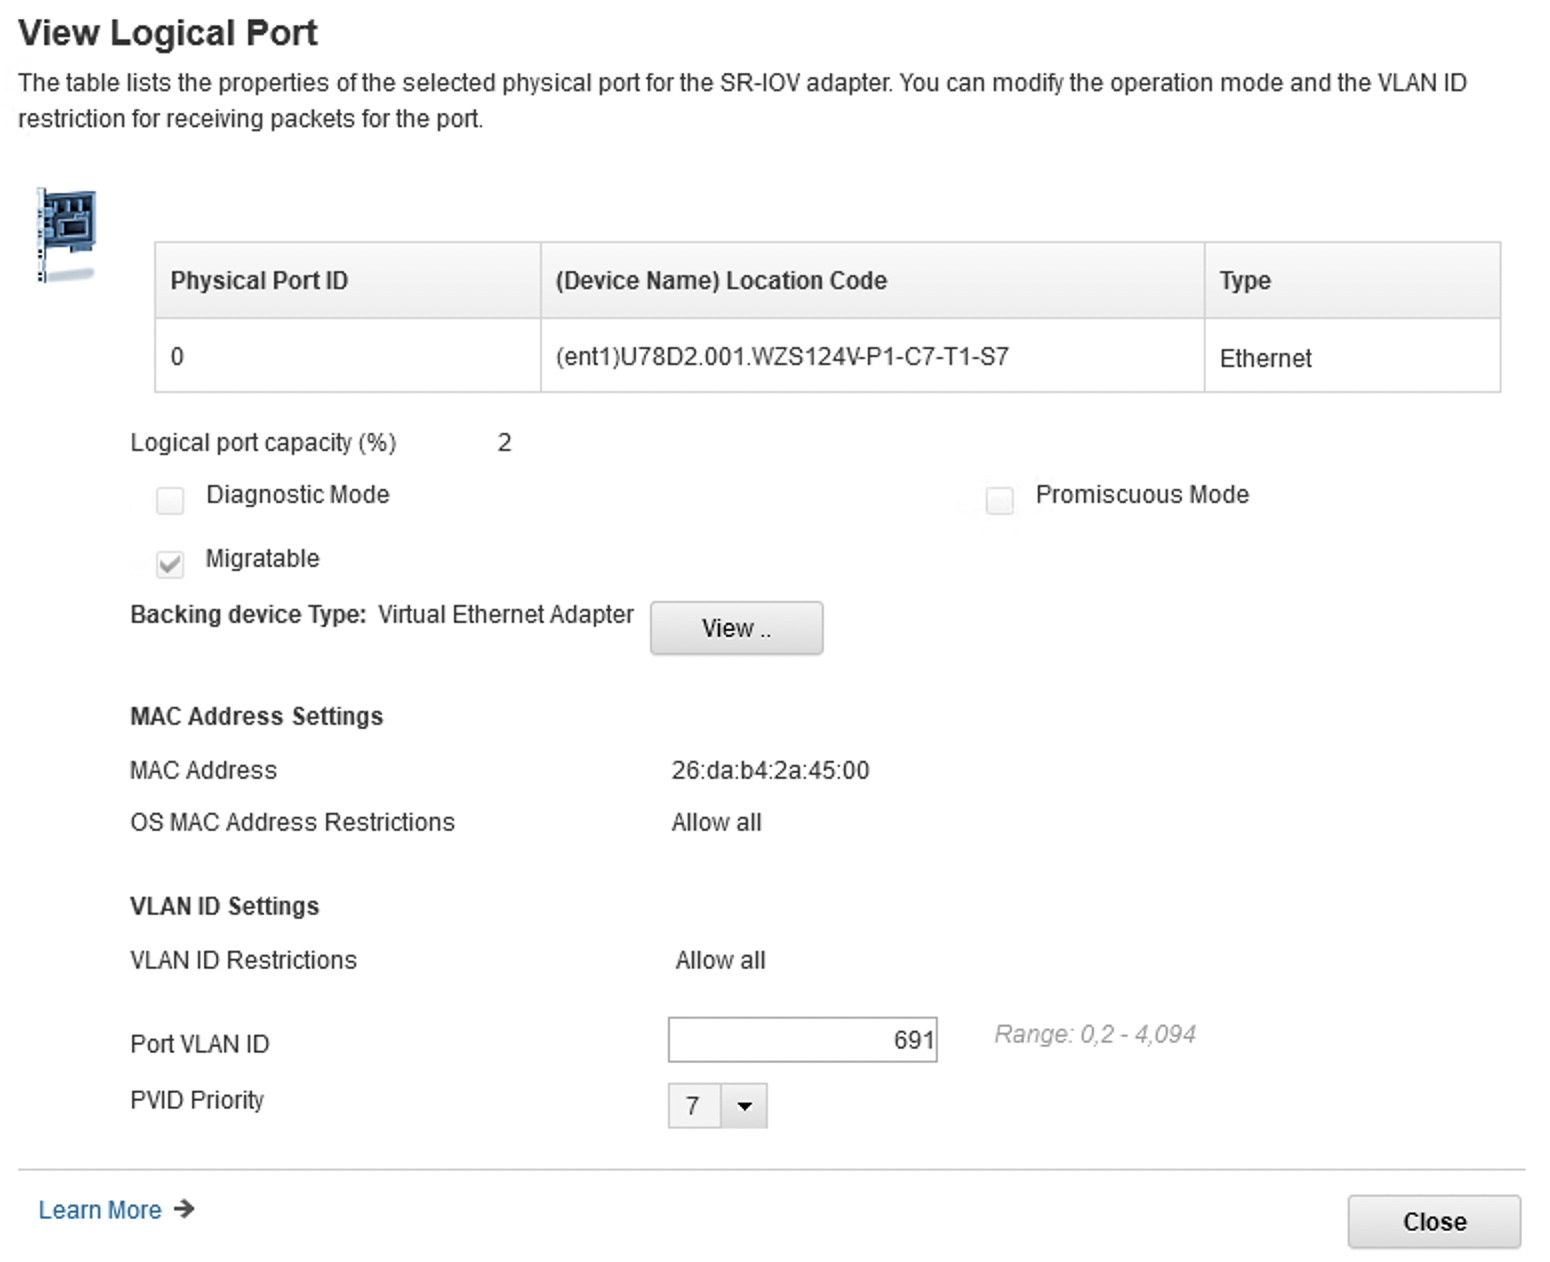
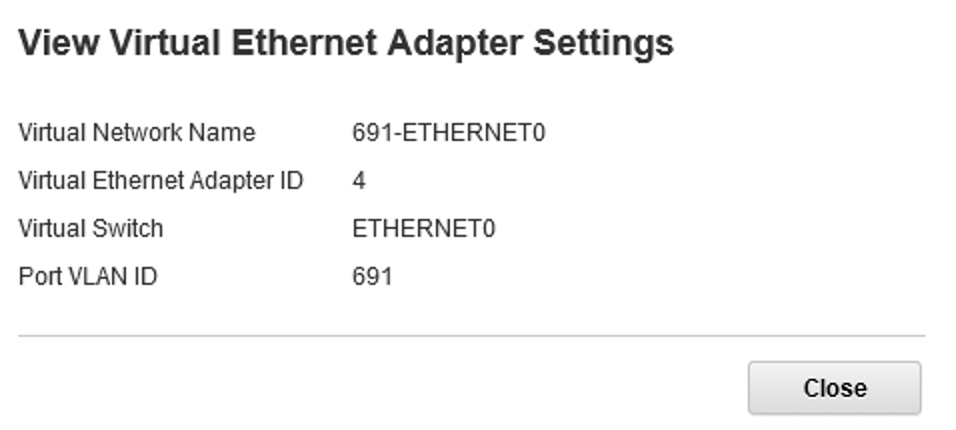
Clicking View provide details of the Backing device type (virtual Ethernet adapter) settings, such as the virtual network name, the VEA (slot) ID, the virtual switch name and the Port VLAN ID (PVID).

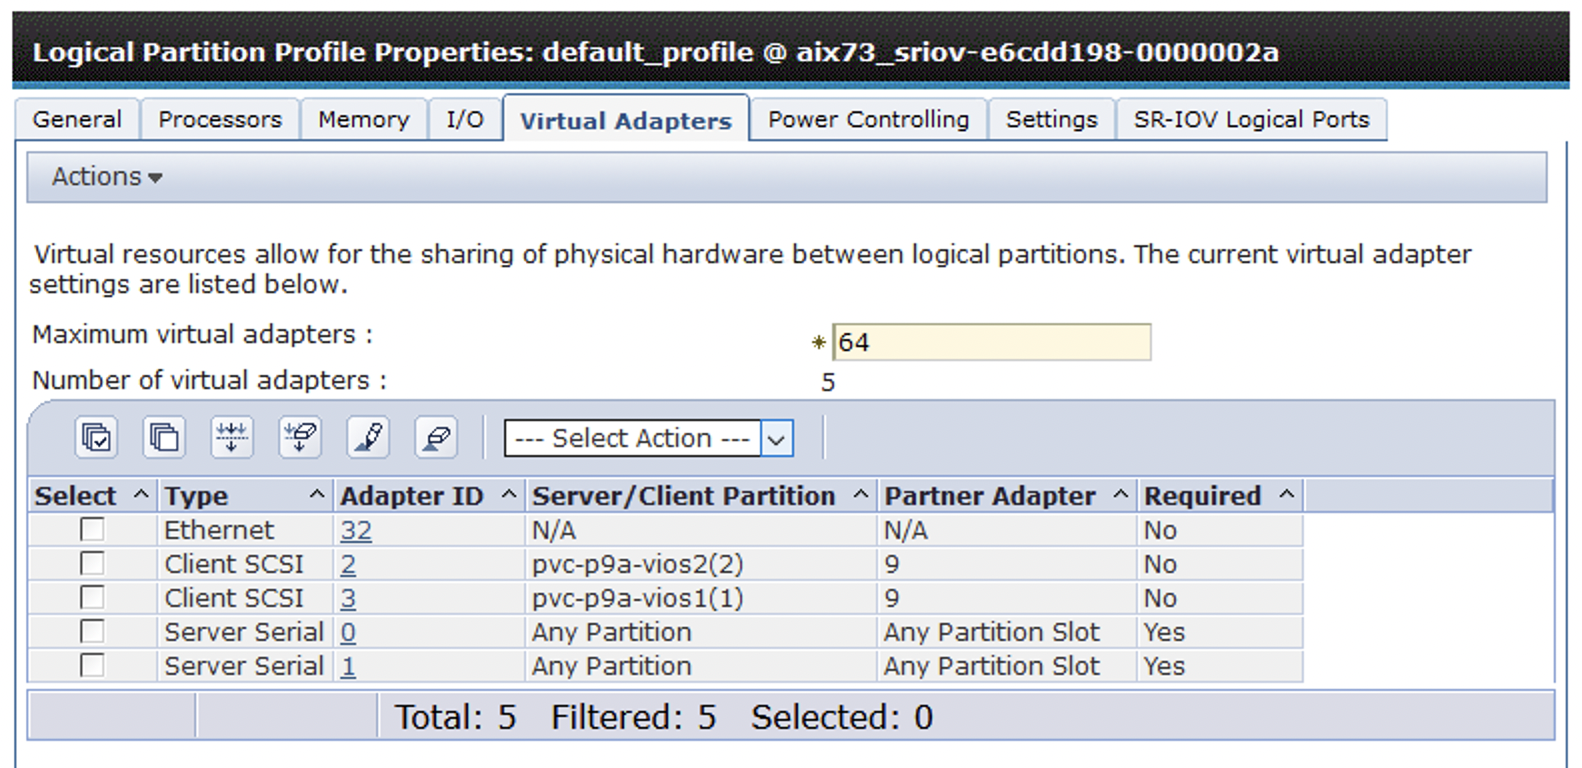
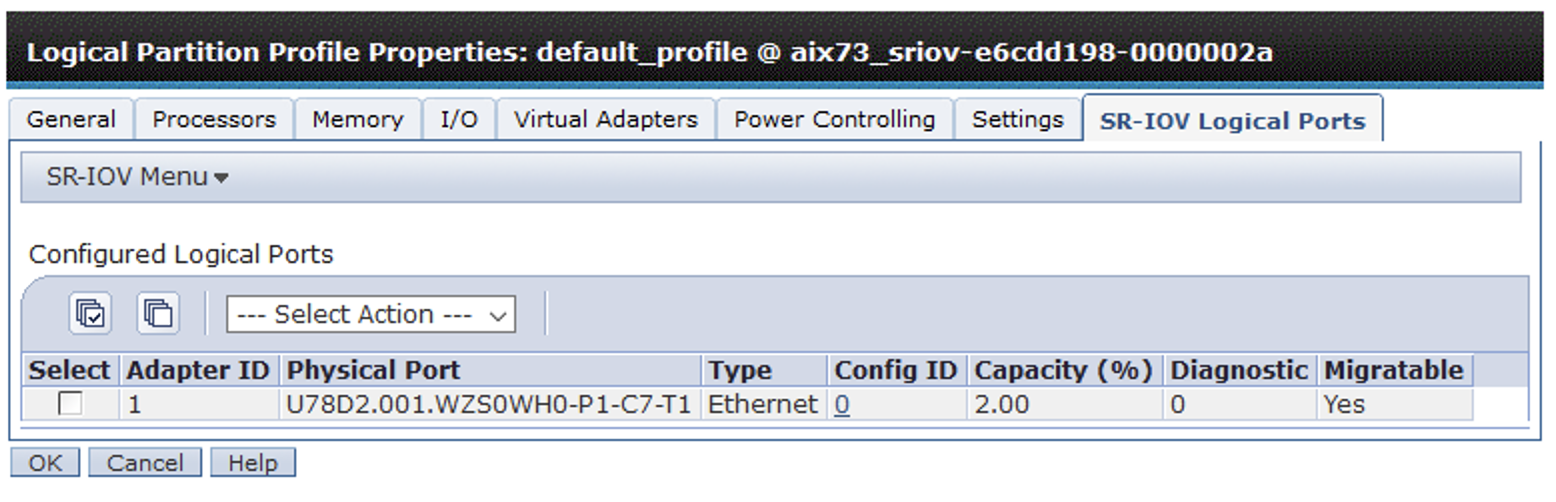
You can also view similar information in the partition profile for the LPAR.
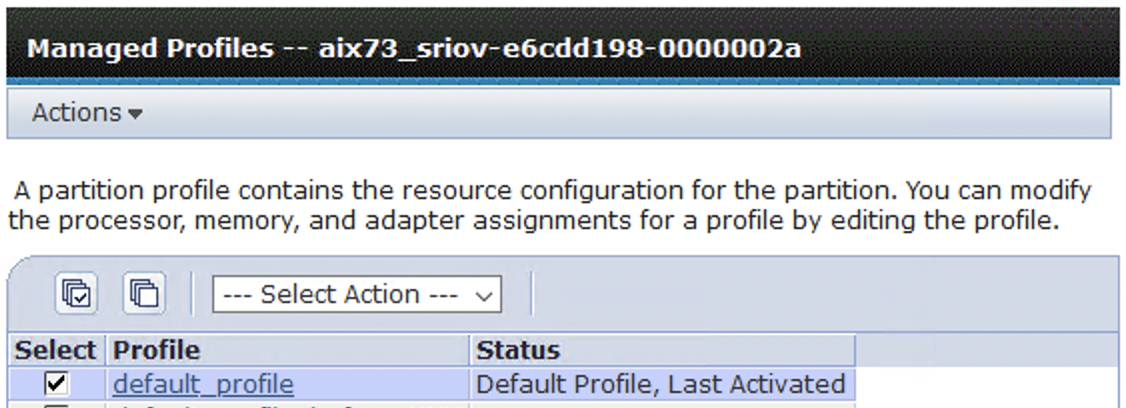
Under Partition Actions, click Profiles, Manage Profiles.
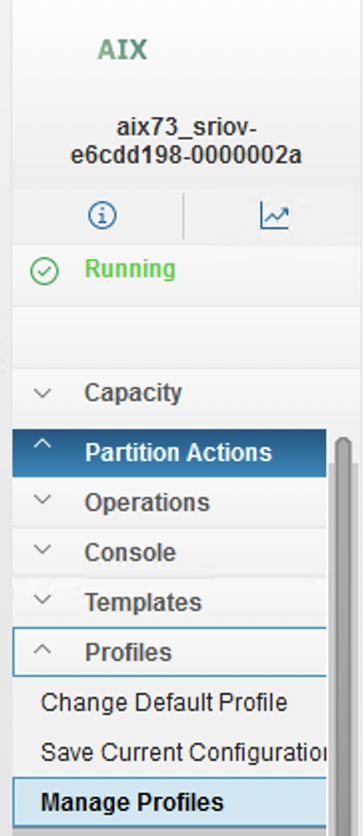
Click on the profile name.
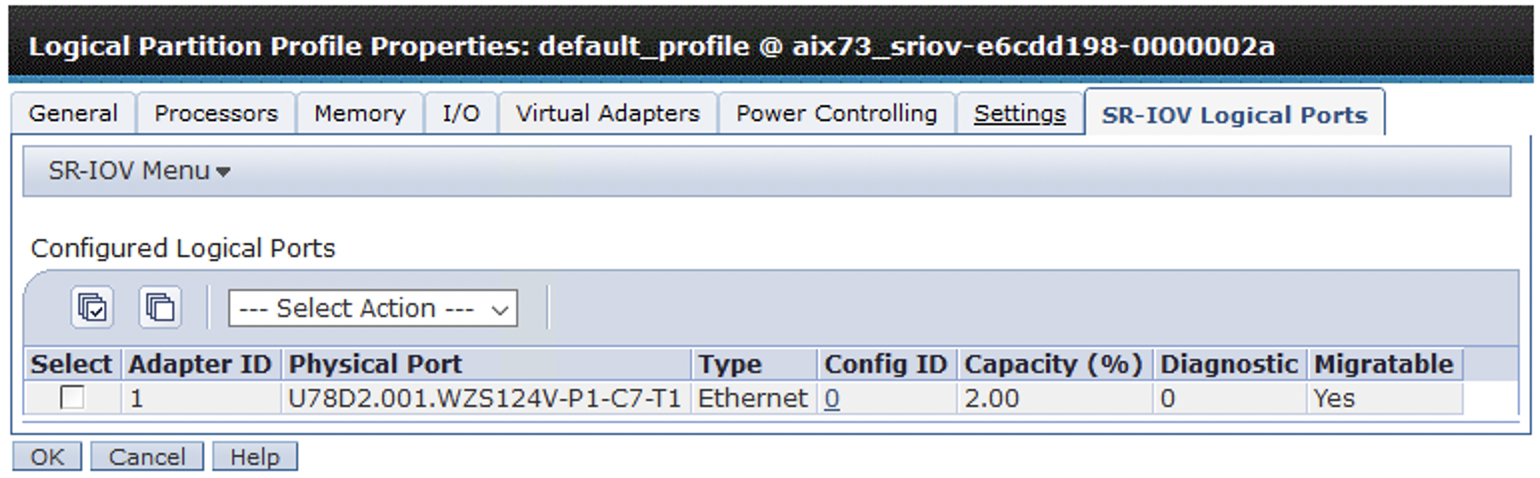
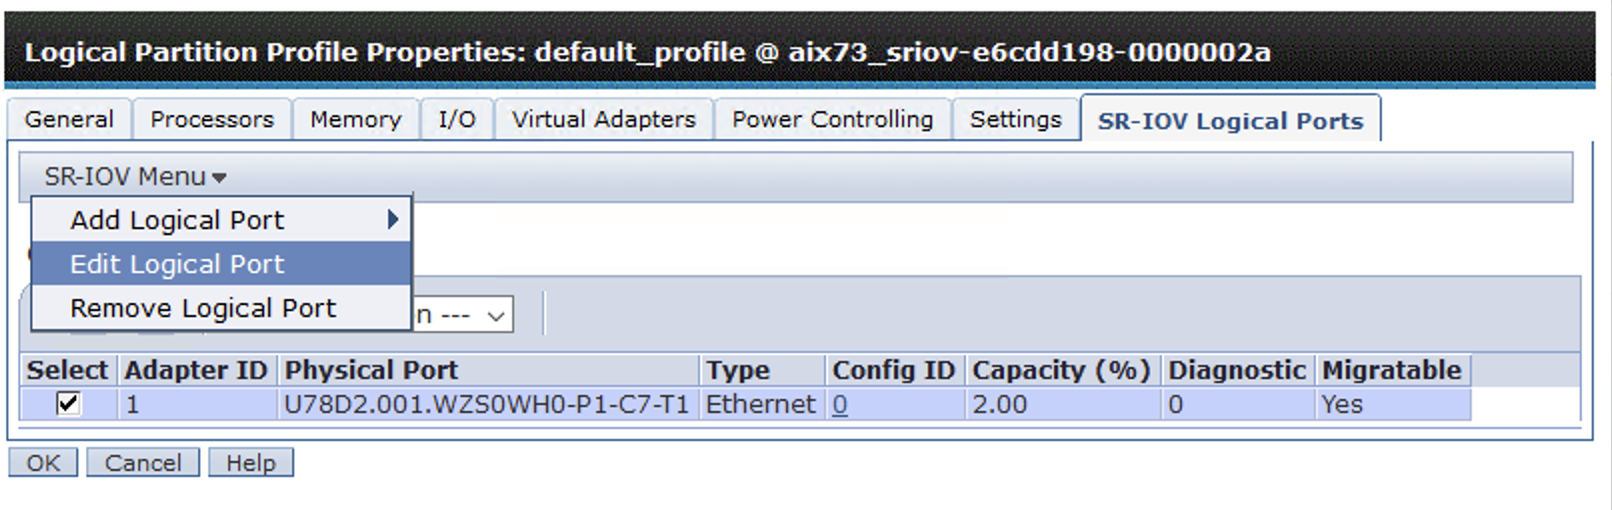
Click on the SR-IOV Logical Ports tab.
Select the logical port and click SR-IOV Menu and Edit Logical Port.
You’re presented with the Logical Port Properties panel. It displays information relating to the SR-IOV logical port, such as the Migratable option selected, the Backing Device Type (VEA) and the Virtual Network Attached.
Click Cancel and Close to exit the partition profile.
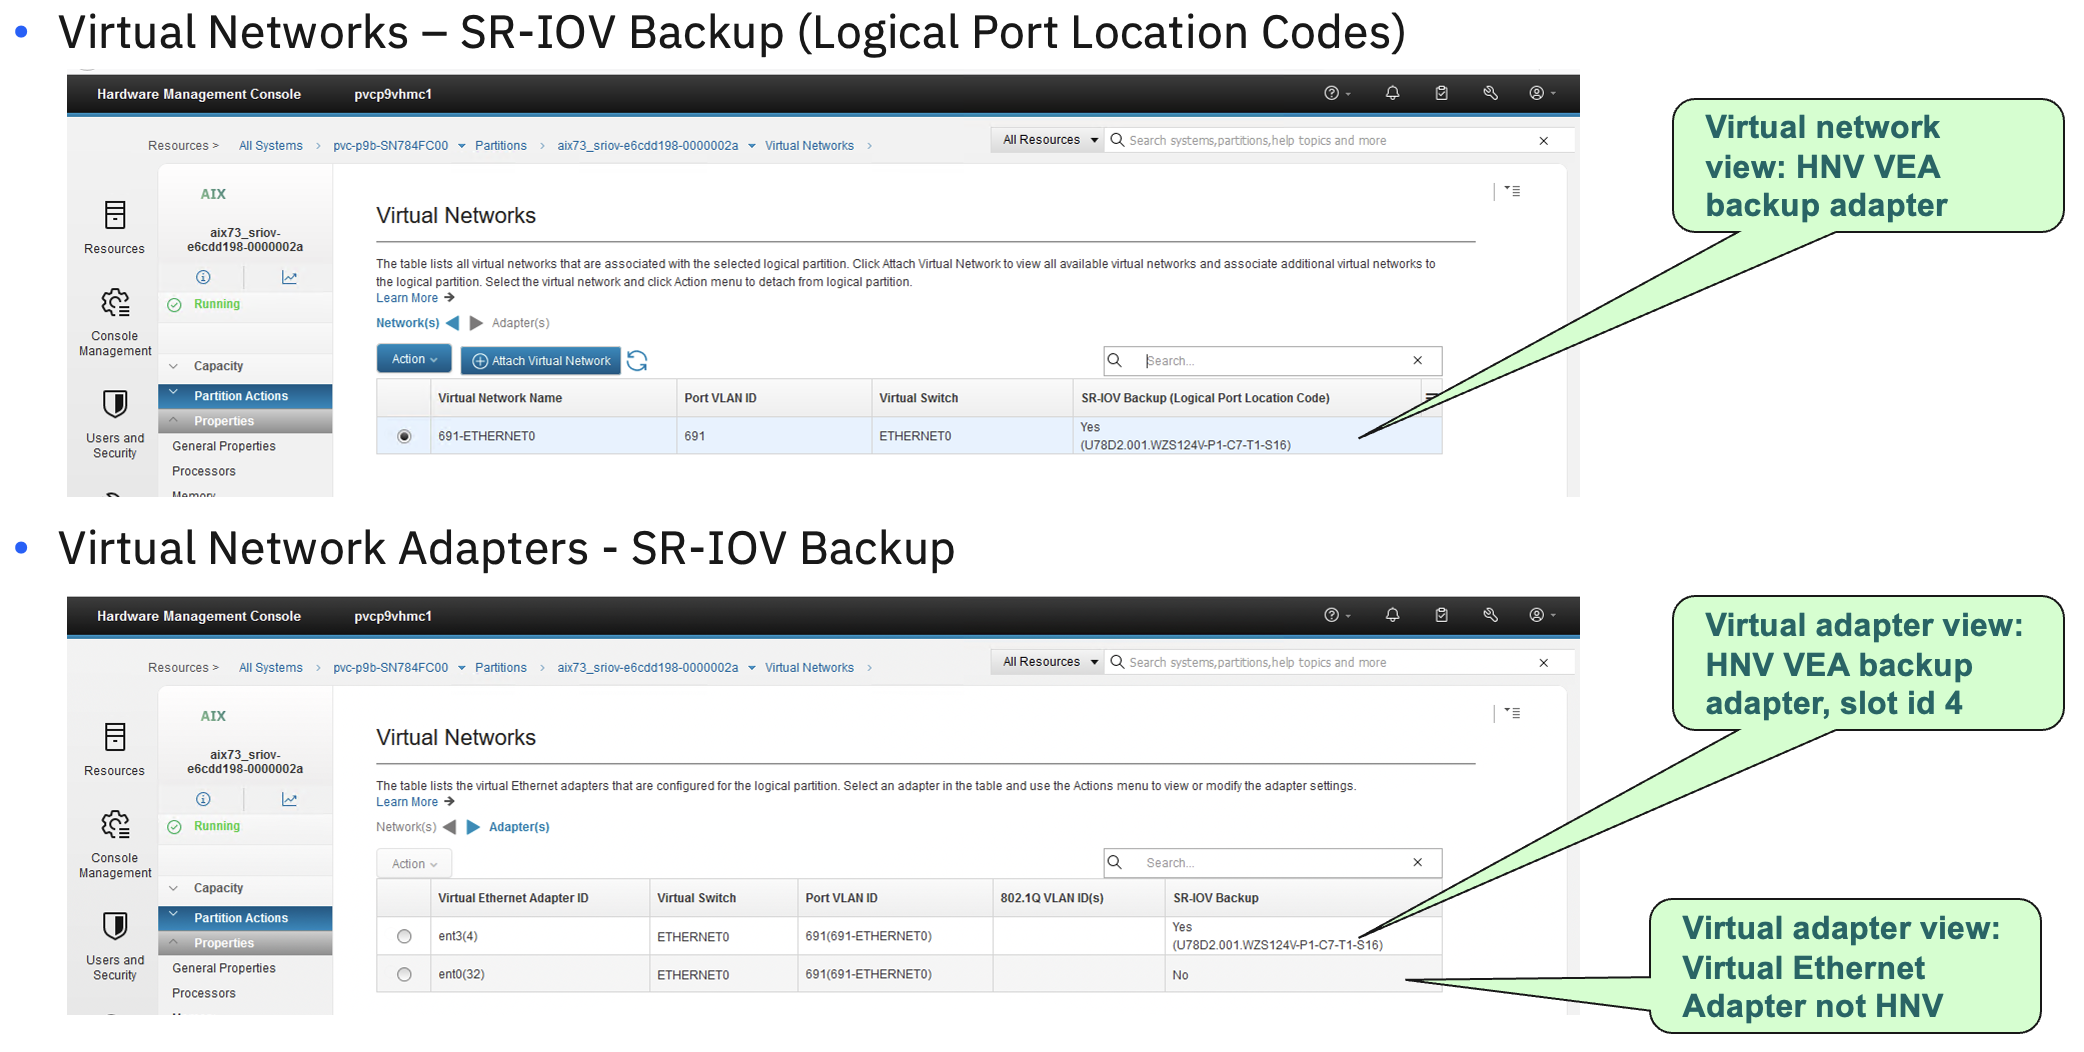
Under Virtual Networks for the LPAR, you’ll find another view of the virtual Ethernet Adapters assigned to the LPAR. This view shows the SR-IOV Backup adapter column(s) containing the location code of the SR-IOV logical port, for which this VEA is its backup adapter.
|
Note: The Virtual Ethernet Adapter, for the HNV configuration, does not appear in the traditional Virtual Adapters tab in the partition profile. This information is only visible under the SR-IOV Logical Ports tab and is managed by the Power Hypervisor.
|
The HMC CLI also provides a command to view the HNV configuration for a partition. The lshwres command, with the --rsubtype logport flags, displays the SRIOV logical port information, including the HNV specific configuration attributes, migratable, backup_device_slot_num, backup_device_type and backup_veth_vnetwork.
devroot@pvcp9vhmc1:~>
lshwres -r sriov -m pvc-p9b-SN784FC00 --rsubtype logport --level eth
config_id=0,lpar_name=aix73_sriov-e6cdd198-0000002a,lpar_id=8,lpar_state=Running,is_required=1,adapter_id=1,logical_port_id=27004008,logical_port_type=eth,drc_name=PHB
4104,location_code=U78D2.001.WZS124V-P1-C7-T1-S8,functional_state=1,phys_port_id=0,debug_mode=0,diag_mode=0,huge_dma_window_mode=0,capacity=2.0,max_capacity=100.0,promisc_mode=0,mac_addr=26dab42a4500,curr_mac_addr=26dab42a4500,allowed_os_mac_addrs=all,allowed_vlan_ids=all,port_vlan_id=691,migratable=1,backup_device_slot_num=4,backup_device_type=veth,backup_veth_vnetwork=691-ETHERNET0,is_vnic_backing_device=0
Automatic AIX configuration changes for HNV
So, what configuration was automatically performed on the AIX LPAR to support the HNV setup?
On the AIX LPAR we observe that several new network adapters were automatically configured by the HNV setup.
root@aix73-sriov
/ # lsdev -Cc adapter | grep ^ent
ent0 Available Virtual I/O Ethernet Adapter (l-lan)
ent1 Available 06-00 PCIe3 10GbE SFP+ SR 4-port
Converged Network Adapter VF (df1028e214100f04)
ent2 Available EtherChannel / IEEE 802.3ad Link
Aggregation
ent3 Available Virtual I/O Ethernet Adapter (l-lan)
The ent2 EtherChannel device is automatically configured by HNV, as an AIX network interface backup (NIB) device. The primary adapter is ent1, which is the SR-IOV logical port, VF adapter. The backup adapter is ent3, which is a new Virtual Ethernet Adapter.
root@aix73-sriov
/ # lsattr -El ent2
adapter_names ent1 EtherChannel Adapters True
alt_addr 0x000000000000 Alternate EtherChannel
Address
True
auto_recovery yes Enable automatic recovery after
failover True
backup_adapter ent3
Adapters to use when the primary channel fails True
delay_log 0 Delay error logging (in seconds)
during open True
hash_mode default Determines how outgoing adapter is
chosen True
hcn_id 0xae01fbf Hybrid Converged Network ID True
interval long Determines interval value for IEEE
802.3ad mode True
mac_swap no Enable MAC address swap between
primary and backup on failover True
mode standard EtherChannel mode of operation True
netaddr 0 Address to ping True
noloss_failover
yes Enable lossless failover
after ping failure
True
num_retries 3 Times to retry ping before
failing True
retry_time 1
Wait time (in seconds)
between pings
True
use_alt_addr no Enable Alternate EtherChannel
Address True
use_jumbo_frame
no Enable Gigabit Ethernet
Jumbo Frames True
root@aix73-sriov
/ # topas -E
Topas
Monitor for host: aix73-sriov
Interval: 2 Mon Apr 17 02:57:34 2023
===============================================================================
Network KBPS I-Pack
O-Pack KB-In KB-Out
ent2
(EC)
0.1 0.6 0.6
0.1 0.1
|\--ent1 (PRIM) 0.1 0.6
0.6 0.1 0.1
\--ent3 (VETH BACK) 0.0 0.0
0.0 0.0
0.0
en0 0.0 0.0
0.0 0.0 0.0
lo0 0.0 0.0
0.0 0.0 0.0
The VEA adapter, ent3, is configured with virtual adapter (slot) id, 4.
root@aix73-sriov
/ # lscfg -vpl ent3 | grep ent
ent3 U9009.42G.78443EX-V8-C4-T1 Virtual I/O Ethernet Adapter (l-lan)
Testing the HNV network setup on AIX
At this point, the HNV setup has configured the AIX NIB interface, but the IP address is still assigned to the existing VEA, en0. So, next we will temporarily move (transfer) the IP address from the VEA interface to the NIB interface, for testing.
We will need to disconnect the network to make this change, so, we connect to the terminal console of the LPAR (via the HMC CLI, with vtmenu) and run the ifconfig transfer command. Then we test the network is functioning, on the NIB interface, by pinging an address on our network.
root@aix73-sriov
/ # tty
/dev/vty0
root@aix73-sriov
/ # ifconfig en0 10.8.191.123 transfer en2
root@aix73-sriov
/ # ifconfig -a
en0:
flags=1e084863,81cc0<UP,BROADCAST,NOTRAILERS,RUNNING,SIMPLEX,MULTICAST,GROUPRT,64BIT,CHECKSUM_OFFLOAD(ACTIVE),LARGESEND,CHAIN>
tcp_sendspace 262144 tcp_recvspace
262144 rfc1323 1
en2:
flags=1e084863,18c0<UP,BROADCAST,NOTRAILERS,RUNNING,SIMPLEX,MULTICAST,GROUPRT,64BIT,CHECKSUM_OFFLOAD(ACTIVE),LARGESEND,CHAIN>
inet 10.8.191.123 netmask 0xffffff00
broadcast 10.8.191.255
tcp_sendspace 262144 tcp_recvspace
262144 rfc1323 1
lo0:
flags=e08084b,c0<UP,BROADCAST,LOOPBACK,RUNNING,SIMPLEX,MULTICAST,GROUPRT,64BIT,LARGESEND,CHAIN>
inet 127.0.0.1 netmask 0xff000000 broadcast
127.255.255.255
inet6 ::1%1/64
tcp_sendspace 131072 tcp_recvspace
131072 rfc1323 1
root@aix73-sriov
/ # ping 10.8.4.100
PING
10.8.4.100: (10.8.4.100): 56 data bytes
64
bytes from 10.8.4.100: icmp_seq=0 ttl=63 time=0 ms
64 bytes
from 10.8.4.100: icmp_seq=1 ttl=63 time=0 ms
64
bytes from 10.8.4.100: icmp_seq=2 ttl=63 time=0 ms
64
bytes from 10.8.4.100: icmp_seq=3 ttl=63 time=0 ms
^C
---
10.8.4.100 ping statistics ---
4
packets transmitted, 4 packets received, 0% packet loss
round-trip
min/avg/max = 0/0/0 ms
Testing LPM with HNV
With the IP now assigned to the NIB, en2 interface and a successful ping test completed, we’re ready to test LPM with the HNV configuration.
Remember, when we use LPM to migrate the LPAR to another server, we’re expecting the NIB interface to failover to the VEA adapter, ent3, and, when the LPM is finished, the NIB should fallback to the primary adapter, ent1 (which is the SR-IOV VF adapter). All of this should happen automatically.
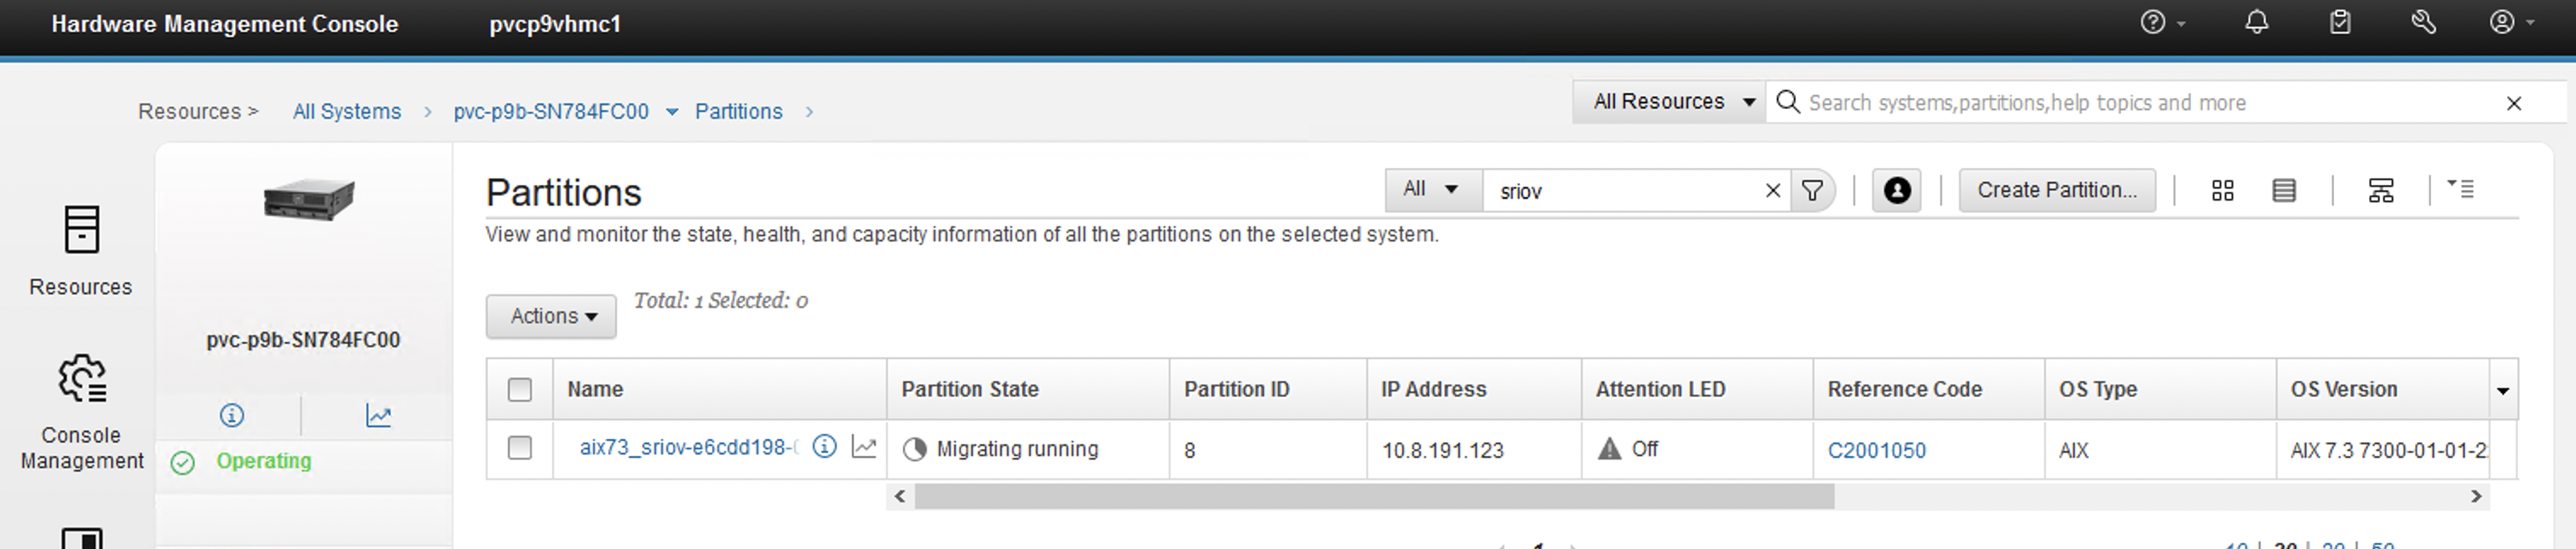
Our AIX LPAR currently resides on the Power server named pvc-p9b-SN784FC00.

We will use LPM to move the LPAR to another Power server named pvc-p9a-SN78443EX.
devroot@pvcp9vhmc1:~>
migrlpar -o v -m pvc-p9b-SN784FC00 -t pvc-p9a-SN78443EX -p aix73_sriov-e6cdd198-0000002a
--migsriov 1
devroot@pvcp9vhmc1:~>
echo $?
0
devroot@pvcp9vhmc1:~>
migrlpar -o m -m pvc-p9b-SN784FC00 -t pvc-p9a-SN78443EX -p
aix73_sriov-e6cdd198-0000002a --migsriov 1
devroot@pvcp9vhmc1:~>
echo $?
0
The last migrlpar flag is a new option called migsriov. When validating or migrating partitions, use this option to specify whether the management console is required to recreate each partition’s migratable SR-IOV logical ports on the destination managed system.
We can use this option to specify whether the HMC is required to recreate each partition’s HNV migratable SR-IOV logical port on the destination server. You can specify either 1 or 2 with this flag.
If you specify 1, the HMC is required to recreate the HNV migratable SR-IOV logical port on the destination server.
If you specify 2, the HMC is not required to recreate the HNV adapter but will try to do so if possible. But if it is unable to, move the LPAR regardless.
If you specify 1, and the HMC is unable configure the HNV adapter on the destination server, then an error is displayed and the LPM operation will fail for the LPAR.
The default value for this option is 1, so it is only included here for demonstration purposes.
Source system – LPAR is migrating away
Destination system – LPAR is arriving
The AIX entstat command shows that the NIB failover has occurred before LPM to the other system.
root@aix73-sriov
/ # entstat -d ent2 | grep channel
Active channel: primary channel <
Before LPM
root@aix73-sriov
/ # entstat -d ent2 | grep channel
Active channel: backup channel <
During LPM
The AIX entstat command and the AIX errpt both report that the NIB fallover and fallback occurred. With failover occurring while the LPM was running, and the fallback occurred after the LPM was successfully completed.
root@aix73-sriov
/ # entstat -d ent2 | grep channel
Active
channel: primary channel
root@aix73-sriov
/ # errpt
IDENTIFIER
TIMESTAMP T C RESOURCE_NAME DESCRIPTION
8650BE3F 0417030423 I H ent2 ETHERCHANNEL RECOVERY
159D686C 0417030323 I S pmig Client Partition Migration Completed
F2646817 0417030323 I S pmig Client Partition Migration Started
59224136 0417030323 P H ent2 ETHERCHANNEL FAILOVER
root@aix73-sriov
/ # errpt -a | grep All
All
primary EtherChannel adapters failed: switching over to backup adapter
root@aix73-sriov
/ # errpt -a | grep prim
A
primary adapter in the EtherChannel recovered: returning to main channel
We observe that the HNV config was successfully recreated during LPM by reviewing the partition profile details and looking under the SR-IOV Logical Ports tab.
We can also view the LPARs’ HNV configuration, on the destination system, using the HMC cli and the lshwres command, as shown below.
devroot@pvcp9vhmc1:~>
lshwres -r sriov -m pvc-p9a-SN78443EX --rsubtype logport --level eth
config_id=0,lpar_name=aix73_sriov-e6cdd198-0000002a,lpar_id=8,lpar_state=Running,is_required=1,adapter_id=1,logical_port_id=27004003,logical_port_type=eth,drc_name=PHB
4099,location_code=U78D2.001.WZS0WH0-P1-C7-T1-S3,functional_state=1,phys_port_id=0,debug_mode=0,diag_mode=0,huge_dma_window_mode=0,capacity=2.0,max_capacity=100.0,promisc_mode=0,mac_addr=26dab42a4500,curr_mac_addr=26dab42a4500,allowed_os_mac_addrs=all,allowed_vlan_ids=all,port_vlan_id=691,migratable=1,backup_device_slot_num=4,backup_device_type=veth,backup_veth_vnetwork=691-ETHERNET0,is_vnic_backing_device=0
Changing AIX IP configuration (permanently) for HNV
Recall that we temporarily assigned (transferred) the IP address from en0 to en2. In this state, if we rebooted/restarted the LPAR, the IP configuration would revert and the IP address would, again, be configured on the en0 interface, which is not desirable.
The en0 VEA interface ODM entry still contains the IP
address information.
root@aix73-sriov
/ # lsattr -El en0
alias4 IPv4 Alias including
Subnet Mask True
alias6 IPv6 Alias including
Prefix Length True
arp on Address Resolution Protocol
(ARP) True
authority Authorized Users True
broadcast Broadcast Address True
monitor off Enable/Disable monitor for virtual
Ethernet True
mtu 1500 Maximum IP Packet Size for This
Device True
mtu_bypass on Enable/Disable largesend for
virtual Ethernet True
netaddr 10.8.191.123 Internet Address True
netaddr6 IPv6 Internet Address True
netmask 255.255.255.0 Subnet Mask True
prefixlen Prefix Length for IPv6
Internet Address True
remmtu 576 Maximum IP Packet Size for REMOTE
Networks True
rfc1323 Enable/Disable TCP RFC
1323 Window Scaling True
security no Security Level True
state up Current Interface Status True
tcp_mssdflt Set TCP Maximum Segment
Size True
tcp_nodelay Enable/Disable TCP_NODELAY
Option True
tcp_recvspace Set Socket Buffer Space for
Receiving True
tcp_sendspace Set Socket Buffer Space for
Sending True
thread off Enable/Disable thread attribute True
The en2 NIB interface ODM entry does not contain the IP
address information.
root@aix73-sriov
/ # lsattr -El en2
alias4 IPv4 Alias including Subnet
Mask True
alias6 IPv6 Alias including Prefix
Length True
arp on
Address Resolution Protocol (ARP) True
authority Authorized Users True
broadcast Broadcast Address True
monitor off
Enable/Disable monitor for virtual Ethernet True
mtu 1500 Maximum IP Packet Size for This
Device True
mtu_bypass on
Enable/Disable largesend for virtual Ethernet True
netaddr Internet Address True
netaddr6 IPv6 Internet Address True
netmask Subnet Mask True
prefixlen Prefix Length for IPv6 Internet
Address True
remmtu 576
Maximum IP Packet Size for REMOTE Networks True
rfc1323 Enable/Disable TCP RFC 1323 Window
Scaling True
security none Security Level True
state down Current Interface Status True
tcp_mssdflt Set TCP Maximum Segment Size True
tcp_nodelay Enable/Disable TCP_NODELAY Option True
tcp_recvspace Set Socket Buffer Space for
Receiving True
tcp_sendspace Set Socket Buffer Space for Sending True
thread off
Enable/Disable thread attribute True
root@aix73-sriov
/ #
To configure the IP address permanently on en2, and to ensure it is preserved on system restarts, we need to remove the IP configuration from the AIX ODM, for en0 (VEA). Then we need to add the IP configuration details to the ODM for en2 (NIB).
We use the AIX chdev command to configure the IP information for the en2 interface into the ODM. Note that we use the -P flag to only update the ODM. We do this because the IP address is already configured and active on the en2 interface and we only need to store the information in the ODM, not configure it online.
root@aix73-sriov
/ # chdev -l en2 -a netaddr=10.8.191.123 -a netmask=255.255.255.0 -a
state=up -P
en2
changed
root@aix73-sriov
/ # lsattr -El en2
alias4 IPv4 Alias including
Subnet Mask True
alias6 IPv6 Alias including Prefix Length True
arp on Address Resolution Protocol
(ARP) True
authority Authorized Users True
broadcast Broadcast Address True
monitor off Enable/Disable monitor for virtual
Ethernet True
mtu 1500 Maximum IP Packet Size for This
Device True
mtu_bypass on Enable/Disable largesend for
virtual Ethernet True
netaddr 10.8.191.123 Internet Address True
netaddr6 IPv6 Internet Address True
netmask 255.255.255.0 Subnet Mask True
...
We use the AIX rmdev command to remove the en0 interface from the ODM and then we run the cfgmgr command to reconfigure the device and ensure the IP information is no longer in the ODM.
root@aix73-sriov
/ # rmdev -dl en0
en0
deleted
root@aix73-sriov
/ # cfgmgr
root@aix73-sriov
/ # lsattr -El en0
alias4 IPv4 Alias including Subnet
Mask True
alias6 IPv6 Alias including Prefix
Length True
arp on
Address Resolution Protocol (ARP) True
authority Authorized Users True
broadcast Broadcast Address True
monitor off
Enable/Disable monitor for virtual Ethernet True
mtu 1500 Maximum IP Packet Size for This
Device True
mtu_bypass on
Enable/Disable largesend for virtual Ethernet True
netaddr Internet Address True
netaddr6 IPv6 Internet Address True
netmask Subnet Mask True
...
Reviewing the AIX NIB configuration
To view the AIX NIB details and statistics, we can use the AIX entstat command. For example, the command below displays the configured VLAN/PVID for the NIB devices, ent1 (VF) and ent3 (VEA).
root@aix73-sriov
/ # entstat -d ent2 | grep -i vlan
Port
VLAN (Priority:ID): 7:0691 <<<
SRIOV VF
VLAN
ACL Status: Disabled
Enabled
VLAN IDs: None
Invalid
VLAN ID Packets: 0
Port
VLAN ID: 691 <<<< VEA
VLAN
Tag IDs: None
..
In the example below the entstat command display both the Primary and Backup Adapters for the NIB, as well as the VLAN/PVID for each adapter.
root@aix73-sriov
/ # entstat -d ent2
-------------------------------------------------------------
ETHERNET
STATISTICS (ent2) :
Device
Type: EtherChannel
Hardware
Address: ee:ed:fe:01:34:04
Elapsed
Time: 0 days 0 hours 29 minutes 27 seconds
Transmit
Statistics:
Receive Statistics:
-------------------- -------------------
Packets:
1381
Packets: 1673
Bytes:
260608
Bytes: 157053
Interrupts:
18
Interrupts: 1570
Transmit
Errors: 0
Receive Errors: 0
Packets
Dropped: 0
Packets Dropped: 0
...
Statistics
for every adapter in the EtherChannel:
-------------------------------------------------
Number
of primary adapters: 1
Number
of backup adapters: 1
Active
channel: primary channel
Operating
mode: Standard mode
MAC
swap: disabled
=============================================================
PRIMARY ADAPTERS
=============================================================
-------------------------------------------------------------
ETHERNET
STATISTICS (ent1) :
Device
Type: 10GbE SFP+ SR PCIe3 Converged Network Adapter VF
Hardware
Address: ee:ed:fe:01:34:04
...
10GbE
SFP+ SR PCIe3 Converged Network Adapter VF
-------------------------------------------------------------
Device
Statistics:
------------------
Device
ID: df1028e214100f04
Version:
1
Physical
Port Link Status: Up
Logical
Port Link Status: Up
Physical
Port Speed: 10 Gbps Full Duplex
...
Port
VLAN (Priority:ID): 7:0691
...
=============================================================
BACKUP ADAPTERS
=============================================================
-------------------------------------------------------------
ETHERNET
STATISTICS (ent3) :
Device
Type: Virtual I/O Ethernet Adapter (l-lan)
Hardware
Address: ee:ed:fe:01:34:04
...
Port
VLAN ID: 691
...
AIX alog configuration logs
During the automatic configuration of the AIX NIB interface, AIX captures debug information to the cfg alog file. You can view the commands that were run to configure the devices and the NIB, using the alog command. The alog log files are saved to /var/adm/ras on you AIX system.
For example, the output below shows some of the initial commands used to dynamically configure the NIB interface.
Creating the NIB device with primary adapter ent1 (VF):
root@aix73-sriov
/var/adm/ras # alog -ot cfg | grep ent2
MS
11862378 11928014 21:34:30.231 /usr/lib/methods/chgvlan -l ent2 -a
base_adapter=ent1 vlan_tag_id=691
MS
11862380 11928014 21:34:30.237 /usr/lib/methods/cfgvlan -l ent2
MS
11927808 7209440 21:52:54.474 /usr/lib/methods/chgent -l ent2 -a
adapter_names=ent1
M0 10682842 21:52:54.502 cfghcn.c 139 hcn_add_prim: Created new ech ent2 with
adapter_names ent1
...
Creating the backup device ent3, slot 4 (VEA):
root@aix73-sriov
/var/adm/ras # alog -ot cfg | grep U9009.42G.784FC00-V8-C4
CS
10617238 11010446 21:52:54.987 /usr/sbin/drmgr -a -c slot -s
U9009.42G.784FC00-V8-C4 -w 5 -d 1
CS
10617238 11010446 21:52:54.999 /usr/sbin/drmgr -a -c slot -s
U9009.42G.784FC00-V8-C4 -w 5 -d 1
C4
10617238 21:52:55.000 drc_name: U9009.42G.784FC00-V8-C4
C4
10617238 21:52:55.015 checking for U9009.42G.784FC00-V8-C4 in all=0x2002fd48
...
MS
7864614 8716722 00:43:44.131 /usr/lib/methods/cfgvioent -l ent3
M4
7864614 00:43:44.131 Parallel mode = 1
M4
7864614 00:43:44.131 Get CuDv for ent3
M4
7864614 00:43:44.131 Get device PdDv, uniquetype=adapter/vdevice/IBM,l-lan
M4
7864614 00:43:44.131 Get parent CuDv, name=vio0
...
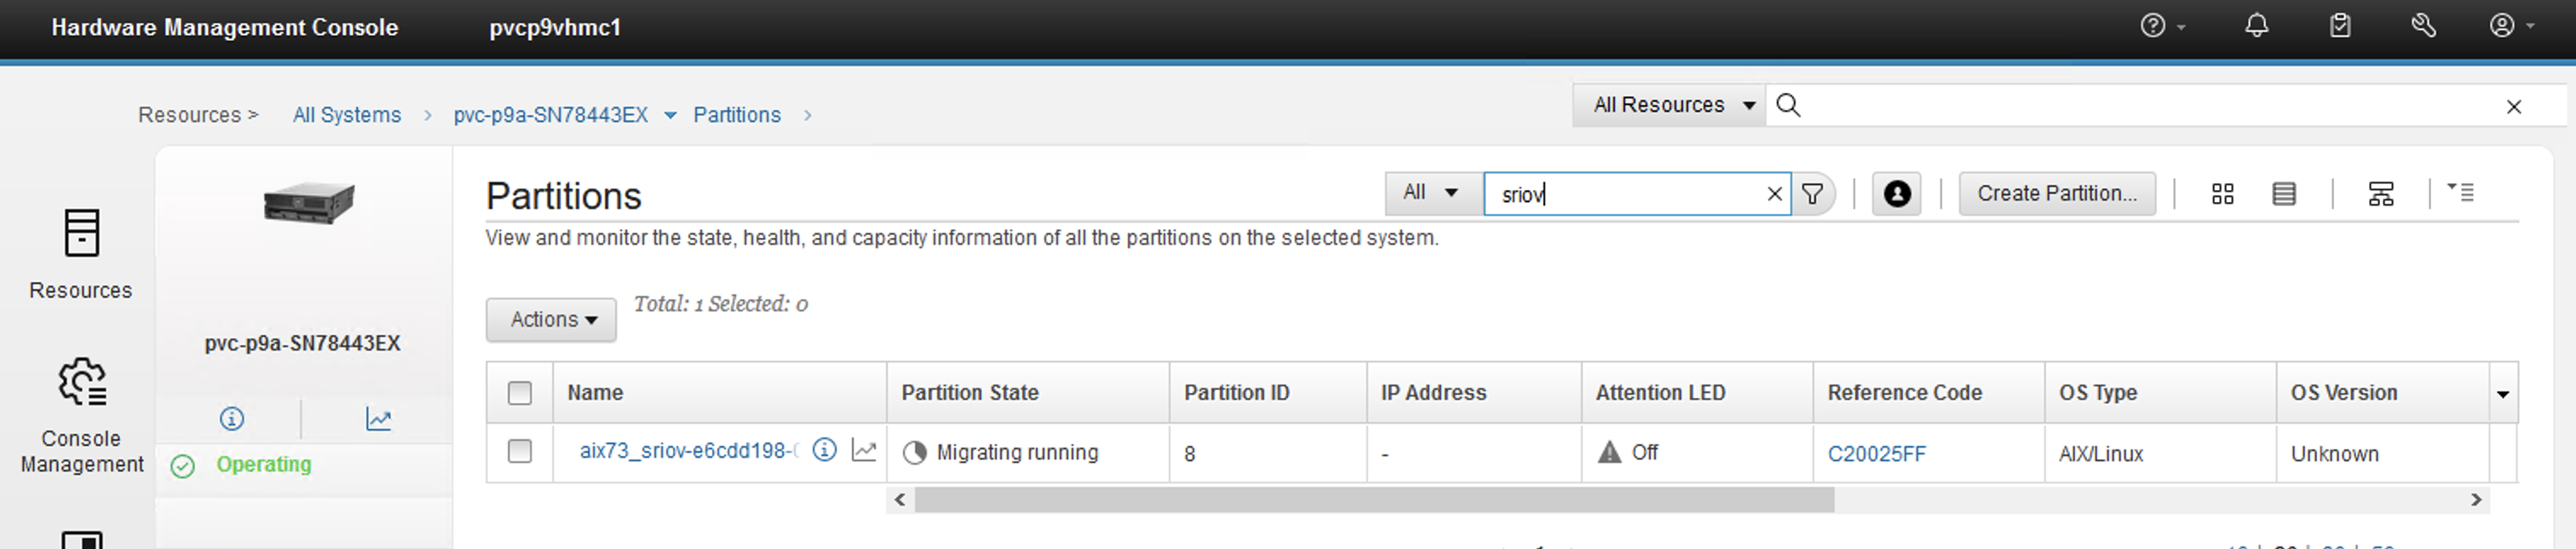
Viewing HNV configuration for a Managed System
You can view the HNV configuration for a managed system by looking at the information displayed under PowerVM -> Hardware Virtualized I/O.
In this view you can see all the SRIOV logical ports that have been configured in the entire system, where they have been assigned and whether they are migratable (i.e., HNV capable).
Click on Hardware Virtualized I/O and select the SRIOV adapter from the drop down list.
The Logical Ports view provides a list of all the partitions that have SR-IOV logical ports assigned and if they are Migratable. In the visual below, we can see that the LPAR named aix73_sriov-e6cdd198-0000002a has a logical port assigned and it is Migratable (Yes). This LPAR is configured for HNV, can take advantage of the high performance SRIOV adapter and participate in LPM (mobility) operations.

Monitoring dynamic HNV NIB changes on AIX during LPM
During a mobility operation, such as LPM, the HNV capable LPAR will automatically failover to the backup adapter for the HNV adapter.
For example, when the LPM operation is initiated, the HNV adapter will automatically failover to the backup adapter, which in our example was the Virtual Ethernet Adapter (in slot 4). Once the NIB failover is completed successfully, the primary adapter, which is the SRIOV logical port (or VF adapter as it is also known), is dynamically removed from the LPAR. At this point the LPAR can live migrate to the other server. Once the LPAR has arrived and is operating on the destination server, a new SRIOV logical port (VF adapter) is assigned to the LPAR and is, once again, introduced into the HNV NIB configuration as the primary adapter. At which point, the NIB automatically performs a fallback to the primary interface. This completed the LPM operation for a HNV capable LPAR.
We can monitor this process during a LPM operation. If we run the following small script, we can monitor the dynamic removal and addition of the VF adapter on the AIX LPAR.
; Small while loop to monitor the NIB status:
#
while true
do
echo
echo ==
lsdev -Cc adapter | grep ^ent
lscfg -vpl ent1 | grep ent
entstat -d ent2 | grep channel
echo ==
sleep
5
echo
done
==
ent0 Available Virtual I/O Ethernet Adapter (l-lan)
ent1 Available 0E-00 PCIe3 10GbE SFP+ SR 4-port
Converged Network Adapter VF (df1028e214100f04) < Primary adapter
for NIB before LPM
ent2 Available EtherChannel / IEEE 802.3ad Link
Aggregation < NIB adapter
ent3 Available Virtual I/O Ethernet Adapter
(l-lan) < Backup adapter
for NIB
ent1
U78D2.001.WZS124V-P1-C7-T1-S15
PCIe3 10GbE SFP+ SR 4-port Converged Network Adapter VF
(df1028e214100f04) <
Primary adapter slot and logical port numbers
Active
channel: primary channel <
Primary adapter is active before LPM
==
...
==
ent0 Available Virtual I/O Ethernet Adapter (l-lan)
ent1 Available 0E-00 PCIe3 10GbE SFP+ SR 4-port
Converged Network Adapter VF (df1028e214100f04) <
Before LPM
ent2 Available EtherChannel / IEEE 802.3ad Link
Aggregation
ent3 Available Virtual I/O Ethernet Adapter (l-lan)
ent1
U78D2.001.WZS124V-P1-C7-T1-S15
PCIe3 10GbE SFP+ SR 4-port Converged Network Adapter VF
(df1028e214100f04)
Active channel: primary channel
==
...
==
ent0 Available
Virtual I/O Ethernet Adapter (l-lan)
ent2 Available
EtherChannel / IEEE 802.3ad Link Aggregation <
Primary SRIOV adapter removed by DLPAR. Ready for LPM
ent3 Available
Virtual I/O Ethernet Adapter (l-lan)
lscfg: device ent1 not found. < Primary
adapter, ent1 has been removed for LPM
Active channel: backup channel < Backup adapter
is now active. Ready for LPM
==
…
==
ent0 Available Virtual I/O Ethernet Adapter (l-lan)
ent1 Available 0E-00 PCIe3 10GbE SFP+ SR 4-port
Converged Network Adapter VF (df1028e214100f04) <
SRIOV VF adapter added by DLPAR after LPM
ent2 Available EtherChannel / IEEE 802.3ad Link
Aggregation
ent3 Available Virtual I/O Ethernet Adapter (l-lan)
ent1 U78D2.001.WZS124V-P1-C7-T1-S7 PCIe3 10GbE SFP+ SR 4-port Converged Network
Adapter VF (df1028e214100f04) < SRIOV LP dynamically configured after LPM
Active channel: primary channel < Primary adapter active
again after LPM
==
Alternatively, we can simply monitor for the removal and addition of the primary adapter to the NIB device. Below is another small script to monitor the changes to the primary and backup adapters in the NIB interface, during LPM
#
while true
do
echo
echo ==
lsattr -El ent2 | grep -E 'backup_|er_'
entstat -d ent2 | grep channel
echo ==
sleep
5
echo
done
==
adapter_names ent1 EtherChannel
Adapters True < Primary adapter, ent1, SRIOV VF adapter before LPM
backup_adapter ent3 Adapters to
use when the primary channel fails True < Backup adapter, ent3, VEA
Active
channel: primary channel <
Primary adapter, ent1, is active before LPM
==
==
adapter_names NONE EtherChannel
Adapters True < Primary adapter dynamically
removed during LPM
backup_adapter ent3
Adapters to use when the primary channel fails True
Active
channel: backup channel < Backup adapter now active during LPM
==
…
==
adapter_names NONE EtherChannel Adapters True
backup_adapter ent3
Adapters to use when the primary channel fails True
Active channel: backup channel
==
…
==
adapter_names NONE EtherChannel Adapters True
backup_adapter ent3
Adapters to use when the primary channel fails True
Active channel: backup channel
==
...
==
adapter_names ent1 EtherChannel Adapters True <
Primary (SRIOV VF) adapter dynamically added after LPM
backup_adapter ent3
Adapters to use when the primary channel fails True
Active channel: primary channel <
Primary adapter active again, after LPM
==
This article has provided an example of configuring HNV for an existing AIX LPAR. It also demonstrated Live Partition Mobility with HNV and AIX. If you would like to learn more about PowerVM’s SR-IOV, vNIC or HNV technology, please consider attending the following, formal, IBM training classes. Both classes cover SR-IOV in detail and are highly recommended:
AN30G IBM PowerVM: Implementing Virtualization
https://www.ibm.com/training/course/AN30G
AN31G IBM PowerVM II: Virtualization: Advanced PowerVM
Management and Performance
https://www.ibm.com/training/course/AN31G
Thanks for reading!
References:
Adding SR-IOV logical ports
https://www.ibm.com/docs/en/power10/9080-HEX?topic=settings-adding-sr-iov-logical-ports
migrlpar