IBMs PowerVP tool became available in November 2013. It was designed to provide Power Systems administrators with performance information in an enhanced visual format. The aim was to accelerate the identification of performance bottlenecks so that performance analysts could make better decisions based on more detailed and comprehensive data from POWER7 (and POWER8) systems. PowerVP presents both System (frame) and Partition level views of performance data. This has not been possible in the past using any single tool. Administrators would typically need to use many different tools and interfaces to obtain a single, system-wide performance view across an entire CEC and to drill down to all individual partitions.
The tool was originally developed for IBM internal use only (known as Sleuth) which helped the IBM development team with rapid development of prototype technology and performance analysis. After a brief demonstration of the tool during an internal, invitation only, event for customers at IBM Austin, almost all of the customer attendees requested that the tool be made available for use outside of IBM.
In this post I will briefly discuss how to quickly install and configure PowerVP in an AIX environment. I will start by discussing how to install the PowerVP GUI on a Windows laptop and then cover to how to install the PowerVP agents on an AIX and/or VIOS partition. I’ll then show you how to monitor your system and collect system wide metrics for an entire frame by recording and playing back your PowerVP sessions.
I’ve written about PowerVP a few times on my blog. First I discussed the challenge I had installing a PowerVP service pack, then how to display VCPU affinity and finally how to collect PowerVP System level data from the AIX command line. Each of these posts referred to version 1.1.2. of PowerVP. In June of 2015, IBM released PowerVP version 1.1.3. I upgraded by lab environment to this version recently and found that the product and its interface had changed quite a bit. I will discuss the changes and new features at the end of this post.
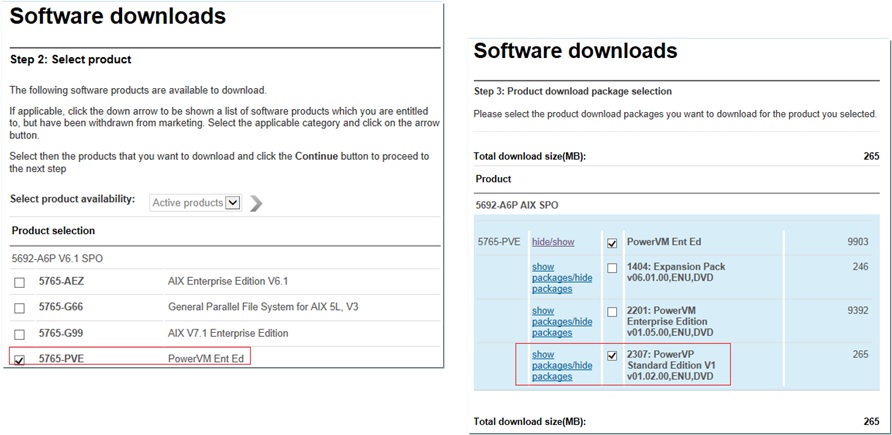
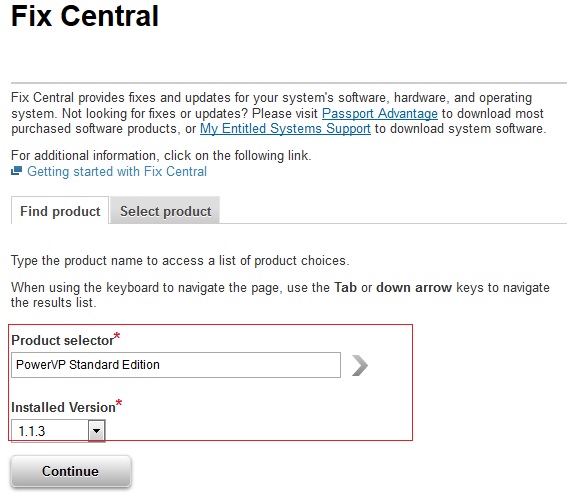
To begin, let’s download, extract and install the latest version of PowerVP. Customers that are entitled (PowerVM Enterprise Edition customers) can download the PowerVP software directly from the IBM Entitled Systems Support (ESS) website.
http://www-304.ibm.com/servers/eserver/ess/index.wss
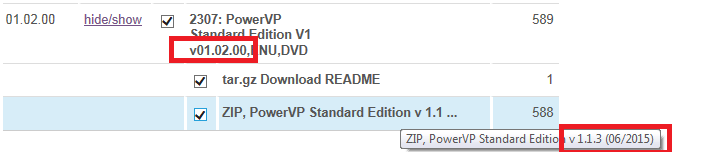
You can be forgiven for thinking that the latest version of PowerVP isn’t available in ESS but if you look closely and expand everything out, you’ll find v1.1.3 is listed for download.
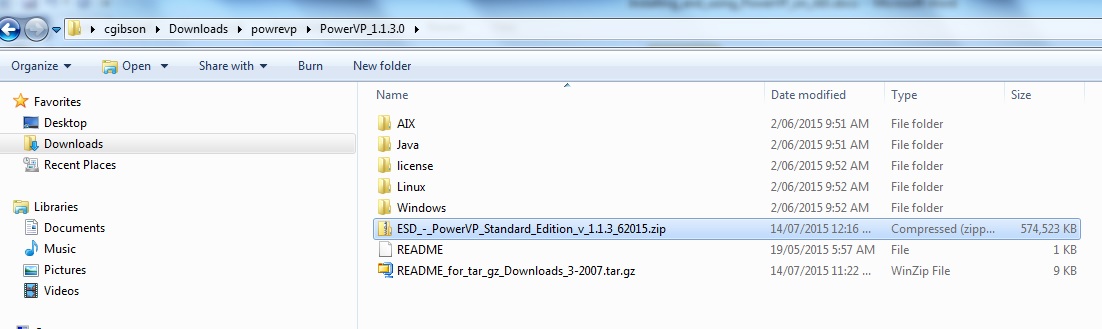
Once you’ve downloaded the software you’ll end up with a PowerVP package that is named something similar to ESD_-_PowerVP_Standard_Edition_v_1.1.3_62015.zip. Extract the zip file and you’ll discover the following directory structure:
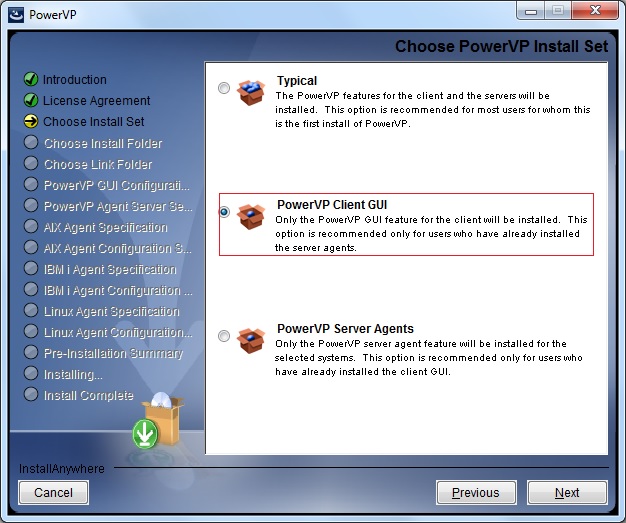
To install the PowerVP GUI for Windows, simply run the PowerVP.exe from the Windows folder. Choose PowerVP Client GUI and click next.
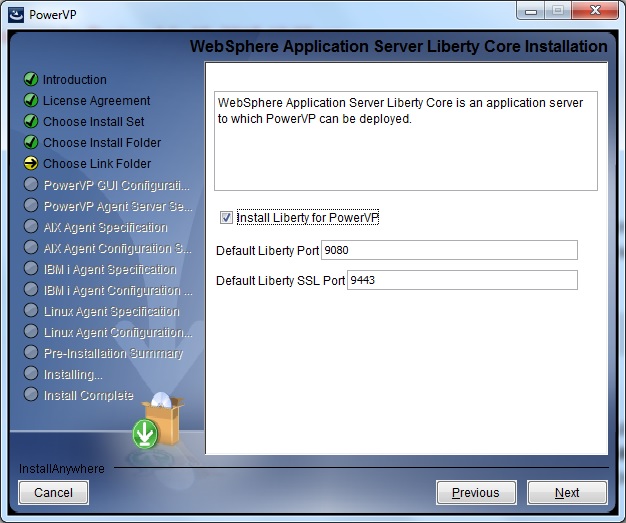
When prompted, select to install Liberty for PowerVP as part of the GUI installation. The IBM PowerVP Redbook explains why:
“Starting with Version 1.1.3 PowerVP has a web based GUI. It is packaged in the Web Application Archive (WAR) format and it must be deployed onto an application server. By default, PowerVP GUI uses IBM WebSphere® Application Server Liberty Core. Liberty profile is a new server profile of IBM WebSphere Application Server V8.5. Liberty profile provides all features required to run the PowerVP, it is lightweight, has a small footprint and fast startup time. PowerVP and a configured Liberty profile are packaged into a compressed file. This provides for an easy and efficient distribution and a simplified installation procedure. Because the new PowerVP GUI is web based it is now possible that a single instance of this GUI be accessed by multiple users using web browsers. This eliminates the need to install a console for each PowerVP user and avoids the potential overhead generated by additional performance data requests initiated from multiple consoles. PowerVP users can connect to the web GUI using web browsers. Users must be able to connect to the ports on which the application server is listening. Default port numbers are 9080 for HTTP traffic and 9443 for HTTPS traffic. Port numbers can be changed during the installation process.”
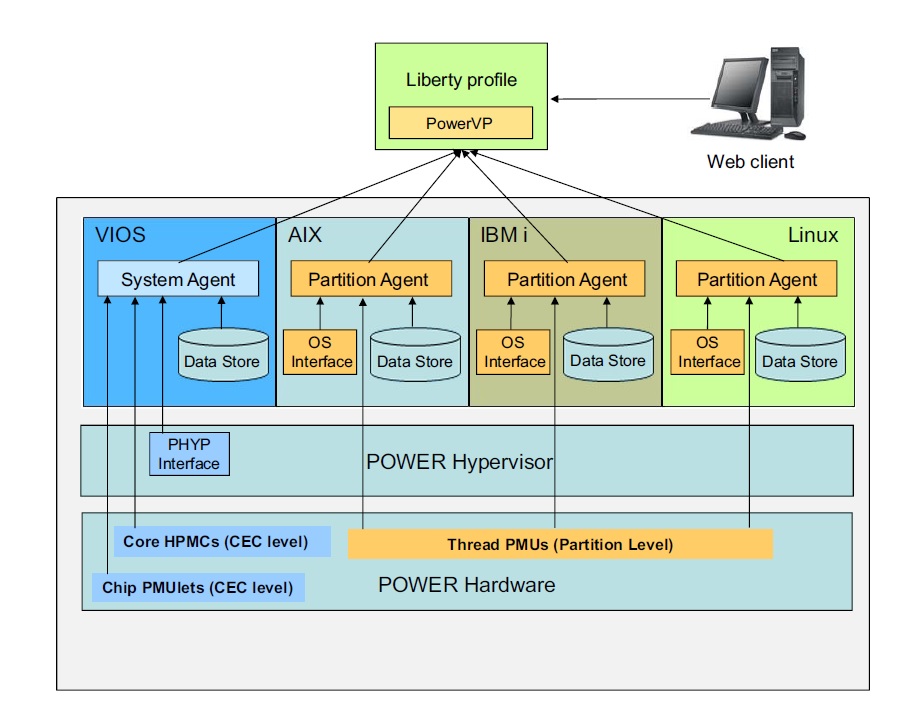
The following diagram, also from the Redbook, provides a visual representation as to where Liberty fits in with the new GUI, the System and Partition level agents.
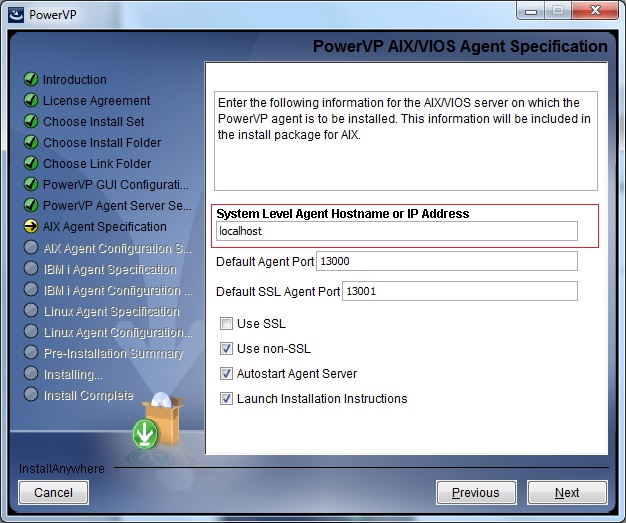
Once the GUI is installed on your Windows desktop, the next step is to extract the PowerVP agent for AIX/VIOS. To do this you, once again, run the PowerVP.exe installer. Select PowerVP Server Agents and click next.

Select AIX/VIOS and click next.

When prompted for a System Level Agent Hostname or IP Address, you can enter anything here as it is ignored. All we want to do here is extract the installation software, not connect to an agent. I entered localhost, even though this is not where the PowerVP agent will reside. Click next.
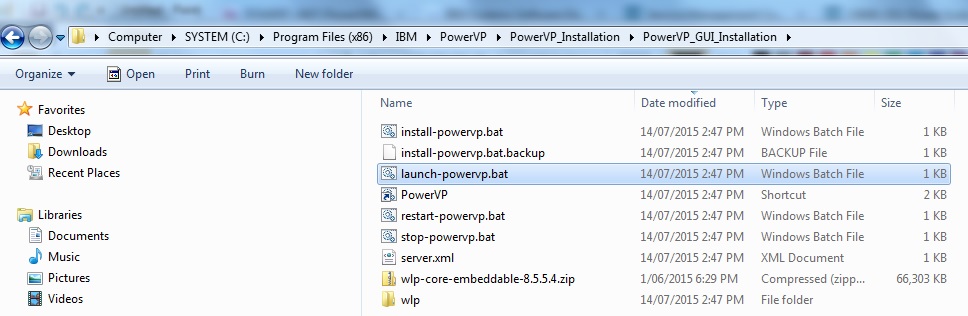
Once the install process is complete you’ll find the extracted AIX/VIOS installation filesets in the C:\Program Files (x86)\IBM\PowerVP\PowerVP_Installation\PowerVP_Agent_Installation_Instructions\AIX directory.
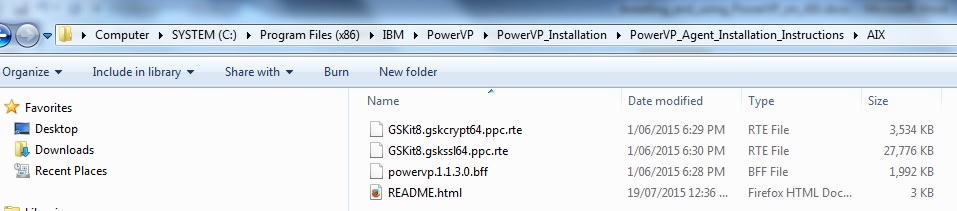
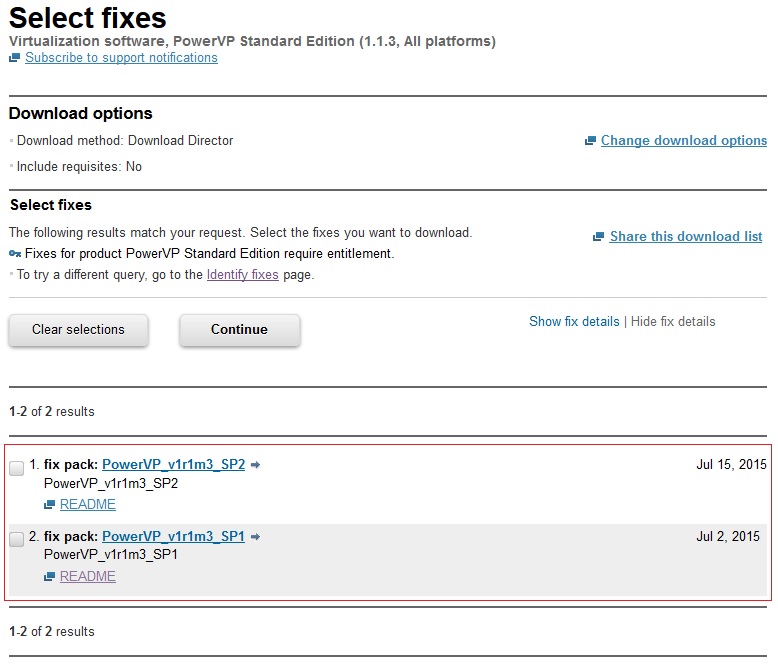
You can now transfer these files to your AIX and/or VIOS system of choice, essentially wherever you’d like to install and run the PowerVP server agent and any partitions you’d like to monitor as a partition level agent. Many customers have chosen to install the PowerVP System level agent on their VIOS. This seems like a logical place to install it as these systems are typically always up and available. Ensure that you copy the powervp.1.1.30.bff fileset and the the GSKit filesets to the destination system, as both are needed for installation. Of course, you should download and install the latest fixes for PowerVP from the IBM Fix Central site as well.
http://www-933.ibm.com/support/fixcentral/
The agent installation on AIX is very simple. Make sure that your hardware and system firmware support PowerVP before you install it. The IBM Redbook, IBM PowerVP Introduction and Technical Overview REDP-5112-00, has a comprehensive list of supported systems and minimum requirements.
http://www.redbooks.ibm.com/abstracts/redp5112.html?Open
If you attempt to install PowerVP on a POWER system that does not have the correct firmware level, you will see the following message in the /var/log/powervp.log file.
# cat /var/log/powervp.log
2014-02-14 15:28:01.844 Error - MSG0047: MSG0205: System does not support the required interfaces. Firmware version 7.7 or greater is required.. [syslet.C:6090]
Ensure that Allow performance information collection is ticked on the LPARs properties. If this box is not checked the System level agent will fail to start with the following error.
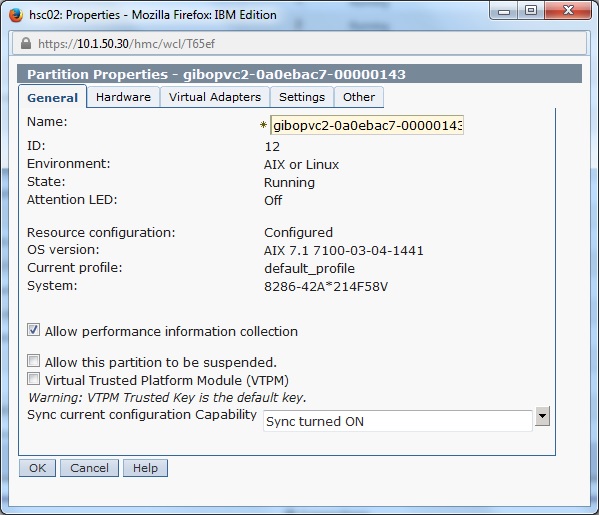
2015-07-23 04:57:42.634 Error - syslet- Gpci_tools- Partition is not authorized to collect system-wide performance metrics. Enable the 'Allow performance information collection' partition property using the Hardware Management Console.. [syslet.C:11470]
To install the agent on an AIX or VIOS partition, simply copy the filesets to the system and use installp to install both the GSKit and powervp filesets. The GSKit filesets are required for SSL support with PowerVP. Even if you don’t plan on using SSL with PowerVP, these filesets must be installed when powervp.rte is installed, regardless.
$ ioslevel
2.2.3.3
$ r oem
# installp -agXd . powervp.rte
+-----------------------------------------------------------------------------+
Pre-installation Verification...
+-----------------------------------------------------------------------------+
Verifying selections...done
Verifying requisites...done
Results...
…
Installation Summary
--------------------
Name Level Part Event Result
-------------------------------------------------------------------------------
GSKit8.gskcrypt64.ppc.rte 8.0.50.42 USR APPLY SUCCESS
GSKit8.gskssl64.ppc.rte 8.0.50.42 USR APPLY SUCCESS
powervp.rte 1.1.3.0 USR APPLY SUCCESS
powervp.rte 1.1.3.0 ROOT APPLY SUCCESS
powervp.rte 1.1.3.2 USR APPLY SUCCESS
[root@gibopvc2]/tmp/cg/pvp # lslpp -l GSK\*
Fileset Level State Description
----------------------------------------------------------------------------
Path: /usr/lib/objrepos
GSKit8.gskcrypt64.ppc.rte
8.0.50.42 COMMITTED IBM GSKit Cryptography Runtime
GSKit8.gskssl64.ppc.rte 8.0.50.42 COMMITTED IBM GSKit SSL Runtime With
Acme Toolkit
[root@gibopvc2]/tmp/cg/pvp #
[root@gibopvc2]/tmp/cg/pvp # lslpp -l powervp.rte
Fileset Level State Description
----------------------------------------------------------------------------
Path: /usr/lib/objrepos
powervp.rte 1.1.3.2 APPLIED PowerVP 1.1.3.2 Fixpack for
AIX
Path: /etc/objrepos
powervp.rte 1.1.3.0 COMMITTED PowerVP for AIX
With the agent installed successfully, you can simply start the PowerVP agent. No further configuration is required at this point. The agent will run as a System level agent and allow you to connect to it with the PowerVP client GUI.
# /etc/rc.d/rc2.d/SPowerVP
# cat /var/log/powervp.log
2015-07-19 04:52:21.911 S824VIO2 - running in partition server mode.
2015-07-19 04:52:23.019 Server running, waiting for clients to request data.
However, if you wanted to configure this agent as a Partition level agent, you need to run the PowerVP iconfig tool to point the Partition agent at an existing System level agent. For example, we could configure the newly installed agent to communicate with an existing System level agent at IP address 10.1.50.59. Then we start the agent using the SPowerVP script. We then confirm that the agent has registered with the System level agent by reviewing the output in the /var/log/powervp.log file on the client partition.
[root@gibopvc2]/ # oslevel -s
7100-03-04-1441
[root@gibopvc2]/tmp/cg/pvp # /opt/ibm/powervp/iconfig Listen="* 13000" SystemLevelAgent=10.1.50.59
[root@gibopvc2]/tmp/cg/pvp # grep SystemLevelAgent /etc/opt/ibm/powervp/powervp.conf
# sample interval from the system level agent. (See SystemLevelAgent
# SystemLevelAgent [hostname-or-address [port [ssl]]]
# connect to the system level agent. Up to two SystemLevelAgents
SystemLevelAgent 10.1.50.59
[root@gibopvc2]/tmp/cg/pvp # /etc/rc.d/rc2.d/SPowerVP
[root@gibopvc2]/ # cat /var/log/powervp.log
2015-07-19 04:52:21.911 GIBOPVC2 - running in partition server mode.
2015-07-19 04:52:23.019 Server running, waiting for clients to request data.
2015-07-19 04:52:23.211 Host GIBOPVC2 successfully registered with syslet server 10.1.50.59.
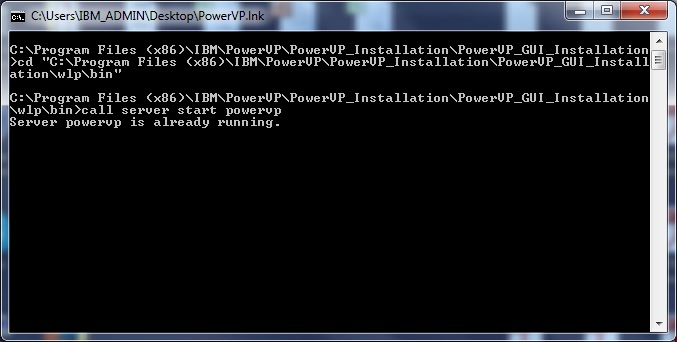
Now that the agent is installed we can connect to it with the PowerVP GUI. You can start the GUI by doubling clicking on the PowerVP icon on your Windows desktop. This starts the Liberty server, opens your web browser and connects you to the PowerVP interface.

You should see the following messages as the PowerVP GUI server is started on your Windows desktop/laptop.
Note: Please ensure that Java is in your path on your Windows machine. If it is not PowerVP will fail to start and you may be presented with an error stating that “javaw” cannot be found. You can check if Java is in the path by opening a DOS prompt and entering a java command For example:
C:\Users\ChrisG>java -version
java version "1.7.0"
Java(TM) SE Runtime Environment (build pwi3270sr9-20150417_01(SR9))
IBM J9 VM (build 2.6, JRE 1.7.0 Windows 7 x86-32 20150406_242981 (JIT enabled, A
OT enabled)
J9VM - R26_Java726_SR9_20150406_1443_B242981
JIT - tr.r11_20150401_88894
GC - R26_Java726_SR9_20150406_1443_B242981
J9CL - 20150406_242981)
JCL - 20150414_02 based on Oracle 7u79-b14
If java isn’t found from the DOS command line, then the following link provides some tips on how to resolve this problem.
https://www.java.com/en/download/help/path.xml
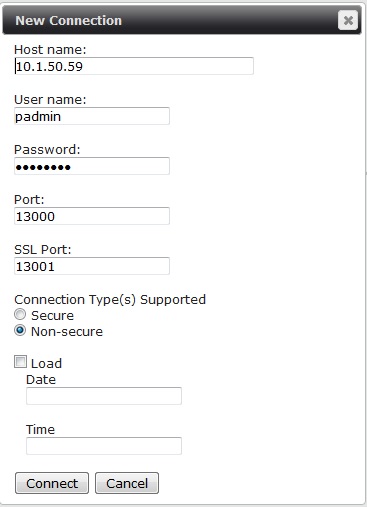
To connect to the System level agent, click on New Connection and enter the IP address or hostname of the partition running the System leve agent, followed by the user name and password of the root user (or padmin if running the agent on a VIOS). Then click on connect.
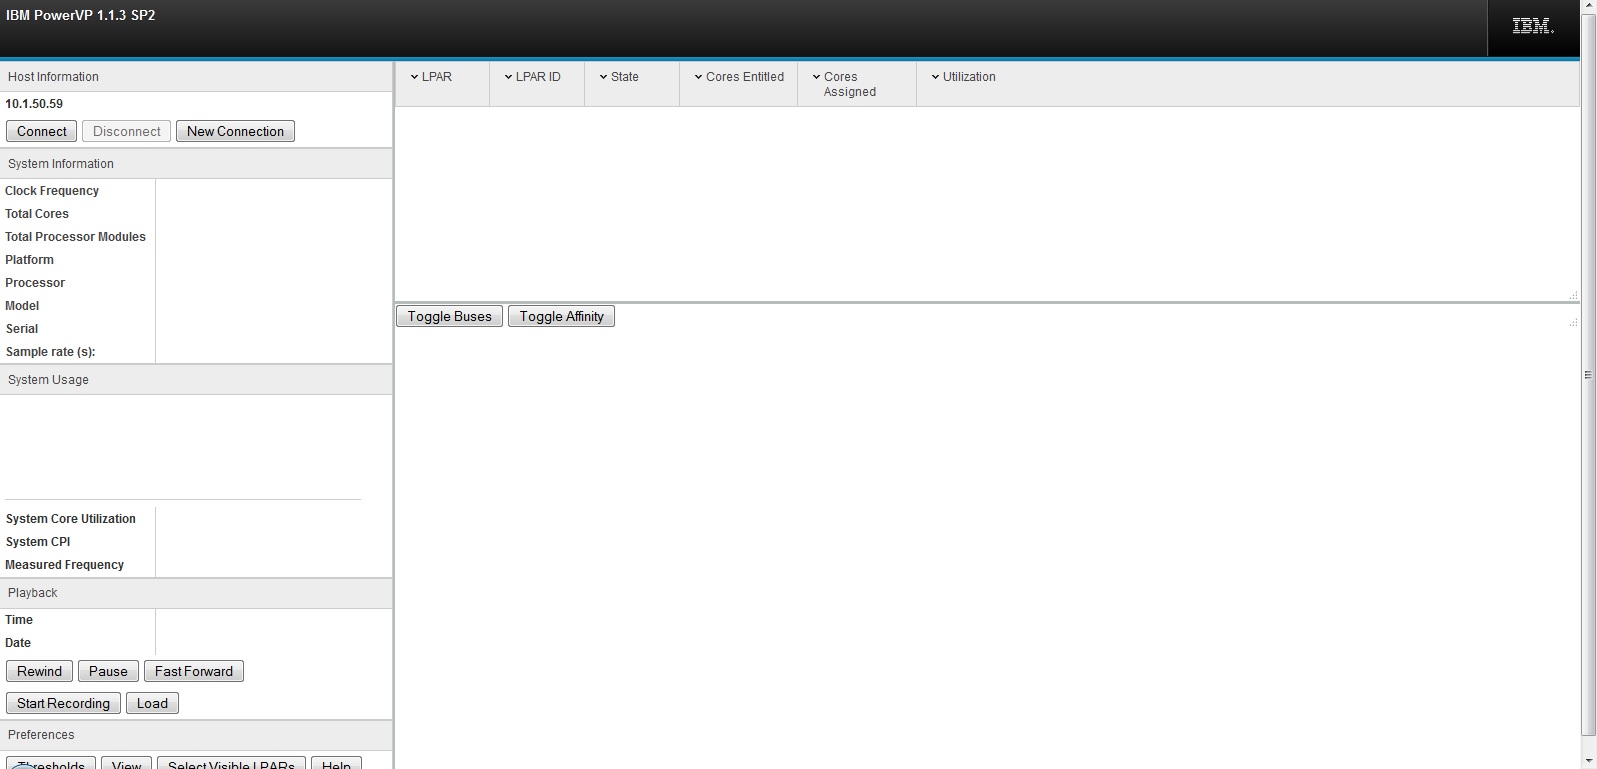
You will be presented with the PowerVP main panel. From here you can start exploring each of the main views available, such as System Topology, Node Drill Down and Partition Drill Down.

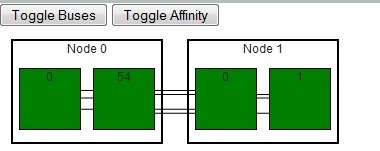
The System Topology view shows the hardware topology of the system we are connected to in the current session. In this view, we can see the topology of a POWER8 S824 with two processor modules. We can see each node has two chips/sockets. We can also see numbers in the boxes which indicate how busy each of the chips are on the system. The lines between the nodes show the traffic on the SMP fabric between each node. If you select Toggle Buses button, PowerVP GUI will show lines between the processor module boxes and processor nodes which represent buses. The Toggle Affinity button is intended to show affinity where every partition has a different colour.
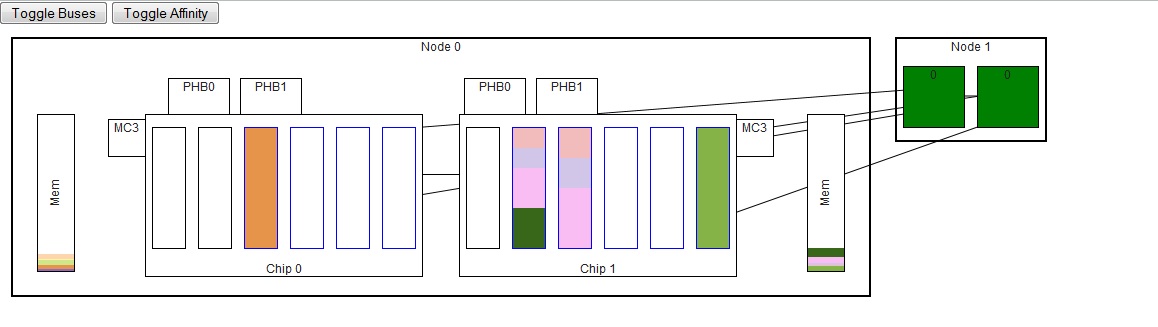
The Node Drill Down view appears when you click on one of the nodes and allows you to see the resources being consumed by the partitions running on the system. In this view we can see this processor module has 12 cores/processors. We can also see lines showing the buses between the chips. We can also see the memory controllers and the PHB buses which shows traffic to and from our remote I/O. We also see connecting to the other processor module; this is the SMP connections to other nodes and shows traffic.
The Partition Drill Down view allows us to drill down on resources being used by a specific partition that we clicked on. This view opens in a new tab in our web browser. In this view, we see CPU, Memory, Disk Iops, and Ethernet being consumed. We can also get an idea of cache and memory affinity (under Detailed LSU Breakdown).

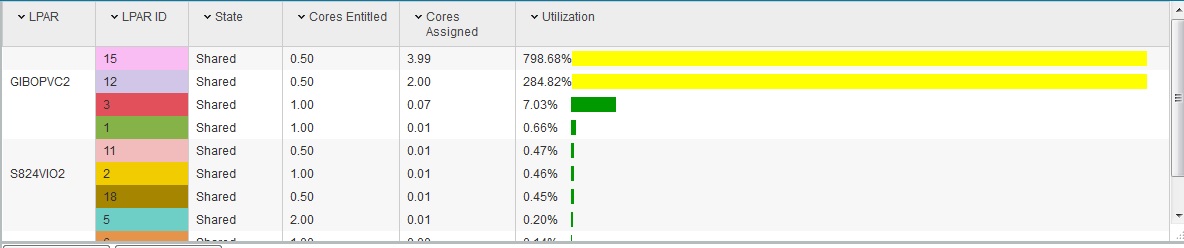
The main panel also provides you with a view of processor utilisation for each LPAR on the system. You can easily sort LPARs based on utilisation to quickly understand which LPARs are consuming the most (or least) CPU across a single system.
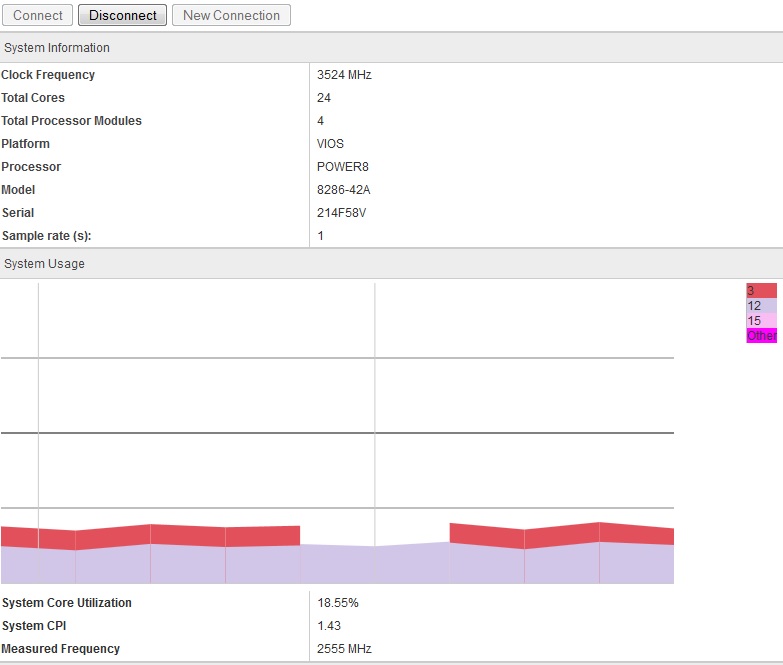
Overall system processor utilisation is available from the main panel also. This view provides a graph of total processor utilisation, over time, for the entire POWER system. Directly above this graph useful information is displayed for items such as clock frequency, total cores, platform (AIX, Linux, VIOS or IBM i), system model/serial number and sample rate.
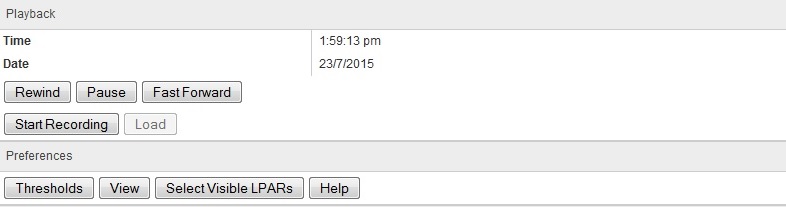
One very useful feature of PowerVP is the ability to record and playback your PowerVP sessions. By clicking on the Start Recording button, PowerVP will start to record your session to your local machine (in my case, my Windows laptop). I can then load this recording at later date for playback inside the PowerVP GUI.

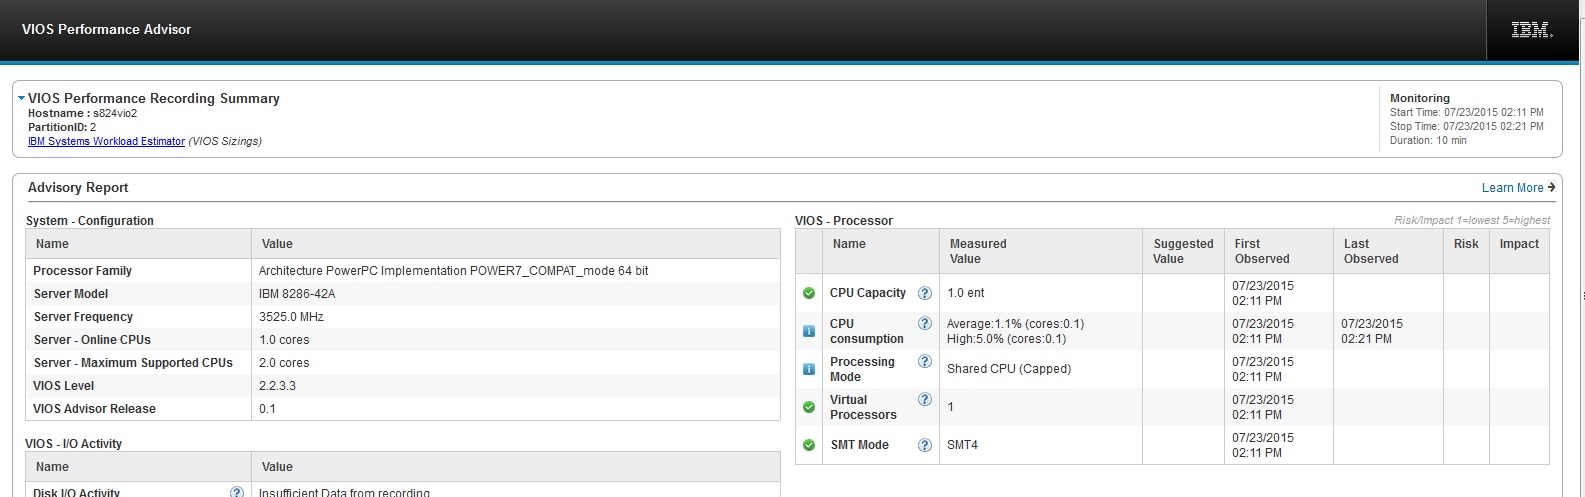
A new feature, in version 1.1.3, now allows you to run the VIOS advisor (part) directly from the PowerVP GUI. When you connect to a System level agent on a VIOS, you will be presented with the VIOS Performance Advisor panel in the GUI. You can configure PowerVP to run the VIOS advisor at a particular time or you can run it on demand. You can also retrieve previously created VIOS advisor reports from the GUI. This is a very nice feature.
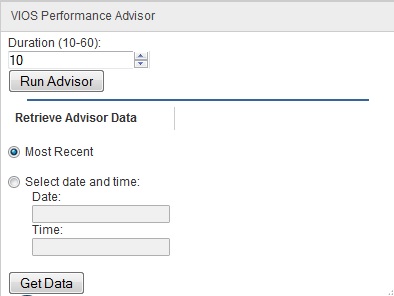
When I clicked on the Run Advisor button I noticed, on my VIOS, that a new topas_nmon and part process were started. The process ran for 10 minutes (default) and then a new tar file was created in /opt/ibm/powervp/advisor.
# pwd
/opt/ibm/powervp/advisor
# ls -ltr
total 672
-rw-r--r-- 1 root system 369 Jul 23 14:11 ioscli.log
-rw-r--r-- 1 root staff 337920 Jul 23 14:22 s824vio2_150723_14_11_34.tar
#
# ps -ef | grep topas_nmon
root 14614550 1 0 15:55:20 - 0:00 /usr/bin/topas_nmon -X -s 15 -c 40 -t -w 4 -l 150 -I 0.1 -ytype=advisor -o ./s824vio2_150723_15_55_20/ -youtput_dir=/opt/ibm/powervp/advisor/./s824vio2_150723_15_55_20/ -ystart_time=15:55:20,Jul23,2015
# ps -ef | grep part
root 16908532 7077922 0 15:55:19 - 0:00 /usr/bin/perl /usr/ios/utils/part -i 10
#
A new tab was automatically opened in my web browser which showed me the VIOS advisor report for my VIOS. Impressive stuff!
Please refer to the PowerVP Redbook for more information how to configure and use this option.
Several features and functions have changed since the last release of PowerVP. Here is the short list of important changes I’ve encountered so far:
I also came across this useful tip in the Redbook. PowerVP can record large amounts of data when recording is enabled. So you should make sure you have sufficient space available to store recorded data on your local machine. It is recommended to increase the sample rate from the default of 1 second to reduce the amount of data collected during recording. The sample rate can be changed by editing the/etc/opt/ibm/powervp/powervp.conf file and changing SampleInterval to a larger value. You need only change the sample interval on the System level agent (the Partition level agents pick up the sample interval from the System level agent). Once you’ve modified the powervp.conf file you must restart the PowerVP system level agent (syslet on AIX).
The aim of this post was to help you quickly install and configure PowerVP in your AIX environment. I encourage the reader to review the available PowerVP material from IBM, in particular the PowerVP Redbook, to learn more about the features and functions of the tool. This tool, finally, provides Power System administrators with a single method of obtaining some important performance data in their POWER7/POWER8 systems environment.
PowerVP version 1.1.3 installation tips
PowerVP Overview