AIX 6 WPARs Beta Test.
10/08/2007
IBM released the AIX 6
Open Beta in July 2007. This is the first time IBM has allowed customers to
download a beta release of their AIX operating system. IBM state they have
taken this approach to give customers a chance to gain experience with the new
OS and to help IBM make improvements, prior to the official release of AIX 6.1.
Several new enhancements
have been introduced in this beta release. They include Workload Partitions, AIX
Security Expert, Role Based Access Control (RBAC), Dynamic Tracing, IBM Systems Director Console for AIX and the Name Resolver
Caching Daemon. The area of greatest interest to me was Workload Partitions
(WPARs). They are similar in concept to Solaris Zones, in that they partition a
single instance of the Operating System into multiple virtual instances of the
OS. WPARs allow for the usage of separate virtual partitions with only one AIX
image. This provides you with the flexibly of having separate environments
without the burden of having to manage separate images of AIX. This could be
useful at sites with large numbers of AIX OS instances (such as ours, which has
over 150 real instances of AIX to manage).
Since downloading and installing
the AIX 6 beta, I’ve focused my attention on testing WPARs. In this paper, I've
captured as much information as I could from my testing (so far), in order to
provide an overview of WPARs, describing the differences between stand-alone
AIX and WPARs and the various types of WPARs i.e. system and application. Also covering the basics, such as creating a WPAR,
starting/stopping a WPAR, configuring networking, making software/applications
available to a WPAR and managing file systems within a WPAR. I'll also
touch on the 'Live Application Mobility' feature which allows you to relocate
live WPARs from one physical server to another physical server.
AIX 6 Open Beta.
AIX 6 is binary
compatible with previous releases of AIX including AIX 5.3, 5.2 and 5.1. AIX 6
includes new capabilities for virtualization, security, continuous availability
and manageability. The open beta can run on any IBM System p or pSeries system
that is based on POWER4, PPC970, POWER5 or POWER6 processors. You can download
the AIX 6 Open Beta from the following site:
https://www14.software.ibm.com/iwm/web/cc/earlyprograms/ibm/aix6beta/
The key features included
in the beta release are:
- Workload Partitions introduce
a new, software-based, virtualization of AIX. This complements the existing IBM
System p LPARs by reducing the number of operating system images that have to
be managed when consolidating workloads. WPARs allow the system administrator
to consolidate multiple instances of AIX within a single running instance of
AIX 6 on an LPAR. The LPAR can consist of real or virtual I/O adapters and
dedicated or shared processors.
- Role Based Access
Control (RBAC) enables administrators to grant authorization for management of
specific AIX resources to users other than root by associating those resources
with a role that is then associated with a particular system user. RBAC can
also be used to associate specific management privileges with programs, which
can reduce the need to run those programs under the root user or via setuid. Another security enhancement is the 'AIX Security Expert'.
This was introduced with AIX 5.3 TL 5. It provides the capability to manage
over 300 system security settings from a single interface (smit). In AIX 6,
this tool has been enhanced with an option to store security templates directly
in a LDAP which may simplify implementation of consistent security across many
AIX systems.
- IBM Systems Director
Console for AIX (aka pconsole). This new tool provides direct access to the
Systems Management Interface Tool (SMIT), WPAR Management and RBAC via a web browser.
- AIX 6 provides a new
dynamic tracing capability that can simplify debugging complex system or
application code. This dynamic tracing facility, known as ‘probevue’ will allow
a developer or system administrator to dynamically insert trace breakpoints in
existing code without having to recompile the code. I have no idea why IBM
didn't take up the offer to incorporate Dtrace into AIX (http://blogs.sun.com/bmc/entry/dtrace_on_aix), but probevue hasn't made
it to the beta release as yet. Hopefully it will appear in a future release of
the beta.
- Name Resolver caching
daemon. The network resolver caching daemon caches requests to resolve a
hostname, service or netgroup to improve the efficiency of subsequent requests
for the same information. Doesn’t seem like a big deal but I guess it’s new so
it’s worth mentioning?
Installing the AIX 6 Open Beta.
For the purposes of my
testing, I installed the beta onto a Power4 p650 LPAR. The LPAR had the
following hardware configuration:
System Model: IBM,7038-6M2
Processor Type: PowerPC_POWER4
Number Of Processors: 1
Processor Clock Speed: 1452 MHz
CPU Type: 64-bit
Kernel Type: 64-bit
LPAR Info: 1 uataix6
Memory Size: 4096 MB
Platform Firmware level: 3K041029
# lsdev -Cs scsi
cd0 Available
1Z-08-00-1,
hdisk0 Available 1Z-08-00-8,0 16 Bit LVD SCSI Disk Drive
hdisk1 Available 1Z-08-00-9,0 16 Bit LVD SCSI Disk Drive
You have the option of
either downloading the beta as a single DVD image or as 3 CD images. I
initially tried installing the beta via CD but had issues with the 3rd install
CD. After downloading the DVD image and burning it to a DVD (with Nero), I was
able to perform a successful installation. Installing the beta is not very
different from a typical AIX installation via media. The beta image is
basically a mksysb which you install. The 'AIX
6 Open Beta Getting started' guide provides step by step information on
installing the beta. It is important to note that (at this stage) NIM
installations are not supported. Also migration installations are also not
supported and TCB is not enabled in order to support the WPAR functionality.
If you need more
assistance or information on installing the beta, please review the information
at the following sites:
AIX 6 InfoCenter:
http://publib.boulder.ibm.com/infocenter/pseries/v6r1/index.jsp
AIX 6 Library:
https://www14.software.ibm.com/iwm/web/cc/earlyprograms/ibm/aix6beta/library.shtml
AIX 6 Open Beta User Forum:
http://www.ibm.com/developerworks/forums/dw_forum.jsp?forum=1123&cat=72
You will find that the
User Forum may already have answers to some of the common issues with the beta
release.
After the beta has
finished installing, I verified the level of beta code with the oslevel
command:
# oslevel -r
6000-01 BETA
It is worth noting that
new fixes and functionality for the beta will be released as completely new ISO
images which will need to be downloaded and installed. The initial open beta
images are referred to as "Beta Driver 6000-01". The next image would
be 6000-02, and so on. Individual fixes for problems are not being provided.
New release notes, outlining new fixes and functionality, will be included with
the new images when they become available.
Perform the following, to
avoid any issues using the beta image (these issues are also listed in the
release notes):
# chmod 1777 /tmp
# rm /etc/resolv.conf
# rmfs /maria
During the first boot of
the beta image, you may see the system 'hang' at LED 581 for a while. Fixing
some of the issues above will prevent this from occurring again.
Now that the beta is
installed, I can set about testing the WPAR technology.
Workload Partitions.
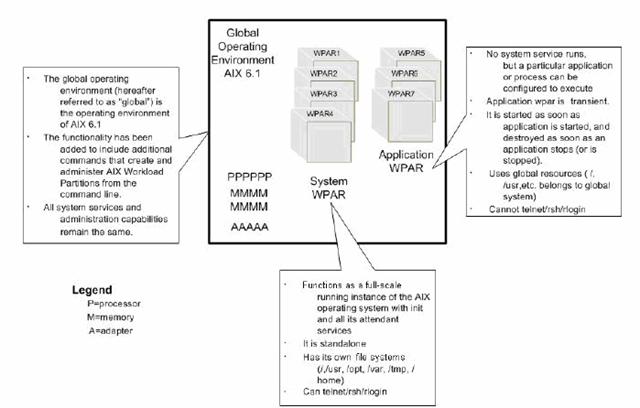
A WPAR is a software
created, virtualized OS environment within a single AIX 6 image. Each workload
partition is a secure and isolated environment for the application it hosts.
The application in a WPAR thinks it is being executed in its own dedicated AIX
instance. The AIX operating system instance that hosts the workload partition
is known as the Global environment. Creating WPARs within an LPAR does not
restrict the use of the hosting AIX instance. It is possible to log into the
global environment and perform normal AIX functions or run applications. It is
no different to a stand-alone instance of AIX. This global environment can be
hosted within a dedicated LPAR or a micropartition, using real or virtual I/O
adapters. All WPAR administration must be performed from the global
environment. WPARs cannot be created within other WPARs. The global environment
owns all physical resources of the LPAR i.e. network adapters, disks adapters,
disks, processors, memory. It allocates CPU and memory resources to the WPARs
and provides access to the network and storage devices. It is possible from the
global environment to see (and control) the processes executing within the
WPARs, and to see the file systems used by the WPARs. Most performance
monitoring and tuning activities are performed from the global environment.
To most applications the
WPAR appears as a normal AIX environment. In general, applications can run
without modification in a WPAR. Applications within a WPAR have private
execution environments, are isolated from other processes outside the WPAR, have
their own signals and file systems, have dedicated network addresses and they have
inter-process communication which is restricted to processes executing in the
same WPAR.
There are two types of
workload partitions that can reside in a global environment i.e. System and
Applications WPARs. A System WPAR looks and feels like a complete instance of
AIX. An Application WPAR is a light weight environment suitable for execution
of one or more processes.
A system WPAR is similar
to a normal AIX environment. Each System WPAR has dedicated writable file
systems, although by default it shares the global environment /usr and /opt file
systems in read only mode. When a system WPAR is started, an init process is created for this WPAR,
which in turns spawns other processes and daemons. For example, a system WPAR
contains an inetd daemon to allow
complete networking capability, making it possible to remotely log into a
system WPAR. It also runs a cron daemon, so that execution of processes can be
scheduled.
In an application WPAR,
an application or group of applications can be started with one command. This
command is passed as an argument to the wparexec
command (which creates the application WPAR). As soon as the command exits, the
WPAR is terminated. An application WPAR shares the file system of the global
environment. It does not have it’s own file systems nor does it have it’s own
network environment. An application partition can run daemons. But application
partitions will not run any of the system service daemons, such as inetd, srcmstr, etc. It is not possible
to remotely log into or remotely execute a command on an application WPAR.
The following figure
depicts the global environment with several WPARs within a single AIX instance.
What follows is a list of
some of the potential advantages I can see when using WPARs:
- Consolidation
(Virutalisation). You can consolidate workloads into one LPAR and instance of
AIX. Using WLM you could host different workloads within a single system. This
means less LPARs (hardware) and instances of AIX to manage. For example, you
could consolidate your development and test LPARs into one physical (or virtual
I/O) LPAR.
- Workload Isolation.
Using WPARs and WLM you can consolidate workloads on a single system without
any impact to the other workloads running on that system.
- Security. Each WPAR can
have it’s own security configuration based on it’s specific needs. One WPAR
cannot interfere with or access another WPAR within the same system. Also,
using the new RBAC features of AIX 6 it is possible to provide access to
certain secure functions for each WPAR e.g. allowing users of a WPAR the
ability to reboot the WPAR or to gain root access to all or some privileged
commands (without compromising the security of the other WPARs running in the
LPAR).
- Reduces AIX administration
overhead i.e. patch management, less LPARs, less AIX instances to manage.
- One installation of an
application can support multiple workloads (WPARs). Reduce number of software
installations.
- Quickly create a WPAR
for testing or development purposes. No need to acquire new hardware or to
install another copy of AIX (or an application). Does not impact workload in
other WPARs. WPARs can be built in a few minutes.
- Separation of admin
roles, based on WPARs. Using, root (privileged) commands can be given to users
without impacting the global environment or other WPARs.
- Live Application
Mobility (LAM). Can move live WPARs (applicatons/services) from one physical
server to another. Good for large outages like microcode upgrades or AIX
maintenance. But is this practical in it’s current
incarnation?
So far so good. WPARs are
certainly a useful and flexible way to deploy and manage AIX systems. There a
few things to consider however:
- Actions in the global
environment can impact a WPAR i.e. unmounting a WPAR file system.
From within the WPAR:
cgibson@wpar1 : /db $ uname –W
3
cgibson@wpar1 : /db $ while true^Jdo^Jps -ef > /db/cg^Jdone
From the global
environment:
# uname –W
0
# umount /wpars/wpar1/db
umount: 0506-349 Cannot unmount /dev/fslv09: The requested resource is busy.
From within the WPAR:
cgibson@wpar1 : /db $ while true^Jdo^Jps -ef > /db/cg^Jdone
cgibson@wpar1 : /db $ cd
cgibson@wpar1 : /home/cgibson $
From the global
environment:
# umount /wpars/wpar1/db
#
Note: You can use the uname –W command to determine if you are
in the global environment (returns 0) or within a WPAR (returns non-zero).
- WPAR mobility requires the
purchase of additional software (the WPAR Manager). It also relies on an NFS
server (which would need to be highly available). It may require the purchase
of additional server hardware (utility server) for the WPAR Manager (and may be
more than one server for it to be highly available – possibly clustered with
HACMP, at additional cost?). More on WPAR mobility later.
- Software is updated in
the global environment only. The good news is the once the software is updated
in the global environment, all the WPARs are also updated. The bad news is that
all the WPARs are also updated! For example, if you apply AIX fixes to the
global environment, the WPARs will also receive the fixes (via the shared /usr and
/opt file systems). This means that all the WPARs applications must be able to
support the same level of AIX. This may, or may not, be an issue depending on
your application requirements. If you are applying fixes for DB2, again all the
WPARS will receive the fixes. Again this may be an issue for you and the
ramifications should be considered first. However, if you wish to install a
different version of a software product, it may be possible to install the software
to a different location than the default. This will allow you to have multiple
versions of the software in the global environment, allowing each WPAR to run a
different version of the application if desired. This makes testing new
versions of software easy as you can continue to use the old version in the other
WPARs while you test it one WPAR only.
- NFS servers are not
supported within WPARs. Also, it’s not advisable to export WPAR file systems
from the global environment because as soon as you stop the WPAR the file
system will be unmounted and no longer accessible.
- To create a System
WPAR, the following disk space will be required (either in rootvg or another
volume group).
- 512MB in rootvg
(default location) per WPAR.
- Non-shared /usr + /opt:
2.5 to 3G per WPAR.
It also is advisable to
create a new file system called /wpars
(the default root directory for WPAR mount points) so that it is separate from
the / (root) file system.
You will see the name corrals
sometimes mentioned
when working with WPARs. Makes me wonder if WPARs were originally going to be
known as something else?
Creating a System WPAR.
Creating a WPAR is fairly
easy. In the following example, I create a WPAR (using the mkwpar command) called wpar1, give it an IP address of 10.1.1.81 and
specify en1 as the real network
interface on which an IP alias will be created for this new WPAR. The creation
process takes a few minutes.
# mkwpar -n wpar1 -N interface=en1 address=10.1.1.81 netmask=255.255.252.0
mkwpar: Creating file systems...
/
/home
/opt
/proc
/tmp
/usr
/var
Mounting all workload partition file systems.
x ./usr
x ./lib
x ./audit
x ./dev
x ./etc
x ./etc/check_config.files
x ./etc/consdef
x ./etc/cronlog.conf
x ./etc/csh.cshrc
x ./etc/csh.login
x ./etc/dlpi.conf
x ./etc/dumpdates
x ./etc/environment
x ./etc/ewlm
x ./etc/ewlm/limits
x ./etc/ewlm/trc
x ./etc/ewlm/trc/config_schema.xsd
x ./etc/ewlm/trc/output_schema.xsd
x ./etc/file systems
x ./etc/group
x ./etc/inittab
x ./etc/magic
x ./etc/motd
x ./etc/nscontrol.conf
x ./etc/objrepos
x ./etc/objrepos/CDiagAtt
......etc.....
csm.core 1.6.0.10 ROOT APPLY SUCCESS
rsct.core.sec 2.5.0.0 ROOT APPLY SUCCESS
rsct.core.sr 2.5.0.0 ROOT APPLY SUCCESS
rsct.core.rmc 2.5.0.0 ROOT APPLY SUCCESS
rsct.core.sensorrm 2.5.0.0 ROOT APPLY SUCCESS
devices.chrp.base.ServiceRM 1.3.0.60 ROOT APPLY SUCCESS
rsct.core.auditrm 2.5.0.0 ROOT APPLY SUCCESS
rsct.core.errm 2.5.0.0 ROOT APPLY SUCCESS
rsct.core.fsrm 2.5.0.0 ROOT APPLY SUCCESS
rsct.core.hostrm 2.5.0.0 ROOT APPLY SUCCESS
rsct.core.lprm 2.5.0.0 ROOT APPLY SUCCESS
csm.client 1.6.0.10 ROOT COMMIT SUCCESS
devices.common.IBM.sni.ml 1.2.0.2 ROOT COMMIT SUCCESS
devices.common.IBM.sni.rte 1.2.0.7 ROOT COMMIT SUCCESS
devices.chrp.IBM.HPS.rte 1.2.0.7 ROOT COMMIT SUCCESS
csm.core 1.6.0.10 ROOT COMMIT SUCCESS
syncroot: Processing root part installation status.
syncroot: Installp root packages are currently synchronized.
syncroot: Synchronizing RPM root files.
syncroot: Checking space requirements.
+---------- Space statistics (in 512 byte-blocks) ----------+
File system: /wpars/wpar1, Free: 225056, Required: 137, Deficit: 0.
syncroot: Installing RPM file: /etc/cdrecord.conf
syncroot: RPM root packages are currently synchronized.
syncroot: Root part is currently synchronized.
syncroot: Returns Status = SUCCESS
mkwpar: Workload partition wpar1 created successfully.
To start the workload partition, execute the following as root: startwpar [-v] 'wpar1'
After the creation
process has completed successfully, you will see the following new logical
volumes in rootvg and new entries in /etc/fileystems:
# lsvg -l rootvg | grep
wpar
fslv04 jfs2 1
1 1 closed/syncd /wpars/wpar1
fslv05 jfs2 1
1 1 closed/syncd /wpars/wpar1/home
fslv06 jfs2 1
1 1 closed/syncd /wpars/wpar1/tmp
fslv07 jfs2 1
1 1 closed/syncd /wpars/wpar1/var
# grep -p wpar /etc/file systems
/wpars/wpar1:
dev = /dev/fslv04
vfs = jfs2
log = INLINE
mount = false
type = wpar1
account = false
/wpars/wpar1/home:
dev = /dev/fslv05
vfs = jfs2
log = INLINE
mount = false
type = wpar1
account = false
/wpars/wpar1/opt:
dev = /opt
vfs = namefs
mount = false
type = wpar1
options = ro
/wpars/wpar1/proc:
dev = /proc
vfs = namefs
mount = false
type = wpar1
options = rw
/wpars/wpar1/tmp:
dev = /dev/fslv06
vfs = jfs2
log = INLINE
mount = false
type = wpar1
account = false
/wpars/wpar1/usr:
dev = /usr
vfs = namefs
mount = false
type = wpar1
options = ro
/wpars/wpar1/var:
dev = /dev/fslv07
vfs = jfs2
log = INLINE
mount = false
type = wpar1
account = false
Starting and Stopping a WPAR.
I can now start my new
WPAR.
# startwpar -v wpar1
Starting workload partition wpar1.
Invalid Script File...
Mounting all workload partition file systems.
Mounting /wpars/wpar1.
Mounting /wpars/wpar1/home.
Mounting /wpars/wpar1/opt.
Mounting /wpars/wpar1/proc.
Mounting /wpars/wpar1/tmp.
Mounting /wpars/wpar1/usr.
Mounting /wpars/wpar1/var.
Loading workload partition.
$corral_t = {
'name' => 'wpar1',
'wlm_cpu' => [
10,
undef,
undef,
undef
],
'path' => '/wpars/wpar1',
'hostname' => 'wpar1',
'wlm_procVirtMem' => [
-1,
undef
],
'wlm_mem' => [
undef,
undef,
undef,
undef
],
'key' => 6,
'vips' => [
[
'en1',
'10.1.1.81',
'255.255.252.0',
'10.1.1.255'
]
],
'wlm_rset' => undef,
'opts' => 4,
'id' => 0
};
Exporting workload partition devices.
Starting workload partition subsystem cor_wpar1.
0513-059 The cor_wpar1 Subsystem has been started. Subsystem PID is 516218.
Verifying workload partition startup.
Return Status = SUCCESS.
Now I can login to the
WPAR (via the new clogin command) and
take a look around.
# clogin wpar1
*******************************************************************************
* *
* *
* Welcome to AIX Version 6.1! *
* *
* *
* Please see the README file in /usr/lpp/bos for information pertinent to *
* this release of the AIX Operating System. *
* *
* *
*******************************************************************************
Last unsuccessful login: Thu Aug 2 13:26:23 EET 2007 on ssh from nim02nim
Last login: Tue Aug 7 14:16:24 EET 2007 on /dev/Global from uataix6
root@wpar1 AIX 6 Beta : / # df
Filesystem 512-blocks Free %Used Iused %Iused Mounted on
/dev/fslv04 262144 209912 20% 1566 7% /
/dev/fslv05 262144 256728 3% 25 1% /home
/opt 262144 124240 53% 1560 10% /opt
/proc - - - - - /proc
/dev/fslv06 262144 256848 3% 10 1% /tmp
/usr 5767168 1807400 69% 42816 18% /usr
/dev/fslv07 262144 246528 6% 324 2% /var
root@wpar1 AIX 6 Beta : / # mount
node mounted mounted over vfs date options
-------- --------------- --------------- ------ ------------ ---------------
/dev/fslv04 / jfs2 Aug 09 11:14 rw,log=INLINE
/dev/fslv05 /home jfs2 Aug 09 11:14 rw,log=INLINE
/opt /opt namefs Aug 09 11:14 ro
/proc /proc namefs Aug 09 11:14 rw
/dev/fslv06 /tmp jfs2 Aug 09 11:14 rw,log=INLINE
/usr /usr namefs Aug 09 11:14 ro
/dev/fslv07 /var jfs2 Aug 09 11:14 rw,log=INLINE
root@wpar1 AIX 6 Beta : / # tty
/dev/Global
From the global
environment I can now see that the WPAR file systems are mounted.
# lsvg -l rootvg | grep wpar1
fslv04 jfs2 1 1 1 open/syncd /wpars/wpar1
fslv05 jfs2 1 1 1 open/syncd /wpars/wpar1/home
fslv06 jfs2 1 1 1 open/syncd /wpars/wpar1/tmp
fslv07 jfs2 1 1 1 open/syncd /wpars/wpar1/var
I can also see the new IP
alias on the en1 network interface.
# ifconfig en1
en1: flags=5e080863,c0<UP,BROADCAST,NOTRAILERS,RUNNING,SIMPLEX,MULTICAST,GROUPRT,64BIT,CHECKSUM_OFFLOAD(ACTIVE),PSEG,LARGESEND,CHAIN>
inet 10.1.1.148 netmask 0xfffffc00 broadcast 10.1.1.255
inet 10.1.1.81 netmask 0xfffffc00 broadcast 10.1.1.255
tcp_sendspace 131072 tcp_recvspace 65536
I can check the status of
my WPAR with the lswpar command, like
so:
# lswpar
Name State Type Hostname Directory
---------------------------------------------
wpar1 A S wpar1 /wpars/wpar1
Stopping my WPAR is also
simple.
# stopwpar -Fv wpar1
Stopping workload partition wpar1.
Stopping workload partition subsystem cor_wpar1.
0513-044 The cor_wpar1 Subsystem was requested to stop.
Advanced Accounting is not running.
stopwpar: 0960-231 ATTENTION: /usr/lib/wpars/wparinstcmd failed with return code 1.
/usr/sbin/stopwpar[155]: 438354 Terminated
stopwpar: 0960-231 ATTENTION: /usr/lib/wpars/wparinstcmd failed with return code 143.
Shutting down all workload partition processes.
WPAR='wpar1' CID=16
ID=2097154 KEY=0x4107001c UID=0 GID=9 RT=-1
ID=3145739 KEY=0x620112bc UID=0 GID=0 RT=-1
ID=3145761 KEY=0x0101111b UID=0 GID=0 RT=-1
Unmounting all workload partition file systems.
Umounting /wpars/wpar1/var.
Umounting /wpars/wpar1/usr.
Umounting /wpars/wpar1/tmp.
Umounting /wpars/wpar1/proc.
Umounting /wpars/wpar1/opt.
Umounting /wpars/wpar1/home.
Umounting /wpars/wpar1.
Return Status = SUCCESS.
With the WPAR stopped, the
IP alias is removed and the logical volumes are now closed again.
# ifconfig en1
en1: flags=5e080863,c0<UP,BROADCAST,NOTRAILERS,RUNNING,SIMPLEX,MULTICAST,GROUPRT,64BIT,CHECKSUM_OFFLOAD(ACTIVE),PSEG,LARGESEND,CHAIN>
inet 10.1.1.148 netmask 0xfffffc00 broadcast 10.1.1.255
tcp_sendspace 131072 tcp_recvspace 65536
# lsvg -l rootvg | grep wpar1
fslv04 jfs2 1 1 1 closed/syncd /wpars/wpar1
fslv05 jfs2 1 1 1 closed/syncd /wpars/wpar1/home
fslv06 jfs2 1 1 1 closed/syncd /wpars/wpar1/tmp
fslv07 jfs2 1 1 1 closed/syncd /wpars/wpar1/var
Removing a WPAR.
To remove a WPAR, use the
rmwpar from the global environment.
# rmwpar -F wpar1
rmwpar: Removing workload partition wpar1
rmwpar: Stopping workload partition wpar1
stopwpar: 0960-254 Workload partition wpar1 is not currently active.
rmwpar: Removing file system /wpars/wpar1/var.
rmlv: Logical volume fslv07 is removed.
rmwpar: Removing file system /wpars/wpar1/usr.
rmwpar: Removing file system /wpars/wpar1/tmp.
rmlv: Logical volume fslv06 is removed.
rmwpar: Removing file system /wpars/wpar1/proc.
rmwpar: Removing file system /wpars/wpar1/opt.
rmwpar: Removing file system /wpars/wpar1/home.
rmlv: Logical volume fslv05 is removed.
rmwpar: Removing file system /wpars/wpar1.
rmlv: Logical volume fslv04 is removed.
rmwpar: Return Status = SUCCESS
The logical volumes (and
file systems) for the WPAR are removed from rootvg.
Creating a Writeable Filesystem for
a WPAR.
We can create a writeable
(non-shared) file system for use by the WPAR. Just create a file system with
type of wparname. e.g. wpar1.
Note: The file system
should be set to not mount automatically i.e. mount=false.
In this example I create
a /usr/local file system for wpar1.
# crfs -v jfs2 -g rootvg -m
/wpars/wpar1/usr/local -u wpar1 -a logname=INLINE -a size=128M
# lsvg –l rootvg | grep wpar1 | grep local
fslv08 jfs2 1 1 1 closed/syncd /wpars/wpar1/usr/local
An new entry is created in /etc/file systems for wpar1
– note: type=wpar1.
/wpars/wpar1/usr/local:
dev = /dev/fslv08
vfs = jfs2
log = INLINE
mount = false
type = wpar1
options = rw
account = false
Of course I can always
create a new volume group for the WPAR file systems e.g. for a database. So,
I’ll create a database file system for wpar1 in my new volume group named
datavg.
# mkvg -y datavg hdisk1
# lspv
hdisk0 0000273a30335231 rootvg active
hdisk1 0000273ae48b5900 datavg active
# crfs -v jfs2 -g datavg -m
/wpars/wpar1/db -u wpar1 -a logname=INLINE -a size=1G
# grep -p db /etc/file systems
/wpars/wpar1/db:
dev = /dev/fslv09
vfs = jfs2
log = INLINE
mount = false
type = wpar1
account = false
# lsvg -l datavg
datavg:
fslv09 jfs2 16 16 1 closed/syncd /wpars/wpar1/db
Now I can mount both new
file systems in the global environment.
# mount /wpars/wpar1/db
# mount /wpars/wpar1/usr/local
# df
Filesystem 512-blocks Free %Used Iused %Iused Mounted on
/dev/hd4 262144 60248 78% 5106 41% /
/dev/hd2 5767168 1807400 69% 42816 18% /usr
/dev/hd9var 1048576 999984 5% 493 1% /var
/dev/hd3 524288 477400 9% 61 1% /tmp
/dev/hd1 262144 243192 8% 97 1% /home
/proc - - - - - /proc
/dev/hd10opt 262144 124240 53% 1560 10% /opt
/dev/locallv 524288 522072 1% 9 1% /usr/local
/dev/fslv00 262144 209696 21% 1572 7% /wpars/wpar1
/dev/fslv01 262144 152208 42% 492 3% /wpars/wpar1/home
/opt 262144 124240 53% 1560 10% /wpars/wpar1/opt
/proc - - - - - /wpars/wpar1/proc
/dev/fslv02 262144 238080 10% 43 1% /wpars/wpar1/tmp
/usr 5767168 1807400 69% 42816 18% /wpars/wpar1/usr
/dev/fslv03 262144 245776 7% 331 2% /wpars/wpar1/var
/dev/fslv08 262144 256120 3% 6 1% /wpars/wpar1/usr/local
/dev/fslv09 2097152 2079792 1% 4 1% /wpars/wpar1/db
Next, I log on to wpar1
and I can see the new file systems.
# clogin wpar1
*******************************************************************************
* *
* *
* Welcome to AIX Version 6.1! *
* *
* *
* Please see the README file in /usr/lpp/bos for information pertinent to *
* this release of the AIX Operating System. *
* *
* *
*******************************************************************************
Last unsuccessful login: Thu Aug 2 13:26:23 EET 2007 on ssh from nim02nim
Last login: Tue Aug 7 14:16:24 EET 2007 on /dev/Global from uataix6
root@wpar1 AIX 6 Beta : / # df
Filesystem 512-blocks Free %Used Iused %Iused Mounted on
/dev/fslv00 262144 209696 21% 1572 7% /
/dev/fslv01 262144 152208 42% 492 3% /home
/opt 262144 124240 53% 1560 10% /opt
/proc - - - - - /proc
/dev/fslv02 262144 238080 10% 43 1% /tmp
/usr 5767168 1807400 69% 42816 18% /usr
/dev/fslv03 262144 245776 7% 331 2% /var
/dev/fslv08 262144 256120 3% 6 1% /usr/local
/dev/fslv09 2097152 2079792 1% 4 1% /db
The new file systems will
mount when the WPAR is started.
# startwpar -v wpar1
Starting workload partition wpar1.
Invalid Script File...
Mounting all workload partition file systems.
Mounting /wpars/wpar1.
Mounting /wpars/wpar1/db.
Mounting /wpars/wpar1/home.
Mounting /wpars/wpar1/opt.
Mounting /wpars/wpar1/proc.
Mounting /wpars/wpar1/tmp.
Mounting /wpars/wpar1/usr.
Mounting /wpars/wpar1/usr/local.
Mounting /wpars/wpar1/var.
Loading workload partition.
....etc....
Making Software Available to System
WPARs.
In the following examples
I demonstrate how I made several software applications available to the WPARs.
Software is installed via the Global environment. Since creating my first WPAR
I’ve created another WPAR named wpar2. Both wpar1 and wpar2 will be used in the
following examples. I installed the following software: OpenSSH, Sudo, Apache
and DB2 V8.
Installing OpenSSH and Sudo.
OpenSSH was installed
into the global environment via installp and Sudo was an RPM install. After
performing a standard installation of both utilities, I ran the syncwpar command to synchronise the
software in the global environment with the WPARs.
# syncwpar -vA
*******************************************************************************
Synchronizing workload partition wpar1 (1 of 2).
*******************************************************************************
Executing /usr/sbin/syncroot -v in workload partition wpar1.
syncroot: Processing root part installation status.
syncroot: Synchronizing installp software.
+-----------------------------------------------------------------------------+
Pre-installation Verification...
+-----------------------------------------------------------------------------+
Verifying selections...done
Verifying requisites...done
Results...
Installation Summary
--------------------
Name Level Part Event Result
-------------------------------------------------------------------------------
openssh.base.server 4.3.0.5301 ROOT APPLY SUCCESS
…..etc….
syncroot: Processing root part installation status.
syncroot: Installing RPM file: /etc/sudoers
syncroot: Installing RPM file: /var/ssl/misc/CA.pl
syncroot: Installing RPM file: /var/ssl/misc/CA.sh
syncroot: Installing RPM file: /var/ssl/misc/c_hash
syncroot: Installing RPM file: /var/ssl/misc/c_info
syncroot: Installing RPM file: /var/ssl/misc/c_issuer
syncroot: Installing RPM file: /var/ssl/misc/c_name
syncroot: Installing RPM file: /var/ssl/misc/der_chop
syncroot: Installing RPM file: /var/ssl/openssl.cnf
syncroot: Installp root packages are currently synchronized.
syncroot: RPM root packages are currently synchronized.
syncroot: Root part is currently synchronized.
syncroot: Returns Status = SUCCESS
Workload partition wpar1 synchronized successfully.
*******************************************************************************
Synchronizing workload partition wpar2 (2 of 2).
*******************************************************************************
Executing /usr/sbin/syncroot -v in workload partition wpar2.
syncroot: Processing root part installation status.
syncroot: Installing RPM file: /etc/sudoers
syncroot: Installing RPM file: /var/ssl/misc/CA.pl
syncroot: Installing RPM file: /var/ssl/misc/CA.sh
syncroot: Installing RPM file: /var/ssl/misc/c_hash
syncroot: Installing RPM file: /var/ssl/misc/c_info
syncroot: Installing RPM file: /var/ssl/misc/c_issuer
syncroot: Installing RPM file: /var/ssl/misc/c_name
syncroot: Installing RPM file: /var/ssl/misc/der_chop
syncroot: Installing RPM file: /var/ssl/openssl.cnf
syncroot: RPM root packages are currently synchronized.
syncroot: Root part is currently synchronized.
syncroot: Installp root packages are currently synchronized.
syncroot: Root part is currently synchronized.
syncroot: Returns Status = SUCCESS
Workload partition wpar2 synchronized successfully.
Return Status = SUCCESS.
Side note: If you create
a WPAR after installing OpenSSH you may see the following error:
0503-464 installp: The installation has FAILED for the "root" part
of the following filesets:
openssh.base.server 4.3.0.5301
installp: Cleaning up software for:
openssh.base.server 4.3.0.5301
openssh.base.server 4.3.0.5301 ROOT APPLY FAILED
openssh.base.server 4.3.0.5301 ROOT CLEANUP SUCCESS
syncroot: Error synchronizing installp software.
syncroot: Returns Status = FAILURE
mkwpar: Workload partition wpar1 created successfully.
To start the workload partition, execute the following as root: startwpar [-v] 'wpar1'
I reported this problem
on the AIX 6 Beta User Forum. The AIX dev team promptly replied stating this
was a known issue (602196). Until a fix is available, you can work around it by
exporting INUBOSTYPE=1 before running mkwpar. I also discovered that if you run
syncwpar, after starting the WPAR, that the fileset installs correctly and the
issue is resolved.
From within in the WPAR I
could now see the OpenSSH and Sudo packages.
root@wpar1 WPAR : / # lslpp -l open*
Fileset
----------------------------------------------------------------------------
Path: /usr/lib/objrepos
openssh.base.client 4.3.0.5301 COMMITTED Open Secure Shell Commands
openssh.base.server 4.3.0.5301 COMMITTED Open Secure Shell Server
openssh.license 4.3.0.5301 COMMITTED Open Secure Shell License
openssh.man.en_US 4.3.0.5301 COMMITTED Open Secure Shell
Documentation -
Path: /etc/objrepos
openssh.base.client 4.3.0.5301 COMMITTED Open Secure Shell Commands
openssh.base.server 4.3.0.5301 COMMITTED Open Secure Shell Server
root@wpar1 WPAR : / # rpm -qa
cdrecord-1.9-7
mkisofs-1.13-4
AIX-rpm-6.1.0.0-1
openssl-0.9.7d-2
sudo-1.6.7p5-3
Installing Apache.
In the next example, I
installed Apache. Again, it was installed into the global environment first.
# uname –W
0
# rpm -i expat-1.95.7-4.aix5.1.ppc.rpm
# rpm -i lynx-2.8.4-2.aix5.1.ppc.rpm
# rpm -i apache-1.3.31-1.aix5.1.ppc.rpm
# rpm -qa
cdrecord-1.9-7
mkisofs-1.13-4
AIX-rpm-6.1.0.0-1
openssl-0.9.7d-2
sudo-1.6.7p5-3
expat-1.95.7-4
lynx-2.8.4-2
apache-1.3.31-1
Again, the syncwpar command was run to sync the
software within the WPARs.
# syncwpar -vA
*******************************************************************************
Synchronizing workload partition wpar1 (1 of 2).
*******************************************************************************
Executing /usr/sbin/syncroot -v in workload partition wpar1.
syncroot: Processing root part installation status.
syncroot: Installp root packages are currently synchronized.
syncroot: Synchronizing RPM root files.
syncroot: Checking space requirements.
+---------- Space statistics (in 512 byte-blocks) ----------+
File system: /var, Free: 246752, Required: 202, Deficit: 0.
File system: /, Free: 221776, Required: 324, Deficit: 0.
syncroot: Installing RPM file: /etc/opt/freeware/apache/access.conf
syncroot: Installing RPM file: /etc/opt/freeware/apache/httpd.conf
syncroot: Installing RPM file: /etc/opt/freeware/apache/magic
syncroot: Installing RPM file: /etc/opt/freeware/apache/mime.types
syncroot: Inst
alling RPM file: /etc/opt/freeware/apache/srm.conf
syncroot: RPM root packages are currently synchronized.
syncroot: Root part is currently synchronized.
syncroot: Returns Status = SUCCESS
Workload partition wpar1 synchronized successfully.
*******************************************************************************
Synchronizing workload partition wpar2 (2 of 2).
*******************************************************************************
Executing /usr/sbin/syncroot -v in workload partition wpar2.
syncroot: Processing root part installation status.
syncroot: Installp root packages are currently synchronized.
syncroot: Synchronizing RPM root files.
syncroot: Checking space requirements.
+---------- Space statistics (in 512 byte-blocks) ----------+
File system: /var, Free: 246752, Required: 202, Deficit: 0.
File system: /, Free: 221776, Required: 324, Deficit: 0.
syncroot: Installing RPM file: /etc/opt/freeware/apache/access.conf
syncroot: Installing RPM file: /etc/opt/freeware/apache/httpd.conf
syncroot: Installing RPM file: /etc/opt/freeware/apache/magic
syncroot: Installing RPM file: /etc/opt/freeware/apache/mime.types
syncroot: Inst
alling RPM file: /etc/opt/freeware/apache/srm.conf
syncroot: RPM root packages are currently synchronized.
syncroot: Root part is currently synchronized.
syncroot: Returns Status = SUCCESS
Workload partition wpar2 synchronized successfully.
Return Status = SUCCESS.
Apache is now available
to wpar1 and wpar2.
# clogin wpar1
root@wpar1 AIX 6 Beta : / # rpm -qa
cdrecord-1.9-7
mkisofs-1.13-4
AIX-rpm-6.1.0.0-1
openssl-0.9.7d-2
sudo-1.6.7p5-3
expat-1.95.7-4
lynx-2.8.4-2
apache-1.3.31-1
For the purposes of
testing I set up Apache on both my WPARs. After customising the httpd.conf file in each WPAR, I was able
to start httpd in each WPAR.
root@wpar1 WPAR : /etc/opt/freeware/apache # ls -ltr
total 152
-rw-r--r-- 1 root system 357 Jun 17 2004 srm.conf
-rw-r--r-- 1 root system 348 Jun 17 2004 access.conf
-rw-r--r-- 1 root system 14987 Jun 17 2004 mime.types
-rw-r--r-- 1 root system 12965 Jun 17 2004 magic
-rw-r--r-- 1 root system 35850 Aug 01 11:42 httpd.conf
root@wpar1 WPAR : /etc/opt/freeware/apache # grep -i wpar httpd.conf
ServerName wpar1
root@wpar1 WPAR : /etc/opt/freeware/apache # grep DocumentRoot httpd.conf
# DocumentRoot: The directory out of which you will serve your
DocumentRoot "/home/cgibson/apache"
root@wpar1 WPAR : /home/cgibson/apache # cat index.html
Welcome to Apache on wpar1!
root@wpar2 WPAR : /etc/opt/freeware/apache # grep -i wpar httpd.conf
ServerName wpar2
root@wpar2 WPAR : /etc/opt/freeware/apache # grep DocumentRoot httpd.conf
# DocumentRoot: The directory out of which you will serve your
DocumentRoot "/home/cgibson/apache"
root@wpar2 WPAR : /home/cgibson/apache # cat index.html
Welcome to Apache on wpar2!
root@wpar1 WPAR : / # apachectl start
/usr/sbin/apachectl start: httpd started
root@wpar1 WPAR : / # ps -ef | grep httpd
nobody 229430 344314 0 12:18:28 - 0:00 /opt/freeware/apache/sbin/httpd
nobody 315580 344314 0 12:18:28 - 0:00 /opt/freeware/apache/sbin/httpd
nobody 319540 344314 0 12:18:28 - 0:00 /opt/freeware/apache/sbin/httpd
root 344314 1 0 12:18:27 - 0:00 /opt/freeware/apache/sbin/httpd
nobody 397548 344314 0 12:18:28 - 0:00 /opt/freeware/apache/sbin/httpd
root 569412 290862 0 12:18:32 pts/0 0:00 grep httpd
nobody 598264 344314 0 12:18:28 - 0:00 /opt/freeware/apache/sbin/httpd
root@wpar2 WPAR : / # apachectl start
/usr/sbin/apachectl start: httpd started
root@wpar2 WPAR : / # ps -ef | grep http
nobody 368884 684286 0 11:22:08 - 0:00 /opt/freeware/apache/sbin/httpd
nobody 413740 684286 0 11:22:08 - 0:00 /opt/freeware/apache/sbin/httpd
nobody 471174 684286 0 11:22:08 - 0:00 /opt/freeware/apache/sbin/httpd
nobody 499924 684286 0 11:22:08 - 0:00 /opt/freeware/apache/sbin/httpd
root 569442 450664 0 12:21:06 ? 0:00 grep http
nobody 643210 684286 0 11:22:08 - 0:00 /opt/freeware/apache/sbin/httpd
root 684286 1 0 11:22:07 - 0:00 /opt/freeware/apache/sbin/httpd
I then confirmed the
Apache was running on each WPAR by connecting to them with my favourite text Web
browser.
$ lynx wpar1
Welcome to Apache on wpar1!
Commands: Use arrow keys to move, '?' for help, 'q' to quit, '<-' to go back.
Arrow keys: Up and Down to move. Right to follow a link; Left to go back.
H)elp O)ptions P)rint G)o M)ain screen Q)uit /=search [delete]=history list
$ lynx wpar2
Welcome to Apache on wpar2!
Commands: Use arrow keys to move, '?' for help, 'q' to quit, '<-' to go back.
Arrow keys: Up and Down to move. Right to follow a link; Left to go back.
H)elp O)ptions P)rint G)o M)ain screen Q)uit /=search [delete]=history list
I now have two WPARs,
both with different IP addresses, running distinct instances of httpd. This was fairly impressive
considering the short amount of time it had taken to setup and configure the
environment.
I could view the httpd
processes from the Global environment also.
# ps -ef | grep httpd
nobody 229430 344314 0 12:18:28 - 0:00 /opt/freeware/apache/sbin/httpd
nobody 315580 344314 0 12:18:28 - 0:00 /opt/freeware/apache/sbin/httpd
nobody 319540 344314 0 12:18:28 - 0:00 /opt/freeware/apache/sbin/httpd
root 344314 655592 0 12:18:27 - 0:00 /opt/freeware/apache/sbin/httpd
nobody 368884 684286 0 11:22:08 - 0:00 /opt/freeware/apache/sbin/httpd
nobody 397548 344314 0 12:18:28 - 0:00 /opt/freeware/apache/sbin/httpd
nobody 413740 684286 0 11:22:08 - 0:00 /opt/freeware/apache/sbin/httpd
root 450666 385130 0 12:22:07 pts/0 0:00 grep httpd
nobody 471174 684286 0 11:22:08 - 0:00 /opt/freeware/apache/sbin/httpd
nobody 499924 684286 0 11:22:08 - 0:00 /opt/freeware/apache/sbin/httpd
nobody 598264 344314 0 12:18:28 - 0:00 /opt/freeware/apache/sbin/httpd
nobody 643210 684286 0 11:22:08 - 0:00 /opt/freeware/apache/sbin/httpd
root 684286 462974 0 11:22:07 - 0:00 /opt/freeware/apache/sbin/httpd
To see which process
belongs to which WPAR, I add the @ symbol to the ps
command.
# ps -ef@ | grep httpd |
sort
wpar1
root 344314 655592 0
12:18:27 - 0:00 /opt/freeware/apache/sbin/httpd
wpar1
nobody 229430 344314 0
12:18:28 - 0:00 /opt/freeware/apache/sbin/httpd
wpar1
nobody 315580 344314 0
12:18:28 - 0:00 /opt/freeware/apache/sbin/httpd
wpar1
nobody 319540 344314 0
12:18:28 - 0:00 /opt/freeware/apache/sbin/httpd
wpar1
nobody 397548 344314 0
12:18:28 - 0:00 /opt/freeware/apache/sbin/httpd
wpar1
nobody 598264 344314 0
12:18:28 - 0:00 /opt/freeware/apache/sbin/httpd
wpar1
root 684286 462974 0
11:22:07 - 0:00 /opt/freeware/apache/sbin/httpd
wpar1
nobody 368884 684286 0
11:22:08 - 0:00 /opt/freeware/apache/sbin/httpd
wpar1
nobody 413740 684286 0 11:22:08 -
0:00 /opt/freeware/apache/sbin/httpd
wpar1
nobody 471174 684286 0
11:22:08 - 0:00 /opt/freeware/apache/sbin/httpd
wpar1
nobody 499924 684286 0
11:22:08 - 0:00 /opt/freeware/apache/sbin/httpd
wpar1
nobody 643210 684286 0
11:22:08 - 0:00 /opt/freeware/apache/sbin/httpd
Global
root 569458 385130 0
12:23:22 pts/0 0:00 grep httpd
Installing DB2.
As a final example, I
installed DB2 and created a DB2 instance on wpar1. I followed the installation
documentation for DB2 V8 and installed it in the Global environment first. A
typical installation installs all of the necessary utilities for configuring
DB2 8 in a WPAR. Documentation for installing DB2 V8 on AIX can be found here:
http://publib.boulder.ibm.com/infocenter/db2luw/v8
After you install DB2 V8,
you can make it available to other WPARs with the syncwpar command.
# uname –W
0
# lslpp -l db2*
Fileset
----------------------------------------------------------------------------
Path: /usr/lib/objrepos
db2_08_01.ca 8.1.1.16 COMMITTED Configuration Assistant
db2_08_01.cc 8.1.1.16 COMMITTED
db2_08_01.ch.en_US.iso88591
8.1.1.16 COMMITTED
en_US.iso88591
db2_08_01.cj 8.1.1.16 COMMITTED Java Common files
db2_08_01.client 8.1.1.16 COMMITTED Base Client Support
db2_08_01.cnvucs 8.1.1.16 COMMITTED Code Page Conversion Tables -
Unicode Support
db2_08_01.conn 8.1.1.16 COMMITTED Connect Support
db2_08_01.conv 8.1.1.16 COMMITTED Code Page Conversion Tables
db2_08_01.cs.rte 8.1.1.16 COMMITTED Communication Support - TCP/IP
db2_08_01.das 8.1.1.16 COMMITTED Administration Server
db2_08_01.db2.engn 8.1.1.16 COMMITTED Base DB2 UDB Support
db2_08_01.db2.rte 8.1.1.16 COMMITTED Run-time Environment
db2_08_01.db2.samples 8.1.1.16 COMMITTED Sample Database Source
db2_08_01.dj 8.1.1.16 COMMITTED DB2 Data Source Support
db2_08_01.essg 8.1.1.16 COMMITTED Product Signature for DB2 UDB
db2_08_01.fs 8.1.1.16 COMMITTED First Steps
db2_08_01.icuc 8.1.1.16 COMMITTED ICU Collation
db2_08_01.icut 8.1.1.16 COMMITTED ICU Utilities
db2_08_01.inst 8.1.1.16 COMMITTED DB2 Instance Setup Wizard
db2_08_01.jdbc 8.1.1.16 COMMITTED Java Support
db2_08_01.jhlp.en_US.iso88591
8.1.1.16 COMMITTED Java Help (HTML) -
en_US.iso88591
db2_08_01.ldap 8.1.1.16 COMMITTED DB2 LDAP Support
db2_08_01.msg.en_US.iso88591
8.1.1.16 COMMITTED Product Messages -
en_US.iso88591
db2_08_01.pext 8.1.1.16 COMMITTED Parallel Extension
db2_08_01.repl 8.1.1.16 COMMITTED Replication
db2_08_01.sqlproc 8.1.1.16 COMMITTED SQL Procedures
# syncwpar -Av
*******************************************************************************
Synchronizing workload partition wpar1 (1 of 2).
*******************************************************************************
Executing /usr/sbin/syncroot -v in workload partition wpar1.
syncroot: Processing root part installation status.
syncroot: Installp root packages are currently synchronized.
syncroot: RPM root packages are currently synchronized.
syncroot: Root part is currently synchronized.
syncroot: Returns Status = SUCCESS
Workload partition wpar1 synchronized successfully.
*******************************************************************************
Synchronizing workload partition wpar2 (2 of 2).
*******************************************************************************
Executing /usr/sbin/syncroot -v in workload partition wpar2.
syncroot: Processing root part installation status.
syncroot: Installp root packages are currently synchronized.
syncroot: RPM root packages are currently synchronized.
syncroot: Root part is currently synchronized.
syncroot: Returns Status = SUCCESS
Workload partition wpar2 synchronized successfully.
Return Status = SUCCESS.
Before creating a DB2
instance, I ensured that the hosts file on wpar1 contained the correct
information for wpar1’s IP address and hostname.
root@wpar1 WPAR : / # grep wpar1 /etc/hosts
10.1.1.81 wpar1
Then I created the DB2 instance.
root@wpar1 WPAR : / # /usr/opt/db2_08_01/instance/db2icrt
-u db2inst1 db2inst1
root@wpar1 WPAR : / # tail /etc/services
DB2_db2inst1 60000/tcp
DB2_db2inst1_1 60001/tcp
DB2_db2inst1_2 60002/tcp
DB2_db2inst1_END 60003/tcp
I found that I needed to create
a nodelock file within the WPAR and copy the contents of the nodelock file from
the global environment. Without it, db2 would not start, claiming it did not
have a valid product license.
root@wpar1 WPAR : /var/ifor # cat nodelock
#
5fbee0xx6feb.02.09.15.0f.48.00.00.00 qifx7tttt9b48n7gafpsa "" "8.1"
#[admin_comment] "IBM Toronto Lab" "DB2 Enterprise Server Edition" "9115794400" "0" "1" ""
After su’ing to the db2inst1 user, I configured the service
name and tcp/ip configuration for the instance and then started it.
db2inst1@wpar1 $ db2 update
database manager configuration using svcename DB2_db2inst1
db2inst1@wpar1 $ db2set DB2COMM=tcpip
I confirmed that the
instance was not “listening” on the correct TCP port.
db2inst1@wpar1 $ tn 0 60000
Trying...
Connected to 0.
Escape character is '^T'.
^T
tn> quit
Connection closed.
db2inst1@wpar1 $ netstat -na | grep 60000
tcp4 0 0 *.60000 *.* LISTEN
I also confirmed this
from the global environment using lsof and netstat.
# lsof -i tcp:60000
lsof: WARNING: compiled for
AIX version 5.3.0.0; this is 6.0.0.0.
COMMAND PID
USER FD TYPE DEVICE SIZE/OFF NODE NAME
db2sysc 303196
db2fenc1 3u IPv4 0xf100020001a3a3b0 0t0
TCP *:60000 (LISTEN)
db2sysc 352376
db2fenc1 3u IPv4 0xf100020001a3a3b0 0t0
TCP *:60000 (LISTEN)
db2sysc 622606
db2fenc1 3u IPv4 0xf100020001a3a3b0 0t0
TCP *:60000 (LISTEN)
db2sysc 659634
db2fenc1 3u IPv4 0xf100020001a3a3b0 0t0
TCP *:60000 (LISTEN)
# netstat -na | grep 60000
tcp4 0
0 *.60000 *.* LISTEN
From the global
environment I could see the DB2 processes.
# ps -@ -ef | grep db2 |
grep -v grep
wpar1 db2fenc1 299244 389366 0 14:46:44 -
0:00 db2srvlst 0
wpar1 db2fenc1 303196 487546 0 14:46:43 -
0:00 db2tcpcm 0
wpar1 db2fenc1 352376 622606 0 14:46:49 -
0:00 db2agent (idle) 0
wpar1 db2fenc1 360638 487546 0 14:46:42 -
0:00 db2syslog 0
wpar1
root 372812 487546 0
14:46:42 - 0:00 db2ckpwd 0
wpar1 db2fenc1 389366 487546 0 14:46:42 -
0:00 db2gds 0
wpar1 db2fenc1 487546 553142 0 14:46:42 -
0:00 db2sysc 0
wpar1 db2fenc1 520382 487546 0 14:46:44 -
0:00 db2spmrsy 0
wpar1
root 524318 487546 0
14:46:42 - 0:00 db2ckpwd 0
wpar1 db2fenc1 536660 487546 0 14:46:44 -
0:00 db2resync 0
wpar1 db2fenc1 544916 389366 0 14:46:45 -
0:00 db2spmlw 0
wpar1
root 553142 655592 0
14:46:42 - 0:00 db2wdog 0
wpar1
207 590010 655592 0
14:31:46 - 0:00 /home/dasusr/das/adm/db2dasrrm
wpar1
root 606398 487546 0
14:46:42 - 0:00 db2ckpwd 0
wpar1 db2fenc1 622606 487546 0 14:46:43 -
0:00 db2tcpcm 0
wpar1 db2fenc1 659634 487546 0 14:46:43 -
0:00 db2tcpcm 0
wpar1 db2fenc1 729214 487546 0 14:46:42 -
0:00 db2ipccm 0
Creating an Application WPAR.
I haven’t thought of a
good use for an Application WPAR in my environment yet, but I tested the
creation of one anyway and documented the process and results.
I created a new entry in
my global /etc/hosts file for the Application WPAR named wapp1 with an IP address of 10.1.1.86.
# grep wapp /etc/hosts
10.1.1.86 wapp1
Starting an app WPAR.
Using the wparexec
command from the global environment I started my Application WPAR, which simply
ran the ‘ps –ef’ command and then
exited.
# wparexec -n wapp1 -- /usr/bin/ps -ef
wparexec: Verifying file systems...
wparexec: Workload partition wapp1 created successfully.
Starting workload partition wapp1.
Invalid Script File...
Mounting all workload partition file systems.
Loading workload partition.
UID PID PPID C STIME TTY TIME CMD
root 372912 1 2 11:42:35 pts/0 0:00 /usr/bin/ps -ef
root 1 0 1 11:42:35 pts/0 0:00 /usr/lib/corrals/vinit wapp1 /usr/bin/ps -ef
Advanced Accounting is not running.
startwpar: 0960-231 ATTENTION: /usr/lib/wpars/wparinstcmd failed with return code 1.
projctl unldall: Operation not permitted.
startwpar: 0960-231 ATTENTION: /usr/lib/wpars/wparinstcmd failed with return code 1.
Shutting down all workload partition processes.
0 != 202
rmwpar: Removing workload partition wapp1
rmwpar: Return Status = SUCCESS
During the ‘life’ of the
Application WPAR, I could see the IP alias for this system in the global environment.
# ifconfig en1
en1: flags=5e080863,c0<UP,BROADCAST,NOTRAILERS,RUNNING,SIMPLEX,MULTICAST,GROUPRT,64BIT,CHECKSUM_OFFLOAD(ACTIVE),PSEG,LARGESEND,CHAIN>
inet 10.1.1.148 netmask 0xfffffc00 broadcast 10.1.1.255
inet 10.1.1.47 netmask 0xfffffc00 broadcast 10.1.1.255
inet 10.1.1.81 netmask 0xfffffc00 broadcast 10.1.1.255
inet 10.1.1.86 netmask 0xfffffc00 broadcast 10.1.1.255
tcp_sendspace 131072 tcp_recvspace 65536
Checking
the status of my Application WPAR.
# lswpar
Name State Type Hostname Directory
---------------------------------------------
wapp1 A
A wapp1 /
wpar1 A S wpar1 /wpars/wpar1
wpar2 A S wpar2 /wpars/wpar2
I could also connect to
the Application WPAR (with clogin) while
it was executing and could view the Global environment file systems from within
it.
# clogin wapp1
*******************************************************************************
* *
* *
* Welcome to AIX Version 6.0 BETA! *
* *
* *
* Please see the README file in /usr/lpp/bos for information pertinent to *
* this release of the AIX Operating System. *
* *
* *
*******************************************************************************
Last unsuccessful login: Wed Aug 1 08:00:14 EET 2007 on /dev/pts/0 from 10.1.1.100
Last login: Mon Aug 6 09:50:51 EET 2007 on /dev/vty0 from uataix6
root@wapp1 AIX 6 Beta : / # df
Filesystem 512-blocks Free %Used Iused %Iused Mounted on
/dev/hd4 262144 60176 78% 5100 41% /
/dev/hd2 5767168 1807400 69% 42816 18% /usr
/dev/hd9var 1048576 1000448 5% 490 1% /var
/dev/hd3 524288 477400 9% 63 1% /tmp
/dev/hd1 262144 243192 8% 97 1% /home
/proc - - - - - /proc
/dev/hd10opt 262144 124240 53% 1560 10% /opt
/dev/fslv04 262144 210672 20% 1563 7% /wpars/wpar1
/dev/fslv05 262144 256728 3% 25 1% /wpars/wpar1/home
/opt 262144 124240 53% 1560 10% /wpars/wpar1/opt
/proc - - - - - /wpars/wpar1/proc
/dev/fslv06 262144 256848 3% 10 1% /wpars/wpar1/tmp
/usr 5767168 1807400 69% 42816 18% /wpars/wpar1/usr
/dev/fslv07 262144 246952 6% 322 2% /wpars/wpar1/var
/dev/locallv 524288 522072 1% 9 1% /usr/local
/dev/fslv00 262144 210760 20% 1570 7% /wpars/wpar2
/dev/fslv01 262144 152208 42% 492 3% /wpars/wpar2/home
/opt 262144 124240 53% 1560 10% /wpars/wpar2/opt
/proc - - - - - /wpars/wpar2/proc
/dev/fslv02 262144 238080 10% 43 1% /wpars/wpar2/tmp
/usr 5767168 1807400 69% 42816 18% /wpars/wpar2/usr
/dev/fslv08 262144 256120 3% 6 1% /wpars/wpar1/usr/local
/dev/fslv03 262144 245816 7% 331 2% /wpars/wpar2/var
Output from the ifconfig command from within the
Application WPAR.
root@wapp1 AIX 6 Beta : / # ifconfig -a
en1: flags=5e080863,c0<UP,BROADCAST,NOTRAILERS,RUNNING,SIMPLEX,MULTICAST,GROUPRT,64BIT,CHECKSUM_OFFLOAD(ACTIVE),PSEG,LARGESEND,CHAIN>
inet 10.1.1.86 netmask 0xfffffc00 broadcast 10.1.1.255
tcp_sendspace 131072 tcp_recvspace 65536
lo0: flags=e08084b<UP,BROADCAST,LOOPBACK,RUNNING,SIMPLEX,MULTICAST,GROUPRT,64BIT>
inet 127.0.0.1 netmask 0xff000000 broadcast 127.255.255.255
inet6 ::1/0
tcp_sendspace 131072 tcp_recvspace 131072 rfc1323 1
Output from the ps command from within the Application
WPAR.
root@wapp1 AIX 6 Beta : / # ps -ef
UID PID PPID C STIME TTY TIME CMD
root 491536 557196 0 12:47:06 pts/2 0:00 -ksh
root 557196 1 0 12:47:06 pts/2 0:00 clogin wapp1
root 1 0 0 12:46:57 pts/0 0:00 /usr/lib/corrals/vinit wapp1 /usr/bin/sleep 30
root 581792 491536 3 12:47:18 pts/2 0:00 ps -ef
root 643302 1 0 12:46:57 pts/0 0:00 /usr/bin/sleep 30
WPAR Resource Control.
WPAR resource control provides
methods for controlling CPU and memory resource allocation to WPARs. This can
help to minimise the impact each WPAR can have on each other, in terms of
resource utilisation and performance. WPAR resource control is based on WLM. However
the inner workings are hidden from the system administrator and they do not need
to have in-depth knowledge of WLM in order to use WPAR resource control. For
people who found WLM confusing and hard to manage, WPAR resource control makes
it very easy.
WPAR resource control can
be used to specify the amount of CPU and memory resources allocated to a WPAR, the
number of processes and threads that are allowed in a WPAR and the amount of
virtual memory that a single process within a WPAR can consume.
A working example:
There are two ways to
control the usage of the CPU: share based and percentage based approach. It is
recommended to start with the share based approach to control the resources. In
almost all cases, it should satisfy your requirements. The share based approach
means that you are allocating the available resource to the workload partitions
based on their relative importance. WPAR resource control settings can be adjusted
dynamically.
In the following example
I’m using CPU shares:
80% for wpar1 (20/25)
20% for wpar2 (5/25)
# lswpar -R
=================================================================
wpar1 - Active
=================================================================
Active: yes
RSet:
CPU Shares: 20
CPU Limits: 0%-100%,100%
Memory Shares: unlimited
Memory Limits: 0%-100%,100%
Per-Process Virtual Memory Limit: unlimited
Total Processes: unlimited
Total Threads: unlimited
=================================================================
wpar2 - Active
=================================================================
Active: yes
RSet:
CPU Shares: 5
CPU Limits: 0%-100%,100%
Memory Shares: unlimited
Memory Limits: 0%-100%,100%
Per-Process Virtual Memory Limit: unlimited
Total Processes: unlimited
Total Threads: unlimited
I started some CPU
intensive jobs on both WPARs and monitored it from the global environment with topas:
# topas -@
Topas Monitor for host: uataix6 EVENTS/QUEUES FILE/TTY
Fri Aug 3 14:36:12 2007 Interval: 2 Cswitch 209 Readch 332
Syscall 76 Writech 684
Kernel 0.0 | | Reads 0 Rawin 0
User 100.0 |############################| Writes 1 Ttyout 332
Wait 0.0 | | Forks 0 Igets 0
Idle 0.0 | | Execs 0 Namei 0
Runqueue 4.0 Dirblk 0
WPAR CPU% Mem% Blk-I/O% Waitqueue 0.0
wpar1 1 0 0 MEMORY
wpar1 0 0 0 PAGING Real,MB 4096
Faults 1 % Comp 30.1
Name PID CPU% PgSp Wpar Steals 0 % Noncomp 39.0
ksh 467120 79.0 0.5 wpar1 PgspIn 0 % Client 39.0
ksh 585946 19.9 0.5 wpar2 PgspOut 0
topas 610386 0.2 1.6 Global PageIn 0 PAGING SPACE
wlmsched 53274 0.1 0.1 Global PageOut 0 Size,MB 512
getty 221404 0.1 0.5 Global Sios 0 % Used 1.6
gil 49176 0.1 0.1 Global % Free 98.3
nfsd 209000 0.1 0.3 Global NFS (calls/sec)
java 307414 0.0 90.2 Global SerV2 0 WPAR Activ 2
xmgc 40980 0.0 0.1 Global CliV2 0 WPAR Total 0
sshd 397422 0.0 0.7 Global SerV3 0 Press: "h"-help
lockd-15 495700 0.0 0.2 Global CliV3 0 "q"-quit
xmtopas 581830 0.0 0.6 wpar1
xmtopas 237798 0.0 0.6 Global
xmtopas 548948 0.0 0.6 wpar1
rpc.lock 184486 0.0 0.2 Global
lockd-12 327770 0.0 0.2 Global
aixmibd 180330 0.0 1.0 Global
httpd 553084 0.0 0.7 wpar1
rmcd 274566 0.0 2.4 Global
httpd 405660 0.0 0.7 wpar1
Changing the CPU shares
impacts the amount of processor a WPAR can use:
66% for
wpar1 (20/30).
33% for
wpar2 (10/30).
# lswpar -R | egrep 'wpar|CPU Share'
wpar1 - Active
CPU Shares: 20
wpar2 - Active
CPU Shares: 5
# chwpar -R shares_CPU=10 wpar2
# lswpar -R | egrep 'wpar|CPU Share'
wpar1 - Active
CPU Shares: 20
wpar2 - Active
CPU Shares: 10
Topas Monitor for host: uataix6 EVENTS/QUEUES FILE/TTY
Fri Aug 3 14:48:27 2007 Interval: 2 Cswitch 203 Readch 329
Syscall 78 Writech 681
Kernel 0.0 | | Reads 1 Rawin 0
User 100.0 |############################| Writes 1 Ttyout 327
Wait 0.0 | | Forks 0 Igets 0
Idle 0.0 | | Execs 0 Namei 2
Runqueue 4.5 Dirblk 0
WPAR CPU% Mem% Blk-I/O% Waitqueue 0.0
wpar1 1 0 0 MEMORY
wpar1 0 0 0 PAGING Real,MB 4096
Faults 2 % Comp 30.1
Name PID CPU% PgSp Wpar Steals 0 % Noncomp 39.0
ksh 467120 64.1 0.5 wpar1 PgspIn 0 % Client 39.0
ksh 585946 34.7 0.5 wpar2 PgspOut 0
topas 589908 0.2 2.2 Global PageIn 0 PAGING SPACE
getty 221404 0.1 0.5 Global PageOut 0 Size,MB 512
wlmsched 53274 0.1 0.1 Global Sios 0 % Used 1.7
gil 49176 0.1 0.1 Global % Free 98.2
nfsd 209000 0.1 0.3 Global NFS (calls/sec)
java 307414 0.0 90.2 Global SerV2 0 WPAR Activ 2
xmgc 40980 0.0 0.1 Global CliV2 0 WPAR Total 0
rmcd 274566 0.0 2.4 Global SerV3 0 Press: "h"-help
sshd 397422 0.0 0.7 Global CliV3 0 "q"-quit
rmcd 557110 0.0 1.5 wpar1
sendmail 344272 0.0 1.0 wpar1
lockd-15 495700 0.0 0.2 Global
syslogd 196736 0.0 0.3 Global
rpc.lock 184486 0.0 0.2 Global
lockd-12 327770 0.0 0.2 Global
httpd 553084 0.0 0.7 wpar1
httpd 405660 0.0 0.7 wpar1
netm 45078 0.0 0.1 Global
The global environment
seems to have priority over WPARs (similar to the System class in WLM). If
something starts in the global environment, look what happens!
Topas Monitor for host: uataix6 EVENTS/QUEUES FILE/TTY
Fri Aug 3 14:50:03 2007 Interval: 2 Cswitch 204 Readch 316
Syscall 67 Writech 638
Kernel 0.5 |# | Reads 1 Rawin 0
User 99.5 |############################| Writes 1 Ttyout 310
Wait 0.0 | | Forks 0 Igets 0
Idle 0.0 | | Execs 0 Namei 1
Runqueue 5.5 Dirblk 0
WPAR CPU% Mem% Blk-I/O% Waitqueue 0.0
wpar1 0 0 0 MEMORY
wpar1 0 0 0 PAGING Real,MB 4096
Faults 2 % Comp 30.2
Name PID CPU% PgSp Wpar Steals 0 % Noncomp 39.0
ksh 524362 75.7 0.5 Global PgspIn 0 % Client 39.0
ksh 467120 14.2 0.5 wpar1 PgspOut 0
ksh 585946 9.0 0.5 wpar2
AIX Tools and WPARs.
Some AIX tools have been
changed to cater for WPARs. In particular, commands relating to system status
and performance have been modified. e.g.
ps and topas are two examples already shown in previous examples, both of
which now take the @ symbol as a new
flag for displaying WPAR information.
Also, the topas –C (Cross Partition monitor) command
can monitor WPARs e.g. on my p650 I could see both my WPARs.
Topas CEC Monitor Interval: 10 Fri Aug 3 11:13:14 2007
Partitions Memory (GB) T Processors
Shr: 0 Mon: 136 InUse: 0.0 Shr: 0 PSz: 0 Don: 0.0 Shr_PhysB 0.00
Ded: 3 Avl: - Ded: 3 APP: 0.0 Stl: 0.0 Ded_PhysB 2.03
Host
OS M Mem InU Lp Us
-------------------------------------shared-------------------------------------
Host OS M Mem InU Lp Us Sy Wa Id PhysB Vcsw %istl %bstl
------------------------------------dedicated-----------------------------------
wpar1 A50 46699 2.7 0 1 98 0 0 0.99 0 - -
wpar1 A50 46699 2.7 0 0 99 0 0 0.99 0 - -
uataix6 A50 46699 2.7 0 0 5 0 94 0.05 0 - -
Along with the lswpar
command, you can also use lssrc to see if your WPARs are active.
# lssrc -a | grep cor
cor_wpar1 655592 active
cor_wpar2 462974 active
The wlmstat command also takes the @
symbol as flag for displaying WPAR information in relation to resource usage
and WLM.
# wlmstat -@ 1
CLASS CPU MEM DKIO
wpar1 0.15 0.03 0.00
wpar2 0.15 0.01 0.00
TOTAL 0.30 0.04 0.00
CLASS CPU MEM DKIO
wpar1 0.46 0.03 0.00
wpar2 0.20 0.01 0.00
TOTAL 0.66 0.04 0.00
CLASS CPU MEM DKIO
wpar1 0.41 0.04 0.00
wpar2 0.21 0.01 0.00
TOTAL 0.62 0.05 0.00
Special Files and Directories
related to WPARs (corrals?).
I’ve listed the files
here purely to make you aware that they exist. The IBM Redbook on WPARs (see
the references section) contains detailed information about each of these files
if you need more information.
/etc/rc.wpars
/etc/wpars/
/var/adm/wpars/
/wpar
/etc/wpars/devexports
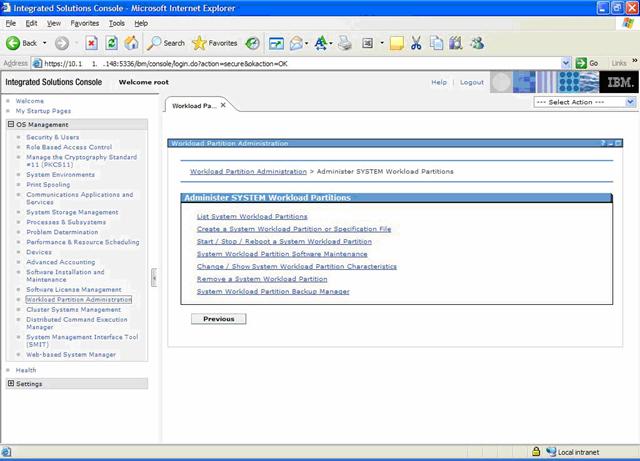
WPAR Administration via pConsole.
IBM have introduced a new
Web interface to SMIT and several other management and administration tasks.
This new interface is known as pConsole and it can be used to manage and
administer WPARs. The release notes for the beta contain extra information on
pConsole. See the document 'Open_Beta_Driver_Release_Notes_6.0.0.0-11'.
To start pconsole:
# startsrc -s pconsole
# lssrc -a | grep pco
pconsole pconsole 241808 active
To automate pconsole startup:
# mkitab "pconsole:2:once:/opt/pconsole/bin/pconsole_start.sh >/dev/null 2>&1"
To connect to pconsole via a web browser:
https://10.1.1.148:5336/ibm/console/logon.jsp
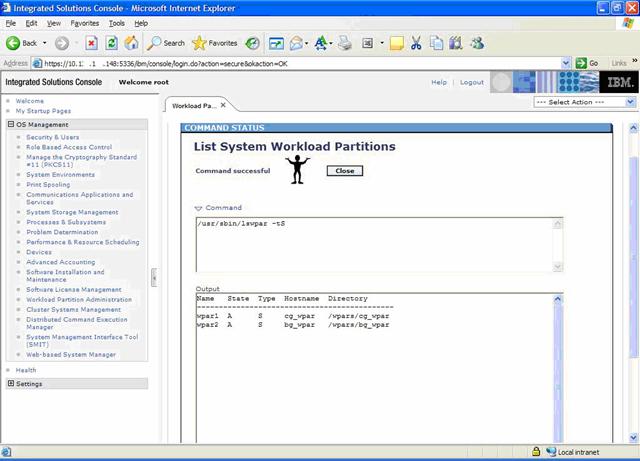
The following screenshots
show the WPAR administration interface.
WPAR Mobility.
Unfortunately, Live
Application Mobility (also known as WPAR mobility) is not available for testing
under the AIX 6 Open Beta program, so I can only offer some descriptive information
on what it is supposed to do and offer up my opinion on it’s
feasibility.
Live Application Mobility
refers to the ability to
relocate a WPAR from one physical system to another. It is also referred to as
WPAR mobility or WPAR relocation. An additional Licensed Program Product,
called Workload Partitions Manager for AIX, is required to enable this feature.
That’s right, it’s not part of the base AIX 6 operating system. This is
disappointing as it is probably the most anticipated feature of AIX since the
ability to shrink file systems! Why we should have to pay for this has got me
beat! There are 3 components required: The WPAR Manager server (a Java
application that runs on the AIX system), the WPAR management agent (that runs
in the global environment of the target WPAR and a web browser (with a network
connection to WPAR Manager).
The WPAR Manager uses a
checkpoint and restart feature to move WPARs. The checkpoint saves the current
status of the application and then restarts it on a new system or
operating-system instance at the previously saved state. For this to work
successfully, the systems must be at the same
AIX level and hardware/processor type.
The WPAR checkpoint feature lets you capture a snapshot of an application
as it runs. This snapshot is saved in a file that you can use to restore the
state of the application and then resume it’s execution.
The premise here is to
allow for planed migrations of workloads from one system to another without
interrupting the application. This could be used for example to perform a
planned firmware installation on a server. Applications do not need to be aware
that a WPAR is being or has been relocated. But IBM urges you to perform proper
planning and testing before attempting a relocation of a production system!
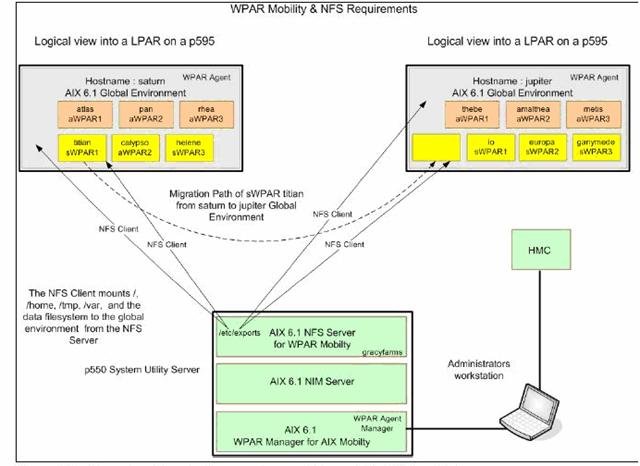
The NFS dilemma!
The relocation of a WPAR
consists of moving its executable code from one LPAR to another one, while
keeping the application data on the same storage devices. It is therefore
mandatory that these storage devices are accessible from both the source and
target LPARs hosting the WPAR. In the initial version of AIX 6, this dual
access to the storage area is provided via NFS. All files that needs to be
accessed by the application must be hosted on NFS. All other files, including
the AIX operating systems files can be stored in file systems local to the
hosting global environment.
The following figure
depicts WPAR mobility and the necessary infrastructure and components to enable
it’s functionality.
The following table
highlights the need for NFS within a System WPAR to support WPAR mobility. Both
System and Application WPARs require the application specific files be hosted
on NFS.
The WPAR Manager requires the following
pre-requisite software for it to function: IBM AIX Version 6.1, Java version 5
and DB2 version 9.
Some considerations with
respect to WPAR mobility:
I was very excited when I
first heard about moving live WPARs between physical systems. The advantages
and flexibility it could provide were amazing, on paper. Like I said, I can’t
test any of this yet but I must say I have a few concerns with the
implementation and design.
The first concern is that
it relies on NFS. NFS is slow and at times unreliable. Most organisations are very
unlikely to host business critical applications via NFS and it’s these critical
systems that would benefit the most from WPAR mobility! Performance is a big
factor. I’d never recommend NFS as an ideal candidate for blindingly fast I/O
performance, so I can’t see myself putting a large database on NFS hosted file
systems.
The second concern is the
time it takes to ‘freeze’ a WPAR before migrating it’s workload to another
system. According to the WPAR documentation a snapshot of the WPAR is taken by
interrupting the processes within it. The process context is saved to a state
file. The checkpoint state file is written to shared
storage via NFS. To restart the WPAR on the other system, first the state file
is loaded (via NFS) and then the WPAR is restarted. Sounds simple enough? But
think about a system that has a large amount of memory, like a WebSphere
Application Server (Java) or DB2 Database Server. Even with a fast Gigabit
network, the time required to write the state file may be a lot longer than
you’d expect and could cause an outage of several minutes or more. But I guess
if you are moving WPARs after hours in order to perform some maintenance activity
that could take several hours, then a 3, 5 or 10 minute “freeze” of an
application may be acceptable (not unlike some HACMP failovers)?
My third concern is that if
I choose to deploy WPAR mobility in it’s current form and use NFS for my WPAR
file systems, I would need to ensure that they were highly available. Wouldn’t
I? Could you imagine if I only had one NFS server and it suddenly stopped
responding and my 200 WPARs also stopped working. What a nightmare! So I’d
probably need to deploy new hardware, in a cluster, so that my NFS server was
always available to my WPARs. This is expensive and adds complexity. I’m hoping
IBM has a better solution in the works?
At the moment the WPAR
mobility solution feels a little kludgy to me and I’d be reluctant to use it
for any real production workload. I had a similar feeling about VIO when it was
first introduced and I still won’t use it for production systems as it does not
offer the best performance. However, I’m confident that IBM can work on these
issues and after listening to customer feedback from the Beta program will, by
the time AIX 6.1 is released, deploy more robust mechanisms for implementing WPAR
Mobility.
REFERENCES:
Introduction to Workload
Partition Management in IBM AIX Version 6.
http://www.redbooks.ibm.com/Redbooks.nsf/RedpieceAbstracts/sg247431.html?Open