Building a two-node IBM GPFS cluster on IBM AIX

Overview

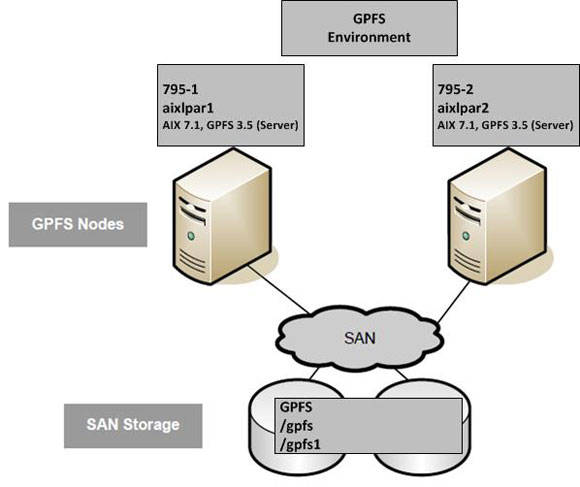
The purpose of this article is to provide a step-by-step guide for installing and configuring a simple two-node GPFS cluster on AIX. The following diagram provides a visual representation of the cluster configuration.

Figure 1. Visual representation of the cluster configuration
Visual representation of the cluster configuration

GPFS

GPFS provides a true “shared file system” capability, with excellent performance and scalability. GPFS allows concurrent access for a group of computers to a common set of file data over a common storage area network (SAN) infrastructure, a network, or a mix of connection types. GPFS provides storage management, information lifecycle management tools, and centralized administration and allows for shared access to file systems from remote GPFS clusters providing a global namespace.

GPFS offers data tiering, replication, and many other advanced features. The configuration can be as simple or complex as you want.

Preparing the AIX environment for GPFS

We’ll assume that you have already purchased the necessary licenses and software for GPFS. With a copy of the GPFS software available, copy the GPFS file sets to each of the AIX nodes on which you need to run GPFS.

In this article, each partition was built with AIX version 7.1, Technology Level 2, Service Pack 1:

#oslevel ‑s
7100‑02‑01‑1245

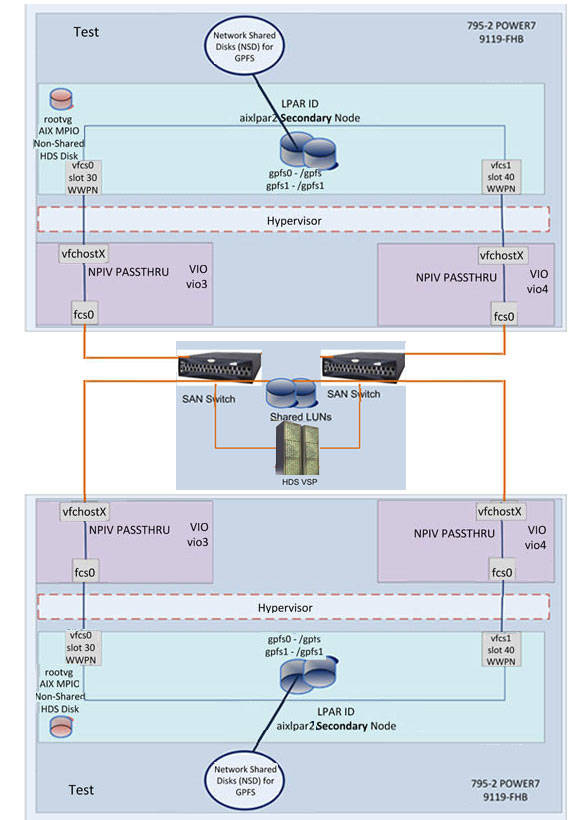
Each AIX system is configured with seven SAN disks. One disk is used for the AIX operating system (rootvg) and the remaining six disks are used by GPFS.

#lspv
hdisk0          00c334b6af00e77b                    rootvg          active
hdisk1          none                                none
hdisk2          none                                none
hdisk3          none                                none
hdisk4          none                                none
hdisk5          none                                none
hdisk6          none                                none

The SAN disks (to be used with GPFS) are assigned to both nodes (that is, they are shared between both partitions). Both AIX partitions are configured with virtual Fibre Channel adapters and access their shared storage through the SAN, as shown in the following figure.

Figure 2. Deployment diagram
Deployment diagram

The following attributes, shown in the table below, were changed for each hdisk, using the chdev command.

AIX device name Size in GB AIX disk device type Algorithm queue_depth reserve_policy
hdisk0 50 Hitachi MPIO Disk VSP round_robin 32 no_reserve
hdisk1 50 Hitachi MPIO Disk VSP round_robin 32 no_reserve
hdisk2 50 Hitachi MPIO Disk VSP round_robin 32 no_reserve
hdisk3 50 Hitachi MPIO Disk VSP round_robin 32 no_reserve
hdisk4 50 Hitachi MPIO Disk VSP round_robin 32 no_reserve
hdisk5 50 Hitachi MPIO Disk VSP round_robin 32 no_reserve
hdisk6 50 Hitachi MPIO Disk VSP round_robin 32 no_reserve

The lsattr command can be used to verify that each attribute is set to the correct value:

#lsattr ‑El hdisk6 –a queue_depth –q algorithm –a reserve_policy
algorithm       round_robin        Algorithm                        True
queue_depth     32                 Queue DEPTH                      True
reserve_policy  no_reserve         Reserve Policy                   True

The next step is to configure Secure Shell (SSH) so that both nodes can communicate with each other. When building a GPFS cluster, you must ensure that the nodes in the cluster have SSH configured correctly so that they do not require password authentication. This requires the configuration of Rivest-Shamir-Adleman algorithm (RSA) key pairs for the root users SSH configuration. This configuration needs to be configured in both directions, to all nodes in the GPFS cluster.

The mm commands in GPFS require authentication in order for them to work. If the keys are not configured correctly, the commands will prompt for the root password each time and the GPFS cluster might fail. A good way to test this is to ensure that the ssh command can work unhindered by a request for the roots password.

You can refer to the step-by-step guide for configuring SSH keys on AIX:

You can confirm that the nodes can communicate with each other (unhindered) using SSH with the following commands on each node:

aixlpar1#ssh aixlpar1a date
aixlpar1#ssh aixlpar2a date
    
aixlpar2#ssh aixlpar2a date
aixlpar2#ssh aixlpar1a date

With SSH working, configure the WCOLL (Working Collective) environment variable for the root user. For example, create a text file that lists each of the nodes, one per line:

#vi /usr/local/etc/gfps‑nodes.list
aixlpar1a
aixlpar2a

Copy the node file to all nodes in the cluster.

Add the following entry to the root users .kshrc file. This will allow the root user to execute commands on all nodes in the GPFS cluster using the dshor mmdshcommands.

export WCOLL=/usr/local/etc/gfps‑nodes.list

The root users PATH should be modified to ensure that all GPFS mm commands are available to the system administrator. Add the following entry to the root user’s .kshrc file.

export PATH=$PATH:/usr/sbin/acct:/usr/lpp/mmfs/bin

The /etc/hosts file should be consistent across all nodes in the GPFS cluster. Each IP address for each node must be added to/etc/hosts on each cluster node. This is recommended, even when Domain Name System (DNS) is configured on each node. For example:

#GPFS_CLUSTER1 Cluster ‑ Test

##GPFS Admin network  ‑ en0
10.1.5.110  aixlpar1a aixlpar1
10.1.5.120  aixlpar2a aixlpar2

##GPFS Daemon ‑ Private Network  – en1   
10.1.7.110   aixlpar1p
10.1.7.120   aixlpar2p

Installing GPFS on AIX

Now that the AIX environment is configured, the next step is to install the GPFS software on each node. This is a very straightforward process.

We will install GPFS version 3.5 (base-level file sets) and then apply the latest updates to bring the level up to 3.5.0.10. There are only three file sets to install. You can use System Management Interface Tool (SMIT) or the installp command to install the software.

aixlpar1 : /tmp/cg/GPFS/gpfs35_aix #inutoc .
aixlpar1 : /tmp/cg/GPFS/gpfs35_aix #ls ‑ltr
total 123024
‑rw‑r‑‑r‑‑    1 root     system       175104 Jun  7 2012  gpfs.msg.en_US
‑rw‑r‑‑r‑‑    1 root     system       868352 Jun  7 2012  gpfs.docs.data
‑rw‑r‑‑r‑‑    1 root     system     61939712 Jun  7 2012  gpfs.base
‑rw‑r‑‑r‑‑    1 root     system         3549 Apr 26 16:37 .toc
aixlpar1 : /tmp/cg/GPFS/gpfs35_aix #install –Y –d . ALL

Repeat this operation on the second node.

You can verify that the base-level GPFS file sets are installed by using the lslpp command:

#lslpp ‑l | grep ‑i gpfs
  gpfs.base                  3.5.0.0  COMMITTED  GPFS File Manager
  gpfs.msg.en_US             3.5.0.0  COMMITTED  GPFS Server Messages ‑ U.S.
  gpfs.base                  3.5.0.0  COMMITTED  GPFS File Manager
  gpfs.docs.data             3.5.0.0  COMMITTED  GPFS Server Manpages and

The latest GPFS updates are installed next. Again, you can use SMIT (or installp) to update the file sets to the latest level. The lslpp command can be used to verify that the GPFS file sets have been updated.

aixlpar1 : /tmp/cg/gpfs_fixes_3510 #inutoc .
aixlpar1 : /tmp/cg/gpfs_fixes_3510 #ls ‑ltr
total 580864
‑rw‑r‑‑r‑‑    1 30007    bin       910336 Feb  9 00:10 U858102.gpfs.docs.data.bff
‑rw‑r‑‑r‑‑    1 30007    bin       47887360 May  8 08:48 U859646.gpfs.base.bff
‑rw‑r‑‑r‑‑    1 30007    bin       99655680 May  8 08:48 U859647.gpfs.gnr.bff
‑rw‑r‑‑r‑‑    1 30007    bin       193536 May  8 08:48 U859648.gpfs.msg.en_US.bff
‑rw‑r‑‑r‑‑    1 root     system    4591 May 10 05:15 changelog
‑rw‑r‑‑r‑‑    1 root     system    3640 May 10 05:42 README
‑rw‑r‑‑‑‑‑    1 root     system    55931 May 15 10:23 GPFS‑3.5.0.10‑power‑AIX.readme.html
‑rw‑r‑‑‑‑‑    1 root     system    148664320 May 15 10:28 GPFS‑3.5.0.10‑power‑AIX.tar
‑rw‑r‑‑r‑‑    1 root     system    8946 May 15 14:48 .toc

aixlpar1 : /tmp/cg/gpfs_fixes_3510 #smitty update_all

COMMAND STATUS

Command: OK            stdout: yes           stderr: no

Before command completion, additional instructions may appear below.

MORE...59Finished processing all filesets.  (Total time:  18 secs).

+‑‑‑‑‑‑‑‑‑‑‑‑‑‑‑‑‑‑‑‑‑‑‑‑‑‑‑‑‑‑‑‑‑‑‑‑‑‑‑‑‑‑‑‑‑‑‑‑‑‑‑‑‑‑‑‑‑‑‑‑‑‑‑‑‑‑‑‑‑‑‑‑‑‑‑‑‑+
                        Pre‑commit Verification...
+‑‑‑‑‑‑‑‑‑‑‑‑‑‑‑‑‑‑‑‑‑‑‑‑‑‑‑‑‑‑‑‑‑‑‑‑‑‑‑‑‑‑‑‑‑‑‑‑‑‑‑‑‑‑‑‑‑‑‑‑‑‑‑‑‑‑‑‑‑‑‑‑‑‑‑‑‑+
Verifying requisites...done
Results...

SUCCESSES
‑‑‑‑‑‑‑‑‑
  Filesets listed in this section passed pre‑commit verification
  and will be committed.

  Selected Filesets
  ‑‑‑‑‑‑‑‑‑‑‑‑‑‑‑‑‑
  gpfs.base 3.5.0.10                          #GPFS File Manager
  gpfs.msg.en_US 3.5.0.9                      #GPFS Server Messages ‑ U.S. ...

  << End of Success Section >>

+‑‑‑‑‑‑‑‑‑‑‑‑‑‑‑‑‑‑‑‑‑‑‑‑‑‑‑‑‑‑‑‑‑‑‑‑‑‑‑‑‑‑‑‑‑‑‑‑‑‑‑‑‑‑‑‑‑‑‑‑‑‑‑‑‑‑‑‑‑‑‑‑‑‑‑‑‑+
                          Committing Software...
+‑‑‑‑‑‑‑‑‑‑‑‑‑‑‑‑‑‑‑‑‑‑‑‑‑‑‑‑‑‑‑‑‑‑‑‑‑‑‑‑‑‑‑‑‑‑‑‑‑‑‑‑‑‑‑‑‑‑‑‑‑‑‑‑‑‑‑‑‑‑‑‑‑‑‑‑‑+

installp: COMMITTING software for:
        gpfs.base 3.5.0.10

Filesets processed:  1 of 2  (Total time:  18 secs).

installp: COMMITTING software for:
        gpfs.msg.en_US 3.5.0.9

Finished processing all filesets.  (Total time:  18 secs).

+‑‑‑‑‑‑‑‑‑‑‑‑‑‑‑‑‑‑‑‑‑‑‑‑‑‑‑‑‑‑‑‑‑‑‑‑‑‑‑‑‑‑‑‑‑‑‑‑‑‑‑‑‑‑‑‑‑‑‑‑‑‑‑‑‑‑‑‑‑‑‑‑‑‑‑‑‑+
                                Summaries:
+‑‑‑‑‑‑‑‑‑‑‑‑‑‑‑‑‑‑‑‑‑‑‑‑‑‑‑‑‑‑‑‑‑‑‑‑‑‑‑‑‑‑‑‑‑‑‑‑‑‑‑‑‑‑‑‑‑‑‑‑‑‑‑‑‑‑‑‑‑‑‑‑‑‑‑‑‑+

Installation Summary
‑‑‑‑‑‑‑‑‑‑‑‑‑‑‑‑‑‑‑‑
Name                        Level           Part        Event       Result
‑‑‑‑‑‑‑‑‑‑‑‑‑‑‑‑‑‑‑‑‑‑‑‑‑‑‑‑‑‑‑‑‑‑‑‑‑‑‑‑‑‑‑‑‑‑‑‑‑‑‑‑‑‑‑‑‑‑‑‑‑‑‑‑‑‑‑‑‑‑‑‑‑‑‑‑‑‑‑
gpfs.msg.en_US              3.5.0.9         USR         APPLY       SUCCESS
gpfs.base                   3.5.0.10        USR         APPLY       SUCCESS
gpfs.base                   3.5.0.10        ROOT        APPLY       SUCCESS
gpfs.base                   3.5.0.10        USR         COMMIT      SUCCESS
gpfs.base                   3.5.0.10        ROOT        COMMIT      SUCCESS
gpfs.msg.en_US              3.5.0.9         USR         COMMIT      SUCCESS


aixlpar1 : /tmp/cg/gpfs_fixes_3510 #lslpp ‑l gpfs\∗
  Fileset                      Level  State      Description
  ‑‑‑‑‑‑‑‑‑‑‑‑‑‑‑‑‑‑‑‑‑‑‑‑‑‑‑‑‑‑‑‑‑‑‑‑‑‑‑‑‑‑‑‑‑‑‑‑‑‑‑‑‑‑‑‑‑‑‑‑‑‑‑‑‑‑‑‑‑‑‑‑‑‑‑‑
Path: /usr/lib/objrepos
  gpfs.base                 3.5.0.10  COMMITTED  GPFS File Manager
  gpfs.msg.en_US             3.5.0.9  COMMITTED  GPFS Server Messages ‑ U.S.
                                                 English

Path: /etc/objrepos
  gpfs.base                 3.5.0.10  COMMITTED  GPFS File Manager

Path: /usr/share/lib/objrepos
  gpfs.docs.data             3.5.0.3  COMMITTED  GPFS Server Manpages and
                                                 Documentation

Repeat the update on the second node.

Configuring the GPFS cluster

Now that GPFS is installed, we can create a cluster across both AIX systems. First, we create a text file that contains a list of each of the nodes and their GPFS description and purpose. We have chosen to configure each node as a GPFS quorum manager. Each node is a GPFS server. If you are unsure of how many quorum managers and GPFS servers are required in your environment, refer to the GPFS Concepts, Planning, and Installation document for guidance.

aixlpar1 : /tmp/cg #cat gpfs‑nodes.txt
aixlpar2p:quorum‑manager:
aixlpar1p:quorum‑manager:

The cluster is created using the mmcrcluster command. The GPFS cluster name is GPFS_CLUSTER1. The primary node (or NSD server; discussed in the next section) is aixlpar1p and the secondary node is aixlpar2p. We have specified that ssh and *scp will be used for cluster communication and administration.

aixlpar1 : /tmp/cg #mmcrcluster –C GPFS_CLUSTER1 ‑N /tmp/cg/gpfs‑nodes.txt ‑p 
aixlpar1p ‑s aixlpar2p ‑r /usr/bin/ssh ‑R /usr/bin/scp
Mon Apr 29 12:01:21 EET 2013: mmcrcluster: Processing node aixlpar2
Mon Apr 29 12:01:24 EET 2013: mmcrcluster: Processing node aixlpar1
mmcrcluster: Command successfully completed
mmcrcluster: Warning: Not all nodes have proper GPFS license designations.
Use the mmchlicense command to designate licenses as needed.
mmcrcluster: Propagating the cluster configuration data to all
affected nodes.  This is an asynchronous process.

Note: To ensure that GPFS daemon communication occurs over the private GPFS network, during cluster creation, we specified the GPFS daemon node names (that is, host names ending with p). There are two types of communication to consider in a GPFS cluster, administrative commands and daemon communication. Administrative commands use remote shell (ssh, rsh, or other) and socket-based communications. It is considered as a best practice to ensure that all GPFS daemon__communication is performed over a private network. Refer to the GPFS IBM Developer wiki for further information and discussion on GPFS network configuration considerations and practices.

To use a separate network for administration command communication, you can change the “Admin node name” using the mmchnode command. In this example, the separate network address is designated by “a” (for Administration) at the end of the node name, aixlpar1a for example.

#mmchnode ‑admin‑interface=aixlpar1p ‑N aixlpar1a
#mmchnode ‑admin‑interface=aixlpar2p ‑N aixlpar2a

The mmcrcluster command warned us that not all nodes have the appropriate GPFS license designation. We use the mmchlicense command to assign a GPFS server license to both the nodes in the cluster.

aixlpar1 : / #mmchlicense server ‑‑accept  ‑N aixlpar1a,aixlpar2a
The following nodes will be designated as possessing GPFS server licenses:
aixlpar2a
aixlpar1a
mmchlicense: Command successfully completed
mmchlicense: Propagating the cluster configuration data to all
  affected nodes.  This is an asynchronous process.

The cluster is now configured. The mmlscluster command can be used to display cluster information.

#mmlscluster

GPFS cluster information
========================
  GPFS cluster name:         GPFS_CLUSTER1.aixlpar1p
  GPFS cluster id:           8831612751005471855
  GPFS UID domain:           GPFS_CLUSTER.aixlpar1p
  Remote shell command:      /usr/bin/ssh
  Remote file copy command:  /usr/bin/scp

GPFS cluster configuration servers:
‑‑‑‑‑‑‑‑‑‑‑‑‑‑‑‑‑‑‑‑‑‑‑‑‑‑‑‑‑‑‑‑‑‑‑
  Primary server:    aixlpar1p
  Secondary server:  aixlpar2p

 Node  Daemon node name  IP address      Admin node name  Designation
‑‑‑‑‑‑‑‑‑‑‑‑‑‑‑‑‑‑‑‑‑‑‑‑‑‑‑‑‑‑‑‑‑‑‑‑‑‑‑‑‑‑‑‑‑‑‑‑‑‑‑‑‑‑‑‑‑‑‑‑‑‑‑‑‑‑‑‑‑‑
   1   aixlpar2p       10.1.7.120   aixlpar2a      quorum‑manager
   2   aixlpar1p       10.1.7.110   aixlpar1a      quorum‑manager

At this point, you can use the mmdsh command to verify that the SSH communication is working as expected on all GPFS nodes. This runs a command on all the nodes in the cluster. If there is an SSH configuration problem, this command highlights the issues.

aixlpar1 : / #mmdsh date
aixlpar1:  Mon Apr 29 12:05:47 EET 2013
aixlpar2:  Mon Apr 29 12:05:47 EET 2013

aixlpar2 : / #mmdsh date
aixlpar1:  Mon Apr 29 12:06:41 EET 2013
aixlpar2:  Mon Apr 29 12:06:41 EET 2013

Configuring Network Shared Disks

GPFS provides a block-level interface over TCP/IP networks called the Network Shared Disk (NSD) protocol. Whether using the NSD protocol or a direct attachment to the SAN, the mounted file system looks the same to the users and application (GPFS transparently handles I/O requests).

A shared disk cluster is the most basic environment. In this configuration, the storage is directly attached to all the systems in the cluster. The direct connection means that each shared block device is available concurrently to all of the nodes in the GPFS cluster. Direct access means that the storage is accessible using a Small Computer System Interface (SCSI) or other block-level protocol using a SAN.

The following figure illustrates a GPFS cluster where all nodes are connected to a common Fibre Channel SAN and storage device. The nodes are connected to the storage using the SAN and to each other using a local area network (LAN). Data used by applications running on the GPFS nodes flows over the SAN, and GPFS control information flows among the GPFS instances in the cluster over the LAN. This configuration is optimal when all nodes in the cluster need the highest performance access to the data.

Figure 3. Overview diagram of the GPFS cluster
Overview diagram of the GPFS cluster

The mmcrnsd command is used to create NSD devices for GPFS. First, we create a text file that contains a list of each of the hdisk names, their GPFS designation (data, metadata, both*), and the NSD name.

hdisk1:::dataAndMetadata::nsd01::
hdisk2:::dataAndMetadata::nsd02::
hdisk3:::dataAndMetadata::nsd03::
hdisk4:::dataAndMetadata::nsd04::
hdisk5:::dataAndMetadata::nsd05::
hdisk6:::dataAndMetadata::nsd06::

Note: Refer to the GPFS Concepts, Planning, and Installation document for guidance on selecting NSD device usage types.

Then, run the mmcrnsd command to create the NSD devices.

#mmcrnsd ‑F /tmp/cg/gpfs‑disks.txt
mmcrnsd: Processing disk hdisk1
mmcrnsd: Processing disk hdisk2
mmcrnsd: Processing disk hdisk3
mmcrnsd: Processing disk hdisk4
mmcrnsd: Processing disk hdisk5
mmcrnsd: Processing disk hdisk6
mmcrnsd: Propagating the cluster configuration data to all
  affected nodes.  This is an asynchronous process.

The lspv command now shows the NSD name associated with each AIX hdisk.

#lspv
hdisk0          00c334b6af00e77b                    rootvg          active
hdisk1          none                                nsd01
hdisk2          none                                nsd02
hdisk3          none                                nsd03
hdisk4          none                                nsd04
hdisk5          none                                nsd05
hdisk6          none                                nsd06

The mmlsnsd command displays information for each NSD, in particular which GPFS file system is associated with each device. At this point, we have not created a GPFS file system. So each disk is currently free. You’ll notice that under NSD servers each device is shown as directly attached. This is expected for SAN-attached disks.

#mmlsnsd

 File system   Disk name    NSD servers
‑‑‑‑‑‑‑‑‑‑‑‑‑‑‑‑‑‑‑‑‑‑‑‑‑‑‑‑‑‑‑‑‑‑‑‑‑‑‑‑‑‑‑‑‑‑‑‑‑‑‑‑‑‑‑‑‑‑‑‑‑‑‑‑‑‑‑‑‑‑‑‑‑‑‑
 (free disk)   nsd01        (directly attached)
 (free disk)   nsd02        (directly attached)
 (free disk)   nsd03        (directly attached)
 (free disk)   nsd04        (directly attached)
 (free disk)   nsd05        (directly attached)
 (free disk)   nsd06        (directly attached)

GPFS file system configuration

Next, the GPFS file systems can be configured. The mmcrfs command is used to create the file systems. We have chosen to create two file systems; /gpfs and /gpfs1. The /gpfs (gpfs0) file system will be configured with a GPFS block size of 256K (the default) and /gpfs1 (gpfs1) with a block size of 1M*. Both file systems are configured for replication (-M2 –R2). The /tmp/cg/gpfs-disk.txt file is specified for /gpfs and /tmp/cg/gpfs1-disk.txt for /gpfs1. These files specify which NSD devices are used for each file system during creation.

Note: Choose your block size carefully. It is not possible to change this value after the GPFS device has been created.

#cat /tmp/cg/gpfs‑disk.txt
nsd01:::dataAndMetadata:‑1::system
nsd02:::dataAndMetadata:‑1::system
nsd03:::dataAndMetadata:‑1::system

#cat /tmp/cg/gpfs1‑disk.txt
nsd04:::dataAndMetadata:‑1::system
nsd05:::dataAndMetadata:‑1::system
nsd06:::dataAndMetadata:‑1::system

#mmcrfs /gpfs gpfs0 ‑F/tmp/cg/gpfs‑disks.txt ‑M2 ‑R 2
#mmcrfs /gpfs1 gpfs1 ‑F/tmp/cg/gpfs1‑disks.txt ‑M2 ‑R 2 –B 1M

The mmlsnsd command displays the NSD configuration per file system. NSD devices 1 to 3 are assigned to the gpfs0 device and devices 4 to 6 are assigned to gpfs1.

#mmlsnsd

 File system   Disk name    NSD servers
‑‑‑‑‑‑‑‑‑‑‑‑‑‑‑‑‑‑‑‑‑‑‑‑‑‑‑‑‑‑‑‑‑‑‑‑‑‑‑‑‑‑‑‑‑‑‑‑‑‑‑‑‑‑‑‑‑‑‑‑‑‑‑‑‑‑‑‑‑‑‑‑‑‑‑
 gpfs0         nsd01        (directly attached)
 gpfs0         nsd02        (directly attached)
 gpfs0         nsd03        (directly attached)
 gpfs1         nsd04        (directly attached)
 gpfs1         nsd05        (directly attached)
 gpfs1         nsd06        (directly attached)

Both GPFS file systems are now available on both nodes.

aixlpar1 : / #df ‑g
Filesystem    GB blocks      Free %Used    Iused %Iused Mounted on
/dev/hd4           1.00      0.89   12%     5211     3% /
/dev/hd2           3.31      0.96   71%    53415    18% /usr
/dev/hd9var        2.00      1.70   16%     5831     2% /var
/dev/hd3           2.00      1.36   33%      177     1% /tmp
/dev/hd1           2.00      2.00    1%      219     1% /home
/proc                 ‑         ‑    ‑         ‑     ‑  /proc
/dev/hd10opt       1.00      0.79   21%     3693     2% /opt
/dev/local         1.00      0.97    3%      333     1% /usr/local
/dev/loglv         1.00      1.00    1%       54     1% /var/log
/dev/tsmlog        1.00      1.00    1%        7     1% /var/tsm/log
/dev/hd11admin      0.12      0.12    1%       13     1% /admin
/dev/optIBMlv      2.00      1.99    1%       17     1% /opt/IBM
/dev/gpfs1       150.00    147.69    2%     4041     3% /gpfs1
/dev/gpfs0       150.00    147.81    2%     4041     7% /gpfs

The mmdsh command can be used here to quickly check the file system status on all the nodes.

aixlpar1 : / #mmdsh df ‑g | grep gpfs
aixlpar2:  /dev/gpfs0       150.00    147.81    2%     4041     7% /gpfs
aixlpar2:  /dev/gpfs1       150.00    147.69    2%     4041     3% /gpfs1
aixlpar1:  /dev/gpfs1       150.00    147.69    2%     4041     3% /gpfs1
aixlpar1:  /dev/gpfs0       150.00    147.81    2%     4041     7% /gpfs

If more detailed information is required, the mmdf command can be used.

aixlpar1 : /gpfs #mmdf gpfs0 ‑‑block‑size=auto
disk      disk size  failure holds    holds                 free                free
name      group metadata data        in full blocks        in fragments
‑‑‑‑‑‑‑‑‑‑‑‑‑‑‑ ‑‑‑‑‑‑‑‑‑‑‑‑‑ ‑‑‑‑‑‑‑‑ ‑‑‑‑‑‑‑‑ ‑‑‑‑‑ ‑‑‑‑‑‑‑‑‑‑‑‑‑‑‑‑‑‑‑‑ ‑‑‑‑‑‑‑‑‑‑‑‑
Disks in storage pool: system (Maximum disk size allowed is 422 GB)
nsd01       50G       ‑1 yes      yes          49.27G ( 99%)          872K ( 0%)
nsd02       50G       ‑1 yes      yes          49.27G ( 99%)          936K ( 0%)
nsd03       50G       ‑1 yes      yes          49.27G ( 99%)          696K ( 0%)
           ‑‑‑‑‑‑‑‑‑‑‑‑‑                       ‑‑‑‑‑‑‑‑‑‑‑‑‑‑‑‑‑‑‑‑ ‑‑‑‑‑‑‑‑‑‑‑‑‑‑‑‑‑‑‑
(pool total) 150G                              147.8G ( 99%)        2.445M ( 0%)

           =============                       ==================== ===================
(total)          150G                          147.8G ( 99%)        2.445M ( 0%)

Inode Information
‑‑‑‑‑‑‑‑‑‑‑‑‑‑‑‑‑
Number of used inodes:            4040
Number of free inodes:           62008
Number of allocated inodes:      66048
Maximum number of inodes:        66048

aixlpar1 : /gpfs #mmdf gpfs1 ‑‑block‑size=auto
disk       disk size  failure holds   holds             free            free
name       group metadata data        in full blocks    in fragments
‑‑‑‑‑‑‑‑‑‑‑‑‑‑‑ ‑‑‑‑‑‑‑‑‑‑‑‑‑ ‑‑‑‑‑‑‑‑ ‑‑‑‑‑‑‑‑ ‑‑‑‑‑ ‑‑‑‑‑‑‑‑‑‑‑‑‑‑‑‑‑‑‑‑ 
Disks in storage pool: system (Maximum disk size allowed is 784 GB)
nsd04        50G       ‑1 yes      yes          49.55G ( 99%)        1.938M ( 00%)
nsd05        50G       ‑1 yes      yes          49.56G ( 99%)          992K ( 0%)
nsd06        50G       ‑1 yes      yes          49.56G ( 99%)        1.906M ( 00%)
          ‑‑‑‑‑‑‑‑‑‑‑‑‑                         ‑‑‑‑‑‑‑‑‑‑‑‑‑‑‑‑‑‑‑‑ ‑‑‑‑‑‑‑‑‑‑‑‑‑‑‑‑‑‑‑
(pool total) 150G                               148.7G ( 99%)        4.812M ( 00%)

          =============                         ==================== ===================
(total)           150G                          148.7G ( 99%)        4.812M ( 00%)

Inode Information
‑‑‑‑‑‑‑‑‑‑‑‑‑‑‑‑‑
Number of used inodes:            4040
Number of free inodes:          155704
Number of allocated inodes:     159744
Maximum number of inodes:       159744

Node quorum with tiebreaker disks

Tiebreaker disks are recommended when you have a two-node cluster or you have a cluster where all of the nodes are SAN-attached to a common set of logical unit numbers (LUNs) and you want to continue to serve data with a single surviving node. Typically, tiebreaker disks are only used in two-node clusters. Tiebreaker disks are not special NSDs; you can use any NSD as a tiebreaker disk.

In this example, we chose three (out of six) NSD devices as tiebreaker disks. We stopped GPFS on all nodes and configured the cluster accordingly.

#mmshutdown ‑a
#mmchconfig tiebreakerDisks="nsd01;nsd03;nsd05"
#mmstartup ‑a

Cluster daemon status

There are two GPFS daemons (processes) that remain active while GPFS is active (mmfsd64 and runmmfs).

#ps ‑ef | grep mmfs
root 4784176 5505220 0   May 20 ‑ 0:27 /usr/lpp/mmfs/bin/aix64/mmfsd64
root 5505220       1 0   May 20 ‑ 0:00 /usr/lpp/mmfs/bin/mmksh /usr/lpp/mmfs/bin/runmmfs

You can use the mmgetstate command to view the status of the GPFS daemons on all the nodes in the cluster.

#mmgetstate ‑aLs

 Node number  Node name       Quorum  Nodes up  Total nodes  GPFS state  Remarks
‑‑‑‑‑‑‑‑‑‑‑‑‑‑‑‑‑‑‑‑‑‑‑‑‑‑‑‑‑‑‑‑‑‑‑‑‑‑‑‑‑‑‑‑‑‑‑‑‑‑‑‑‑‑‑‑‑‑‑‑‑‑‑‑‑‑‑‑‑‑‑‑‑‑‑‑‑‑‑‑‑‑‑‑
       1      aixlpar2a       1∗        2          2       active      quorum node
       2      aixlpar1a       1∗        2          2       active      quorum node

 Summary information
‑‑‑‑‑‑‑‑‑‑‑‑‑‑‑‑‑‑‑‑‑
Number of nodes defined in the cluster:            2
Number of local nodes active in the cluster:       2
Number of remote nodes joined in this cluster:     0
Number of quorum nodes defined in the cluster:     2
Number of quorum nodes active in the cluster:      2
Quorum = 1∗, Quorum achieved

Summary

Congratulations! You’ve just configured your first GPFS cluster. In this article, you’ve learnt how to build a simple two-node GPFS cluster on AIX. This type of configuration can be easily deployed to support clustered workload with high availability requirements, for example an MQ multi-instance cluster. GPFS offers many configuration options; you can spend a lot of time planning for a GPFS cluster. If you are seriously considering a GPFS deployment, I encourage you to read all of the available GPFS documentation in the Resources section on the right.

Chris Gibson

How likely are you to recommend IBM Developer to a friend or colleague? What can we do to improve your experience? How would you describe IBM Developer to a friend or colleague?

  • 0
  • 1
  • 2
  • 3
  • 4
  • 5
  • 6
  • 7
  • 8
  • 9
  • 10
Not at all likely
Extremely likely

Thank you for answering this Poll. Your feedback is highly appreciated!